

Relays. Assembly Electronics ltd: USB Four Channel Relay Board for Automation. Overview This is relay board with 4 SPDT Relays controlled from USB port of your computer.
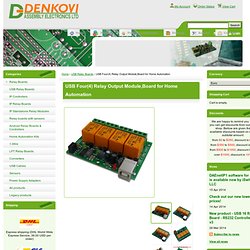
The main purpouse of this USB relay module is to help you building projects regarding robotics and home automation (domotic). You may control differenet electrical devices like home lights, DC motors, pneumatic cylinders, lasers and so on. Each such board requires one USB port. The more USB ports you have the more such relay units you may connect and control. Features. Install_RaspberryPi - drcontrol - Installation for Raspberry Pi and like - Denkovi Relay board control via Python.
Instructions how to install the needed libraries and test DRControl utility to control Denkovi USB Relay board.
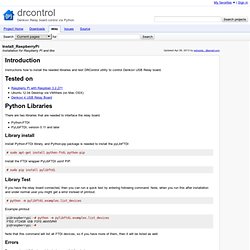
There are two libraries that are needed to interface the relay board. Python-FTDI PyLibFTDI, version 0.11 and later Library install Install Python-FTDI library, and Python-pip package is needed to install the pyLibFTDI # sudo apt-get install python-ftdi python-pip Install the FTDI wrapper PyLibFTDI usinf PIP. # sudo pip install pylibftdi Library Test If you have the relay board connected, then you can run a quick test by entering following command. . # python -m pylibftdi.examples.list_devices Example printout. 1014_2 - PhidgetInterfaceKit 0/0/4. Product Description The PhidgetInterfaceKit 0/0/4 Provides a convenient way to interface your PC with various higher-voltage devices such as incandescent bulbs, high-power relays, and motors The 1014 contains 4 Relay Outputs for switching AC or DC power; the relays are Single Pole Double Throw (SPDT).
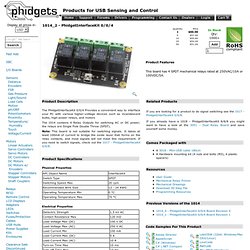
Note: This board is not suitable for switching signals. It takes at least 100mA of current to bridge the oxide layer that forms on the relay contacts, and most signals will not meet this requirement. If you need to switch signals, check out the 1017 - PhidgetInterfaceKit 0/0/8. Product Specifications Physical Properties Electrical Properties. Solid State Relay Kit. Description: A solid state relay (SSR) is just what it sounds like; an IC that acts like a mechanical relay.
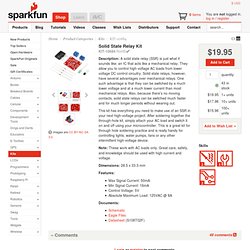
They allow you to control high-voltage AC loads from lower voltage DC control circuitry. Solid state relays, however, have several advantages over mechanical relays. One such advantage is that they can be switched by a much lower voltage and at a much lower current than most mechanical relays. Also, because there's no moving contacts, solid state relays can be switched much faster and for much longer periods without wearing out. Rasberry Pi + Relay. 240A25 - 240 VAC, 25 Amp, AC Control Solid State Relay (SSR)
Www.opto22.com/documents/0859_Solid_State_Relays_data_sheet.pdf. Drivers, Relays, and Solid State Relays. Driver circuits A typical digital logic output pin can only supply tens of MA of current.

Even though they might require the same voltage levels, small external devices such as high-power LEDs, motors, speakers, light bulbs, buzzers, solenoids, and relays can require hundreds of MA. Larger devices might even need several amps. To control smaller devices that use DC, a transistor-based driver circuit can be used to boost the current to the levels needed for the device. When voltage and current levels are in the correct range, the transistor acts like a high-current switch controlled by the lower current digital logic signal. Basic driver circuit using a BJT transistor The transistor primarily provides current gain. Using Relays with Arduino – Turning on the Lights. Warning!!!

This project deals with AC electricity which is dangerous if you don’t know how to treat it safely. You must treat electricity with caution. There are many books and websites about electrical safety procedures and if you’re not sure how to be safe you should read that information. The most basic advice I can give is always assume any exposed wires are live and touching them will hurt a lot at best and kill at worst. Microcontrollers are good at controlling small devices, but frequently we DIY-ers want to use them to control things that aren’t so micro.
The first thing you need is a cheap extension core that you are willing to cut in half. I spliced the relay into the black wire on my power cord. The last step and the one that makes this project useful is getting the microcontroller to control this relay. Single Pole Double Throw (SPDT), Single Pole Single Throw (SPST) Automotive Relays.
If you are looking for relay diagrams, check out our relay diagrams quick reference.
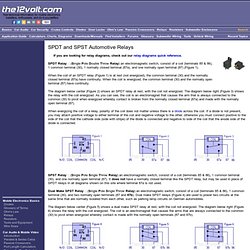
SPDT Relay : (Single Pole Double Throw Relay) an electromagnetic switch, consist of a coil (terminals 85 & 86), 1 common terminal (30), 1 normally closed terminal (87a), and one normally open terminal (87) (Figure 1). When the coil of an SPDT relay (Figure 1) is at rest (not energized), the common terminal (30) and the normally closed terminal (87a) have continuity. When the coil is energized, the common terminal (30) and the normally open terminal (87) have continuity.
The diagram below center (Figure 2) shows an SPDT relay at rest, with the coil not energized. The diagram below right (Figure 3) shows the relay with the coil energized. When energizing the coil of a relay, polarity of the coil does not matter unless there is a diode across the coil. Relay Diagrams - Quick Reference. Relay Using GPIO on Raspberry Pi.
Hardware - Can I switch mains devices on/off? There's an American product called a PowerSwitch Tail which is basically an optically isolated relay in a box.
They make a complete unit for 120V, but only kits for 240V supplies. The kit assembly looks pretty straightforward (even for a beginner). The benefit of this route is that (once completed) all the high voltage connections are safely inside the case and that the board has been designed by a professional engineer with due regard for proper isolation between the high and low voltages and between the high voltage connections. Raspberry Pi – Driving a Relay using GPIO. There’s something exciting about crossing the boundary between the abstract world of software and the physical ‘real world’, and a relay driven from a GPIO pin seemed like a good example of this.
Although a simple project, I still learned some new things about the Raspberry Pi while doing it. There are only four components required, and the cost for these is around 70p, so it would be a good candidate for a classroom exercise.