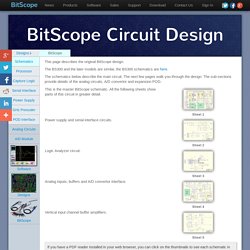

BitScope Circuit Design. This page describes the original BitScope design.

The BS300 and the later models are similar, the BS300 schematics are here. The schematics below describe the main circuit. The next few pages walk you through the design. The sub-sections provide details of the analog circuits, A/D convertor and expansion POD. If you have a PDF reader installed in your web browser, you can click on the thumbnails to see each schematic in detail. You can also can download all five sheets in one zip file from our download area. In addition to the main circuit, you can also view the schematics of our high speed A/D convertor. A/D Convertor and a circuit prototyping system called Proto POD Proto POD which connects to BitScope's Logic POD connector. Main Board. AVR 10MHz 50MS/s Digital Storage Oscilloscope.
Beschreibung des AVR-Oszilloscopes Als Junge zwischen 0 und 20 Jahren habe ich mir immer ein Oszilloscope gewünscht ;-) In dieser Zeit war ein Scope für mich aber unerschwinglich, also baute ich mir das LED-Scope aus der Elektor.

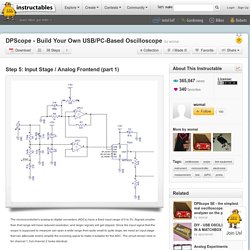
Heute nenne ich ein Tektronix TDS2014B und ein Hameg HM1507 mein eigen, allerdings reizte der Selbstbau eines Scopes mich schon immer. Daher entschloss ich mich nun ein Do-It-Yourself AVR Scope zu bauen. Billige Scopes gibt es schon auf dem Markt für etwa 200€. Bei meinem Scope habe ich somit einen Preis von etwa 50€ bis 60€ anvisiert. Warum 40 bis 50MS/s? Der AD-Wandler ist nur für 40MS/s ausgelegt, allerdings funktioniert dieser bei mir ohne Probleme mit 50MS/s. Warum wird nicht der interne AD-Wandler des AVR benutzt? Der interne AD-Wandler des AVR ist zu langsam. Bei dem AVR DSO handelt es sich um keine professionelle Schaltung, für einfache Messungen und Anwendungen leistet die Schaltung gute Dienste. DPScope - Build Your Own USB/PC-Based Oscilloscope : Input Stage / Analog Frontend (part 1) The microncontroller's analog-to-digital converters (ADCs) have a fixed input range of 0 to 5V.

Signals smaller than that range will have reduced resolution, and larger signals will get clipped. Since the input signal that the scope is supposed to measure can span a wide range from quite small to quite large, we need an input stage that can attenuate and/or amplify the incoming signal to make it suitable for the ADC.
The circuit shown here is for channel 1, but channel 2 looks identical. First, the incoming signal is attenuated by a factor of 4. This increases the maximum voltage range to 20V. The offset is fed in on the bottom of the voltage divider (between C12 - which buffers fast transients - and R2). The input divider deserves some further consideration. Quick estimate: output impedance of the divider is R1 || R2 = 187 kOhm, parasitic C_par maybe 20 pF, that would give a time constant of 187k * 20p = 3.74us and a bandwidth of just 0.35/3.74 = approx. 90 kHz).
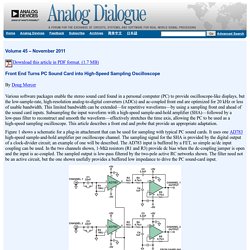
Oscilloscope_Fundamentals_-_Tektronix. TekProbeCircuits. Visual Analyser. Sound Card Oscilloscope: Analog Dialogue: Analog Devices. Volume 45 – November 2011 Download this article in PDF format. (1.7 MB) Front End Turns PC Sound Card into High-Speed Sampling Oscilloscope By Doug Mercer Various software packages enable the stereo sound card found in a personal computer (PC) to provide oscilloscope-like displays, but the low-sample-rate, high-resolution analog-to-digital converters (ADCs) and ac-coupled front end are optimized for 20 kHz or less of usable bandwidth.

This limited bandwidth can be extended—for repetitive waveforms—by using a sampling front end ahead of the sound card inputs. Figure 1 shows a schematic for a plug-in attachment that can be used for sampling with typical PC sound cards. Figure 1. 2-channel analog sampling circuit. The AD783 SHA provides a usable large-signal bandwidth up to a few megahertz. With the front-end circuit of Figure 1, and a PC’s sound card employing the Visual Analyser1 software, the screen shot in Figure 2 illustrates a 2-MHz, single-cycle sine repeated at 1 MHz.