

Livid Instruments. Livid Builder is a line of Do-It-Yourself parts that make it easy for makers to design their own physical computing devices and MIDI control surfaces using buttons, knobs, encoders, velocity pads, arcade buttons, accelerometers, faders, other sensors, and talkback LED’s.
The easy-to-use Brain V2, Brain jr., and Omni Board allows you to easily configure and create a MIDI control device using modular circuit boards that can be organized and arranged into customized setups and configurations. The Livid Builder line is inspired by our own desires to create custom controllers using quality production-grade parts, without the need to create custom circuit boards for every design. Even if you have no experience with electronics we have designed the Builder series and provide tutorials to make it easy for beginners and productive for advanced hackers.
The Builder Brain v2 is the central device in the Builder line of products. Livid Instruments. Expression pedal to MIDI continuous controller. Untitled. MIDI 6 Way Potentiometer Controller. The 6 poteniometers are wired to the 6 analogue inputs of the Miduino board.
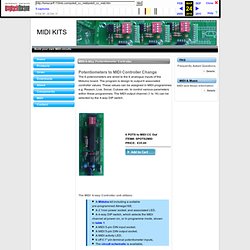
The program is design to output 6 associated controller values. These values can be assigned in MIDI programmes e.g. Reason, Live, Sonar, Cubase etc. to control various parameters within these programmes. The MIDI output channel (1 to 16) can be selected by the 4-way DIP switch. The MIDI 6-way Controller unit utilizes: A Miduino kit including a suitable pre-programmed Atmega168, A 2.1mm power socket, and associated LED, A 4-way DIP switch, which selects the MIDI channel at power-on, or in programme mode, shown in table 1 A MIDI 5-pin DIN input socket, A MIDI 5-pin DIN output socket, A MIDI activity LED, 6 off 0.1" pin-terminal potentiometer inputs, The circuit schematic is available, The MIDI 6-way Controller unit requires: A 9 Volt battery or equivalent 9 Volt DC power source 6 linear 10k potentiometers Assembly: The kit includes all parts necessary, the assembly is straightforward and well documented.
Beagle Bone Tutorial: Read a potentimeter from M-Audio EXP. Sensor systems. Eowave Eobody2 OEM Board v2 is a pre-programmed analogue/digital USB converter with 29 digital I/O and 16 analogue inputs.
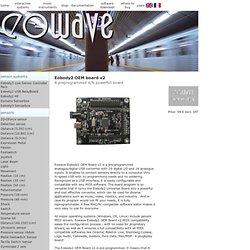
It enables to connect sensors directly to a computer thru hi-speed USB with no programming needs and no soldering. Recognized as a USB interface, it is easily configurable and compatible with any MIDI software. The board program is so versatile that it turns the Eobody2 Universal Board into a powerful and cost effective converter, which can be used for diverse applications such as music, video, robotics, and industry… And in case its program would not fit your needs, it is fully reprogrammable. A free MAC/PC compatible software editor makes it very easy to use for everyone. All major operating systems (Windows, OS, Linux) include generic MIDI drivers. The Eobody2 OEM Board v2 is pre-programmed.
Connecting your Retro-Controllers. Thema anzeigen - JoyWarrior24A10L as a complete circuit. Guido Körber hat geschrieben: A module for the JW24A10L/8L is one of the ideas we have been kicking around for some time now, though always something else has higher priority.

We do have a sample board for the MW24H8, which is very similar, but that has also never been finished for a release. Maybe the module will be one of our next small projects. Ok - so I have a professionally designed pc board for the JW24A10L coming to me within the next week or two. The man who did the board design is a real pro: HowTo Gameport. How to connect things to the Gameport The Gameport was invented with the orgiginal PC in 1981 and is therfore a very simple and forgiving port.
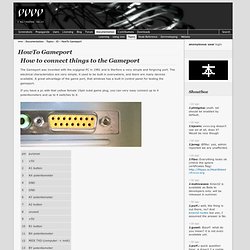
The electrical characteristics are very simple, it used to be built in everywhere, and there are many devices available. A great advantage of the game port, that windows has a built in control panel for testing the gameport. If you have a pc with that yellow female 15pin subd game plug, you can very easy connect up to 4 potentiometers and up to 4 switches to it. Connect up to four switches between the four button pins and GND Connect up to four 100kOhm potentiometers between one of the four potentiometer signals and the +5V pins. There is much information on the internet, how to build your own joysticks. see for example: The GameController (Devices Analog) node will simply give you the results in vvvv as a number between 0 and 1. it can not be simpler.
PC Gameport (Joystick) pinout and wiring. Nowadays the most common analogue joystick type is PC analogue joystick.
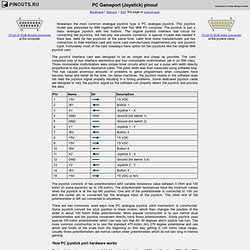
This joystick model was presented by IBM together with their first IBM PC computer. The joystick is just a basic analogue joystick with two buttons. The original joystick interface had circuit for connecting two joysticks, but had only one joystick connector. A special Y-cable was needed if there was need for two joysticks at the same time. Later time some manufacturers put two connectors to their interface card and some card manufacturers implemented only one joystick input. The joystick interface card was designed to be as simple and cheap as possible. USB Converters - Custom Sensors, Inc. USB To Joystick (DB15) Adapter or Game Port. Converts Joystick to new USB technology Allows conventional analog game controllers to interface with USB connections> USB to Joystick Converter 4-mode selection switch - supports most popular gaming modes Designed for IBM PC compatible computers and meets PC 98 standards Extra-long 6 foot cable Easy installation and operation System Requirements: IBM PC 586 or Pentium compatibles with Windows 95/98 OS.

Analogue to USB Gameport Convertor. USB game port Adapter Rockfire RM-203 gameport: Electronics. How to get 4 cc midi controllers of cho (pedals/sliders etc)- usb powered for £10/$15.