

How-To: French Knot - the best instructions ever! The most feared and equally adored embroidery stitch.
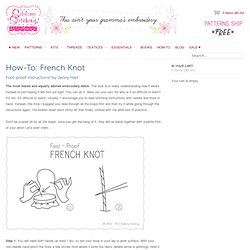
The trick is in really understanding how it works instead of just hoping it will turn out right. You can do it. Mais oui, you can! So why is it so difficult to learn? It's not. Don't be scared off by all the steps, once you get the hang of it, they will all blend together with a petite flick of your wrist! Step 1: You will need both hands (at least I do), so set your hoop in your lap or work surface. Step 2: Place your needle in front of this stretch of floss. Step 3: Wind the floss around the needle once or twice (shown winding twice), depending on if you want a bigger or smaller knot. IMPORTANT: Keep your hand holding the needle still while winding it with the floss in this step.
Step 5: Remember your non-needle hand pinching the length of floss? Step 6: With your coil snugly held in position against the surface, now push your needle all the way through! Embroidery - How to Long and Short Stitch. How to embroider the eyes on your knits. How to Convert a Picture to an Embroidery Pattern. Hand embroidery patterns are a great way to create imagery in floss.

But what if you can’t find the exact pattern your looking for? Google. Sweet family portrait. Embroidery Ribbon + Tutorials & picture instructions. Beginners' Silk-Ribbon Embroidery: Five Easy Stitches. Vests come to life with asymmetrical floral designs embroidered with silk ribbon.
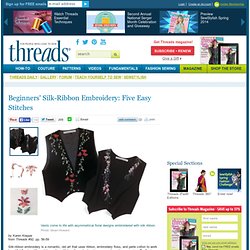
Sloan Howard The basic straight stitch can be used for numerous effects. Christine Erickson Ribbon stitch makes great leaves or petals. Photo: Sloan Howard by Karen Kieppefrom Threads #92. pp. 56-59. Embroidery Designs at Urban Threads - Projects. Transfer Techniques. Annies Crazy World. On the last seam I did a Double Feather Stitch with Colonial Knots.
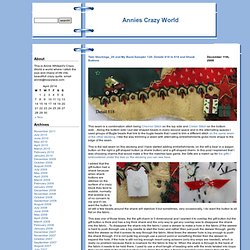
Then before adding embellishments I cut a window template to help place them, which is just as well because I found that the flower trail was cramped on the edge, fortunatly I had enough in the seams to make the heart about 1/4 inch bigger which gives just enough extra space so that it isn’t cramped. To Draw a basic heart shape Draw a square and then draw a half circle on 2 edges…to make it slightly more shapely, I then deepen the indent at the top just a little and slightly curve the point at the bottom, curving the bottom or just snipping of the very tip of the point will prevent the point poking through the fabric when you cover it. Trace the heart onto template plastic or any stiff plastic. I Draw the finished size of the heart onto the back of the crazy piece and Run a gathering thread around the edge, Use a big knot and start at the top of the heart…clip into the V at the top. Stitch and embroidery picture dictionary. This picture dictionary will help you to identify the stitches based on how they look.
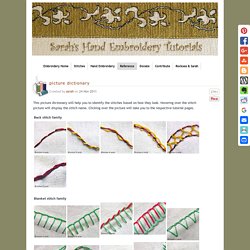
Hovering over the stitch picture will display the stitch name. Clicking over the picture will take you to the respective tutorial pages. Tags: back stitch, chain stitch, cretan stitch, cross stitch, embroidery tutorials, feather stitch, fishbone stitch, fly stitch, hand embroidery, herringbone stitch, knots, palestrina stitch, picture dictionary, running stitch, satin stitch, stem stitch, stitch dictionary, stitch family, stitch variations, weaving stitch 213 Comments » Tips and Tutorials. Tutorials. Weekly (almost):Shawkl Blog PostsMonthly:CQJP - Octogon CQ BlocksBOM - Jingle QuiltBead Cabochon or Something!
UFOs to Finish This Year:Jingle! My Own - No Schedule:Shabby Chic 12 inch quiltShabby Chic 8 inch blocksSilkie CoCo Drawing StitchingAidan Horse QuiltApplique Design MedallionWriting:Book - ECQIICook BookPattern Designing:StitchMAP Hex ClassesStitchMAP Quilting ClassesAll prayers for strength,good health, and sanityretention are welcome! Embroidery. Embroidery. Needle and thread. Embroidery basics: strands, sewing, stabbing and starting. Welcome back to Embroidery Basics!
We took a week off for some other fun, but things are on track to keep on for the next month and beyond. It's just about time to learn some stitches, but there are a few more things to consider before starting. After today, you'll be ready to dig in. First things first. Cut a length of floss. Before the floss touches the needle, you need to decide how many strands you are going to use.
Take a look at what some different number of strands look like. Think of it as using different widths of markers. If you are going to split the strands of floss, separate the number you want at one end, and slowly pull the ends away from each other. There's this lovely product called Thread Heaven, and running your floss through it first will make separating the strands easier.
Next up, there are two methods of stitching embroidery stitches. Although efficient in terms of stitches, I find that it is more difficult to work in a hoop when using this method. HEAPS of embroidery how to videos here... ... Tips & Techniques. Start Stitching! A Beginner’s Embroidery Tutorial. It is National Embroidery Month, don’t you know?
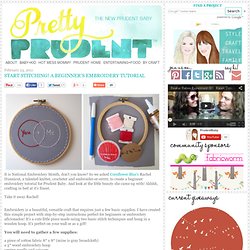
So we asked Cornflower Blue’s Rachel Hunnicut, a talented knitter, crocheter and embroider-er-errrrr, to create a beginner embroidery tutorial for Prudent Baby. And look at the little beauty she came up with! Ahhhh, crafting in bed at it’s finest. Take it away Rachel! Embroidery is a beautiful, versatile craft that requires just a few basic supplies.
You will need to gather a few supplies: a piece of cotton fabric 8″ x 8″ (mine is gray broadcloth) a 5″ wood embroidery hoop sewing needle and scissors 3 colors of embroidery floss (I’m using red, pink, and white)* a circle template cut from cardboard or card stock (I used a cereal box) measuring 2 1/4 ” in diameter water soluble fabric marker glue. Embroidery How To's. How to Embroider A complete overview of Embroidery. How To Videos.