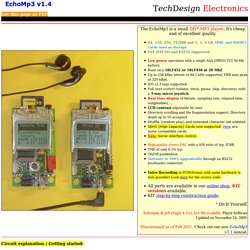
 Circuit explanation / Getting started: Downloads: right-click & "save as" Get this page as PDF Info & datasheet: Screenshots: Tools: Check out our development tools page. The PIC code was made with the PCWH CCS compiler ($425,-); you can install Microchip's MPLAB IDE (click on the link and you can get it for free) with it to get things running smoothly. Programming of the PIC was done with the excellent Tiny PIC bootloader, through the RC6 & RC7 pins. Eagle 4.11e was used for the schematic & PCB layout. Projects Home
020 - EchoMp3 v1.4 - MMC/SD Card MP3 Player
DIY
Note from Weeks: Both my husband and daughter are restless sorts. When our daughter was little and we went to a restaurant, Bill would take her out to run up and down the sidewalk while I paid the bill so she wouldn’t start squirming at the table. Those kids who kick the back of your seat on planes have the same issue. Therapists refer to them as “sensory seeking.” One therapist explained to me that the way I would feel if I sat in a car for ten hours straight is how she feels after sitting for one hour. Bill has talked for years about finding a way to create a heavy blanket that would calm his and our daughter’s restless muscles. Like me, our daughter is frequently restless and, at the end of the day, often asks for a heavy quilt on her legs or for a deep-muscle massage. Little did I know that weighted blankets and vests are in widespread use as therapeutic devices for children and adults with sensory conditions including ADD and autism. Like this: Like Loading...
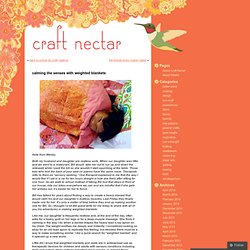
calming the senses with weighted blankets « Craft Nectar
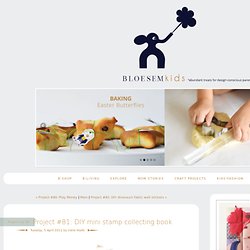
81: DIY mini stamp collecting book
Tuesday, 5 April 2011 by Irene Hoofs DIY mini stamp collecting book by Teri from Giddy Giddy We needed a lovely display and storage solution for all the wonderful stamps we’ve been collecting. The criteria is something kid friendly and practical. The materials you will need:*Cardstock paper*2 paper maps *Glassine envelopes *Leather scrap*White masking tape*Rubber cement glue (acid free) ** It’s important that you do not use white glue as this will discolor the paper over time. Step 1:Cut cardstock paper desired size.For my example, I used 3 inches by 3 inches cardstock pages.Step 2: Cut map into long strips which will be used to cover the cardstock pages. ..Giddy Giddy..
Out of Order: DIY Tutorial - Full Skirt

DIY of the Month: Braided T-shirt Bracelet - StumbleUpon
How To: Give your old t-shirts a second life. Sorry dust rag pile! photos: kirsten for we heart this I love using simple materials to make something fun and innovative. The supplies for this bracelet DIY are really basic, so there’s a REALLY good chance you own all of them already. I mean, who doesn’t have a stack of soft old T’s you can’t wear outside of the house, but love to much to toss in the rag pile? As with most of my DIY’s for wht, this is very customizable. Supplies: • T-shirt scraps • 2 keychain rings • Scissors • Needles and thread • Glue gun • Ruler 1. 2. 3. 4. 5. 6. 7. More Options: • Add a strand of metallic thread into the braid • Add charms to the key rings or actual strips of fabric • Use the colors of your school or favorite sports team, or coordinate it with your latest spring outfit Readers – do you have an favorite T just waiting to be turned into a new bracelet?

DIY Project: Repurposing your maps!
Good Morning darlings...Hope you have a fabulous day today!! With the use of GPS there is really not much use to all those maps we collected through out time...but somehow I have a hard time throwing them away. How about this lovely way of repurposing them?? I think they are super cute for a corridor to the kids room, or a small side wall!! Can you think of any other great way of repurposing your maps?? {Image via 1.
I’m in a good mood and thought I’d come share one of my old products! These layered Take-Out Box Templates are super cute and fun to make! Perfect for packaging up small gifts and treats! It includes 2 sizes and they come in both .psd and layered .tif file formats. FOR PERSONAL USE ONLY! If you’d like to purchase a limited commercial use license (this includes creating freebies for your blog) then you can contact me using the contact form. Enjoy! EDIT: I have made a separate download for paper scrappers/non-digi scrappers/people without Photoshop. You can now download ready to print PDF files for these templates!
Take-Out Box Templates FREEBIE! « Designs by Megan Turnidge | Digital Scrapbooking Blog
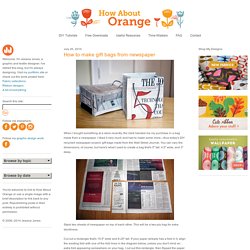
How to make gift bags from newspaper
When I bought something at a store recently, the clerk handed me my purchase in a bag made from a newspaper. I liked it very much and had to make some more—thus today's DIY recycled newspaper project: gift bags made from the Wall Street Journal. You can vary the dimensions, of course, but here's what I used to create a bag that's 5" tall, 4.5" wide, and 3" deep. Stack two sheets of newspaper on top of each other. This will be a two-ply bag for extra sturdiness. Cut out a rectangle that's 15.5" wide and 8.25" tall. Fold a flap 1.25" down from the top. Cut two pieces of cardstock or chipboard to 4.25" x 1", then glue them on the widest two panels just under the top fold. Put glue on the outside of the 0.5" tab and bring the left-most panel over to form the body of the bag, aligning the cut edge of the panel with the folded edge of the flap. Upend the bag so the 2" flap is now up. Put glue on both flaps and fold them inward to form the bottom of the bag.
DIY Luv Aj Handpiece
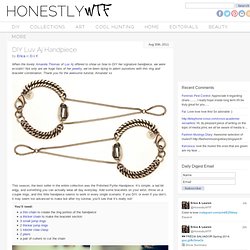 When the lovely Amanda Thomas of Luv Aj offered to show us how to DIY her signature handpiece, we were ecstatic! Not only are we huge fans of her jewelry, we’ve been dying to adorn ourselves with this ring and bracelet combination. Thank you for the awesome tutorial, Amanda! This season, the best seller in the entire collection was the Polished Pyrite Handpiece. You’ll need: Now that you have all you need, let’s get cracking. Now for the bracelet portion- everyone’s wrist is a little different so you can ball park the length. So now we need to attach all the smaller chains together: Open up one of the smaller jump rings and loop the shorter piece of chain and connect the jump ring on both ends. Don’t close the jump ring yet though, we need to add the two longer strands of the thin chain to the same jump ring. Grab the thick chain you cut for the bracelet portion and find the middle. Repeat the same step on the other side. Voila!
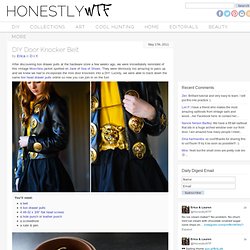
After discovering lion drawer pulls at the hardware store a few weeks ago, we were immediately reminded of this vintage Moschino jacket spotted on Jane of Sea of Shoes. They were obviously too amazing to pass up and we knew we had to incorporate the mini door knockers into a DIY. Luckily, we were able to track down the same lion head drawer pulls online so now you can join in on the fun! You’ll need: Start by placing the drawer pulls along the backside of the belt and place them to your liking. Push the screws through the holes and twist on the drawer pulls, tightening each one with a screwdriver. Your Moschino-inspired belt is finito! Roarrrrr! (top image via Atlantis Home, rest of images by Honestly…WTF)
DIY Door Knocker Belt
The moment we saw Phillip Lim‘s Box Braid Collar Necklace, we were immediately overcome with a wave of nostalgia. Our memories of a neon, plastic box braid lanyard was suddenly transformed into a sophisticated leather jewelry component. Honestly, brilliant! Start by cutting the suede in 4 three-yard pieces. Repeat the box braid until you are ready to add washers to the necklace. Once the necklace is finished, trim the ends. Wear it as a necklace, wrap bracelet or even a headband! (top image via Ssense, rest of images by Honestly…WTF)
DIY Box Braid Necklace

Our first challenge for the second year of Iron Craft was to make something with paper. I channeled my inner Dr. Russ and did a paper cut map of the city of Amsterdam. We recently had the bathrooms redone in our house. I was looking through Etsy for some art for the downstairs one and came across these amazing paper cut maps by Lekker Haas Paper. I decided to do a map of Amsterdam, because the other artwork I have planned for that room is a photo I took of Amsterdam canal houses. After a lot of time on Google images I found this map which had a great graphic quality to start with. Next, I had to figure out what I was going to cut out. Then I scanned the map with all my markings into my computer. Then it was just down to the cutting. Here you can see the back of the cut out with a little of the map left and plain white front. Once it was all cut out it was just a matter of mounting it to a piece of paper and framing.
Iron Craft Challenge #1 – Paper Cut Map
Last week my mom sent me a crafty care-package. Yes, my mother still sends me care packages, how great is that?? Included was a fabric bowl from my childhood home as inspiration and 12 yards of 1/2″ piping cord. Gather ye scraps. Tear your fabric into 1″ strips. This is 1/2″ piping cord. Start with a strip and cover the end of rope, then wrap fabric around end of rope to secure. Continue wrapping fabric around rope, keeping fabric flat and covering rope completely. When you have wrapped enough rope to to enclose the tip as shown here, use a small crochet hook and pull the fabric from the outer rope up through the center of the spiral. Pull the fabric through and continue wrapping around outer-most layer of rope. If your strips are fairly short, you can sew a few together end to end but not more than a yard in length at a time. At this point you should alternate single wraps around outer rope, with doubles wraps around the outer two layers of rope. And more wrapping. Starting to look good!
Scrap-busting Fabric Bowl
By Kate on September 13, 2011 This bracelet has been inspired by this really wonderful “Braided Hex-nut Bracelet” tutorial which I pinned on Pinterest a while back. Two things I absolutely love about this project are: 1) It’s cheap as chips: I already had string in the cupboard and the brass hexnuts were 3p each from the hardware shop. 2) It’s my kind of jewellery: I’m not really a girly girl IYKWIM! The bracelet I made is a bit different to the ‘braided hex-nut bracelet’ and uses macrame instead, which is great, because I promised some tutorials a while back and felt a bit bad that I hadn’t written any yet! Full instructions after the jump! Square Knot Please note: I have used different colored cord in the tutorial so that it’s easier for you to figure out whats going on! 1. 2. 3. 4. This might seem a little tricky a first but I promise once you have done it a dozen times you’ll be sorted….! If you need a hand then leave a comment and I’ll get back to you.
{macramé: square knot} string & hexnut bracelet
DIY Wrap Bracelet - Honestly WTF - StumbleUpon
You should all know by now that we are all about stacking bracelets on our wrists. The more, the better. In fact . . . the most, the best! With that being said, we’ll show you how to master a version of the ever so popular wrap bracelet. It’s so simple and addicting, you’ll soon be churning out these wristlets with your eyes closed. Clearly this arm party train isn’t stopping and it’s about time you get on board! You’ll need (for a double wrapped bracelet) :* Lengths will vary depending on the size of your wrist (see comments for suggestions). Fold the length of leather cording in half to form a loop. Place the ball chain along the leather cording with the end of the chain meeting the end of the wrap. Continue wrapping while checking it for fit around the wrist. When you have reached the end of the ball chain wrap the linen cording around the leather strands 2-3 more times. Thread the hex nut through the strands and tie a second knot. Trim with scissors and your wrap bracelet is finished!!
I was debating over a couple of Re-Styles this week, but because of a few parties, the glitter heels won out in the end. Welcome everyone to my Project Re-Style Monday. I have only 5 more Re-Styles left to reach the the one year mark. I can hardly believe that a whole year has passed. This week I am saving a pair of shoes from the garbage. Ruined ~so I thought~ But leave it to a little glue and glitter to save the day. So Girls, if you have a pair of shoes you love, but feel like you can't wear them because the heel looks like a cheese grater, grab your glue and glitter and get to work. Tutorial Things you need Glitter ~I used Martha Stewart, fine glitter in Smoky Quartz ~Glue ~ Mod Podge~Paint brushPaper plate Mix your glue with you glitter make a thick paste Place the mixture on your heel. let dry, Repeat Now you and your shoes can hit the town, unashamed of their grated past. More Glitter Shoe fixesHERE HEREHERE 47 down 5 to go I hope all of you have a wonderful night. Thanks for joining me, Anne
Project Re-Style #47 Glitter Heel Fix
DIY Braided Bead Bracelet
Stuff I Would Make. DIY
DIY Chindi Reindeer
The Zen of Making
DIY Workout Shirt : Rabbit Food For My Bunny Teeth
Doily lamp tutorial. Finally!
Polo Refashion
DIY
vanillascented
DIY
66 DIY Bride Wedding Projects & Ideas - Part I
10 Killer Wedding DIYs to Obsess Over | Emmaline Bride™
Wedding Belles » DIY project
LIVLIG-online.com // for life's a DIY project
Delighted Momma
#手工劳动光荣#_堆糖图片专辑
Style Scrapbook: DIY: YELLOW CLUTCH
DIY dresser round-up
Pimp your sneakers! 10+ DIY Ideas
Heart Jeans D.I.Y.
Modern Wall Art with Paint Swatches!
Make Your Own Tree Swing
DIY
a pair & a spare
How to Make Illuminated Yarn Lanterns
Détournement d'objet, rendre l'inutile utile 2 !
Détournement d'objet, rendre l'inutile utile 2 !
*** Esprit Cabane, Le magazine des idees creatives et ecologiques
