

Jonathan Criner - Blog Cabin. Modelowanie broni dla gier FPP. Przeglądając serwisy internetowe poświęcone tematyce game-art łatwo dostrzec, jak bardzo popularnym tematem jest broń.
Wielu niedoświadczonych grafików wpada na pomysł, że stworzą własny model do portfolio. Niestety, traktują go tak samo jak modele będące dekoracją otoczenia. W rezultacie powstaje coś, co wygląda jak karabin, ale nadaje się tylko do powieszenia na ścianę. Rozpoczynając pracę przy Deadfall Adventures pierwszy raz zetknąłem się z modelowaniem broni. Miałem już wtedy pewne doświadczenie w pracy nad modelami, lecz bylem zupełnie zielony w kwestii modelowania pod FPP. Publikacja ta w całości poświęcona jest problematyce modelowania dla widoku FPP. Wszystkie kwestie rozpatrywane są przede wszystkim pod względem wizualnym, który mnie najbardziej interesuje. W Sztuce barwy Johannes Itten napisał Nauki i teorie przydają się w kiepskich momentach. Uważam, że wiedza zdobyta poprzez praktykę jest cenniejsza niż wszelkie zbiory regułek i porad. Johannes Itten. Czytaj więcej. Design and create impressive mechs by Lee Souder. 3D generalist Lee Souder shares the techniques design theory and processes adopted in the creation of his sci-fi image Chinese oppressor drones For this tutorial I am going to focus on design theories that can be used in any software.

I am providing a step by step tutorial on how I created a believable mech from scratch. Inspiration Since you can go in any direction design-wise, I like to set goals. I tried to keep one thing in mind - what would a commercial security mech look like? Initial inspiration came from real world robotic companies such as ABB and Raytheon. Those robotic factory arms move as though they are from a sentient life form.
Ground yourself and find some inspiration related to your subject - stay focused and do not go overboard with conceptual ideas. How do I create real-time hair for games? Making believable real-time hair for games is often a very technical task, usually requiring the use of specialist in-house hair solutions or lots of fiddling with curves.
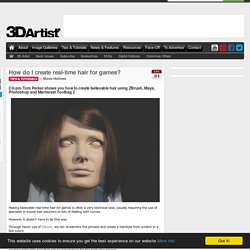
However, it doesn’t have to be this way. Through clever use of ZBrush, we can streamline the process and create a hairstyle from scratch in a few hours. Here you’ll build medium- to long-length hairstyles in line with the latest videogame techniques and specifications. The idea behind this workflow is to keep the process as artistic as possible, so we’ll be working in ZBrush often, using InsertMultiMesh brushes for laying down our Alpha strips and also in creating believable hair that can be baked down for the texturing process.
We’ll finish the tutorial in Marmoset Toolbag 2, which is a real-time PBR renderer. Our thanks to Tom for this tutorial. Step 01 – Prepare your IMM brush This is going to be the basis of our Alpha cards, so is very important to get right early on. Step 02 – Set up the IMM brush. Project Zavala - Full Tutorial. Sculpting Human Anatomy — From Clay to ZBrush on Livestream. Avengers Particle Techniques with Thinkbox Krakatoa and Maya nParticles - krakatoa, Maya. Creating first environment – basics. When working on a 3d game by yourself you need to have knowledge about preparing scenes.
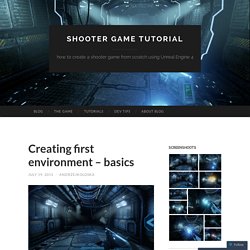
In this post I will give you some tips about: Static and dynamic lighting your levels,Using Unreal Engine 4 tools to prepare scene, Basically lighting and preparing scenes is big piece of cake of game development and there are separate positions for people doing this. Graphics Level Designers, Lighters, Meshers – it depends on company, but mostly they have graphics knowledge. If you are doing game with “realistic” graphics (as I’m doing) unfortunately you need to have good computer to work with. 4 cores CPU, SDD disc and good graphics card. In earlier post I showed you some great sci-fi enviro assets packs. Unreal Engine 4 use light maps for lighting named Lighmass. Must Read – Unreal Engine 4 Lighting Documentation page,Unreal Engine 3 documentation page. And about level design: As always – take your time! Static Lighting Level Scale. Without AO. THE ILLUSION OF LIFE. A Comprehensive Look at Hard Surface Modeling for Video Games.
Timothee Yeramian has made a great hard surface tutorial with Max entitled - A Comprehensive Look at Hard Surface Modeling for Video Games, which can be viewed over on Vimeo Quote: "Its finally here!
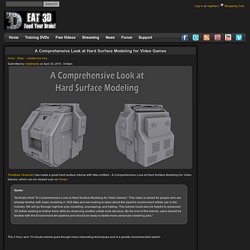
"A Comprehensive Look at Hard Surface Modeling for Video Games. " This video is aimed for people who are already familiar with basic modeling in 3DS Max and are looking to learn about the pipeline environment artists use in the industry. We will go through high/low poly modeling, unwrapping, and baking. The 2 Hour and 15 minute tutorial goes though many interesting techniques and is a greatly recommended watch!
How do I create real-time hair for games? How to create custom rig controls in 3ds max? In this tutorial, I am going to show you how to create your own rig controls in few easy steps.
We basically create controls to drive our rig but they also make the animation process much easier as we can manipulate and pose the rig easily with the help of these controls. In animation, we generally do not manipulate the bones directly so these controls also help us to avoid the direct manipulation of the bone objects. You might have seen the rigs having a complex UI with elements like sliders, spinners, buttons, Joystick controls etc., created with maxscript and .NET but you can also create them without getting into programming. Let’s go and learn how to create these controls. Demo: Step1 I have a basic slider control that I made with the help of splines. Step2 Let’s assume the two ends of the slider bar as point A and point B. Step 3 Since the slider point will move only in one axis (x-axis) so we don’t need to worry about rest of the two axes. Animating with the Spline IK Solver.
Animation menu > IK Solvers > Spline IK Solver Create panel > Systems > Bones > Choose SplineIKSolver from the IK Solver list.
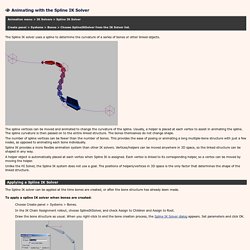
The Spline IK solver uses a spline to determine the curvature of a series of bones or other linked objects. The spline vertices can be moved and animated to change the curvature of the spline. Usually, a helper is placed at each vertex to assist in animating the spline. The spline curvature is then passed on to the entire linked structure. The number of spline vertices can be fewer than the number of bones. Spline IK provides a more flexible animation system than other IK solvers. A helper object is automatically placed at each vertex when Spline IK is assigned. Unlike the HI Solver, the Spline IK system does not use a goal.