
How to make a purse out of a kitchen rug - zevy joy. EmailEmail I am a huge fan of IKEA and have bought several of their cute striped kitchen rugs here.

I love the print and thought how simple it would be to sew one into a bag. These rugs cost a few dollars and the whole project costs less than ten! You will need a sewing machine, but the project is manageable for beginning sewers. Here is what you will need… A kitchen rug (I got mine from Ikea and there are some great options at TargetI yard of 1 1/2 inch wide of cotton belting or webbing for the strap of the bag. Here is how you will sew this useful bag… Begin by taking only one side of the rug and unthreading the fringe. Trim off the fringe. Fold the newly cut side up 13 inches – the fringed side will remain longer. Now on the top flap of your bag, fold in the side excess and hem it with the same simple stitch as done above Take your measured webbing and place it on the onside of one side of the bag (you can pin it in place if preferred). Stitch the other side of your webbing the same way. Knitting for Beginners: Great Resources to Get Started.
Knitting is an incredibly useful skill.

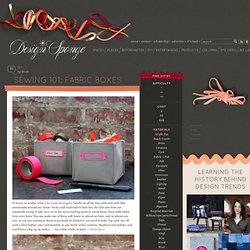
Not only can you make garments, accessories, and even home decor, with just a few sticks and some string, but the actual act of knitting is also amazingly meditative. So if you're ready to pick up this ancient skill, here is some advice on where to start. This month, Apartment Therapy teamed up with a bunch of talented knitters — like KOEL Magazine and Flax & Twine — to give you a rich mix of informative posts about this useful and meditative craft, including resources and original patterns. If you've never picked up knitting needles before, this is a great time to start. See the entire knitting series right here. Other Knitters. Sewing 101: fabric boxes. It seems no matter what I do, I can never get a handle on all the tiny odds and ends that accumulate around my house.

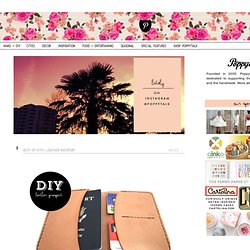
From craft materials to hair ties, the bits and bobs are constantly trying to take over, so in the never-ending quest to corral them, these little fabric bins were born. You can make one of these soft boxes in almost no time, and in almost any size, so you can customize them to perfectly fit whatever you need to hold. Top each one off with a label holder (also customizable in any shade of the rainbow, thanks to nail polish), and you’ll have a leg up on clutter . . . for a little while, at least. — Brett Bara Read the full how-to after the jump . . . Materials a sturdy fabric, such as canvasthread to matchsewing machine, iron and basic sewing supplieslabel holdersnail polish (optional) 1. Leather Passport. Continuing with our summer series of Best of DIYs we bring you this pretty fab project by Alicia Jepsen of Jepsen LeatherGoods.

How much fabric do I need to reupholster... Dressmaking table on casters. Expedit sewing/crafting/cutting table. Craft Published on December 7th, 2012 | by Jules IKEAHacker Materials: Expedit 4×2 units, Vika Amon tabletop, Ribba picture ledge Description: This is a cutting table for craft and sewing projects. The base is two Ikea Expedit units (4×2) that I put on their sides and connected together. To connect them together I used the brackets that come with the Expedits that are meant to connect them to the wall.
Then I attached Besta 4 inch legs (10 of them total – 5 on each Expedit) to the bottom to give the table more height (so it would be closer to counter height). The tabletop is the Vika Amon tabletop (the one that is 59 x 29.5). On the long edge of one side of the table are two Ribba picture ledges that I cut to the right size and connected (they are screwed into the Expedit) . ~ Summer Frace, Austin, TX The Author. Expedit sewing/crafting/cutting table. Tips for Sewing Sweater Knit. It's the perfect time of year for warm, fuzzy accessories!

I love scarves, mittens and snow hats, but did you know you can make them yourself from an old sweater? Today I'll show you how to recycle a sweater into something brand new! Step 1: Use the hemline on your sweater as the hemline for your new piece. For example, since we are making a hat today I am using the bottom of this sweater, which already has a pretty finished hem! Step 2: Mark off the area that you want to sew with chalk or a marker. Step 3: Stitch your shape on your sewing machine. Turn it inside out and it's done! -Always use the existing hem, if you can! -Give yourself extra seam allowance, it's easier to size down than to size up.
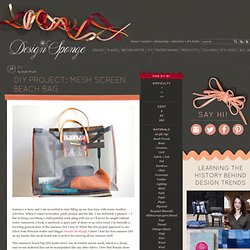
-Always sew before you cut the knit fabric! Mesh screen beach bag. Summer is here, and I am so excited to start filling up my free time with warm weather activities.

When it comes to beaches, pools, picnics and the like, I am definitely a planner — I like to bring everything I could possibly want along with me so I’ll never be caught without water, sunscreen, a book, a sandwich, a spare pair of shoes or an extra towel. I’m basically a traveling general store in the summer, but I love it!
When this fun project appeared in our inbox from Parisian crafter and blogger Pascale Mestdagh, I knew I had my first summer DIY on my hands; this mesh beach tote is perfect for carrying all my summer stuff. This summery beach bag DIY makes clever use of window screen mesh, which is a cheap, easy-to-use material that can be manipulated like any other fabric. I love that Pascale chose punchy orange and natural leather to contrast with the light gray tone of the mesh; it’s sophisticated and hits just the right note for summer. Read the full how-to after the jump . . . 1.
ReStyle a comfy sweatshirt! Scrappy Iowa Pillow Cover.