
Games. Router Work Station. I've chosen to prepare all the pieces and finish them in advance before assembling the cabinet using dowels, and the method of construction reflects this.

The router table is held together with dowels and using the DowelMax jig provided foolproof alignment of all of the parts during assembly and glue-up. If you choose another method, such as biscuits, read through the entire process, as you will need to modify some of the design as well as the order of operations. The table is built around a plywood core that is then edge banded and all of the remaining parts are fitted in sequence. When the entire cabinet is finished, it is then taken apart and the curved pieces shaped to give it a softer, less blocky look. With all of the shaping done, the parts are sanded and finished and the cabinet assembled and the hardware installed. . • Cut the Baltic birch plywood parts for the bottom (A), two sides (B) and the back (C). • Cut a ¾" dado across each side piece, 12 ⅞" down from the top edge.
Finger-Joint Jig. There are countless ways to cut finger joints (also called box joints).

You can cut them by hand, with a router, or on the tablesaw. Over the years, Fine Woodworking has published plans for a variety of jigs to cut them. In issue #214, we featured another one: a dedicated tablesaw sled by Dennis Theisen of Grand Rapids, Mich. The jig is super easy to make (some can be highly-engineered like this one by Matthias Wandel) and cuts one size of fingers. Woodworking Plans for Immediate Download from PlansNOW.com. How to build a platform storage bed for under $200.
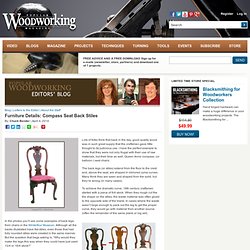
Furniture Details — Compass Seat Back Stiles. Lots of folks think that back in the day, good quality wood was in such great supply that the craftsmen gave little thought to its judicious use.

I have the perfect example to show that they were not only frugal with their use of raw materials, but their time as well; Queen Anne compass- (or balloon-) seat chairs. The back legs (or stiles) extend from the floor to the crest and, above the seat, are shaped in mirrored cyma curves. Many think they are sawn and shaped from the solid, but they’re wrong (in many cases). To achieve the dramatic curve, 18th century craftsmen started with a piece of 8/4 stock. High Style, Low-Cost TV Cabinet. The striking style of this cabinet was inspired by visits to upscale furniture stores where we found similar pieces selling for $1,500 or more.

But we designed this unit so you can build and finish it in about three weekends for a cost of less than $300! That will leave you more money for what you put inside the cabinet. Design Features • The TV space is 39 in. wide by 30-1/2 in. tall by 23-3/4 in. deep, and will accommodate most 36-in. TVs, but measure your TV before building this cabinet. • The two large component openings will accommodate stacks of high-tech TV gear. . • Cutouts in the back of the TV shelf make it easy to run wires between the TV and the components. • Two deep drawers provide lots of room for videotapes, DVDs or video-game junk. • To create the bold color contrast, we stained the stiles and top with a dye before assembly.
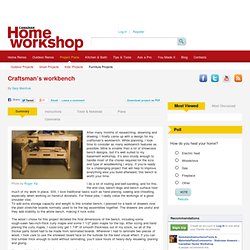
Tools and Materials This project requires a jigsaw, tablesaw and router. It takes only three sheets of 3/4-in. Prepare the Plywood Parts 1. 2. 3. 4. 5. Craftsman's workbench – Canadian Home Workshop. Building the Benchtop Start by milling wood for the laminated top.

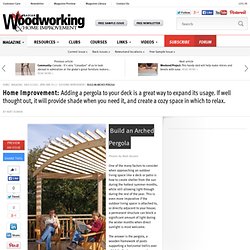
You’ll need 13 pieces of maple in all, each measuring 1 3/8" thick x 2 1/2" wide x 54" long. I glued them together on edge to create a 2 1/2"-thick top that’s about 18" wide and 54" long. Build an Arched Pergola - Canadian Woodworking Magazine. Build an Arched Pergola Photos by Matt Dunkin One of the many factors to consider when approaching an outdoor living space like a deck or patio is how to create shelter from the sun during the hottest summer months, while still allowing light through during the rest of the year.

This is even more imperative if the outdoor living space is attached to, or directly adjacent to your house; a permanent structure can block a significant amount of light during the winter months when direct sunlight is most welcome. The answer is the pergola, a wooden framework of posts supporting a horizontal trellis over which leafy vines can grow to provide shade during the summer, but allow light through during the early spring, late fall, and throughout the winter months. Pergolas define a space, turning a deck, which might otherwise feel too exposed, into an outdoor room, combining our need for shelter with our desire for a vantage point. Quick & Easy Shop Organizer. Want more great tips?

By subscribing to Woodsmith Tips, you'll get free tips in your email inbox every week! Share eTips with your friends. Japanese Garb. DIY. All Things Wood. Techno Tips. Web 2.0 - tools. Web 2.0 Tools.