

Interactive environments lab » Robertsonics / Sparkfun mp3Trigger v2. We have 5 of these and have been using them in a few interactive installations – they do work.
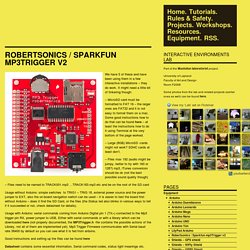
It might need a little bit of tinkering though: – MicroSD card must be formatted to FAT 16 – the larger ones are FAT32 and it is not easy to format them on a mac. Some good instructions how to do that can be found here – at least the instructions how to do it using Terminal at the very bottom of the page worked. – Large (8GB) MicroSD -cards might not work? SDHC cards at least don’t. – Files max 192 (audio might be jumpy, better to try with 160 or 128?) – Files need to be named to TRACK001.mp3 …TRACK183.mp3 etc and be on the root of the SD card Usage without Arduino: simple switches to TRIG1 – TRIG 18, external power source and the power jumper to EXT, also the on-board navigation switch can be used – it is easier to test the board first without Arduino – does it find the SD Card, or the files (the Status led also blinks in various ways to tell if it succeeded or not, check datasheet for details).
MP3 Trigger Support – robertsonics. Support is provided through SparkFun, including their online forums, which I monitor frequently.
If you are having difficulty playing audio with you MP3 Trigger, I strongly recommend that you first follow the troubleshooting procedure below. IMPORTANT: Before you begin, remove anything you may have connected to the MP3 Trigger, including any buttons, switches, wires, serial adaptors, etc. If you’ve globbed on custom wiring that can’t be removed, then all bets are off. Please do the tests in the prescribed order. If your unit fails at any point, please mention at what point the first failure occurred when you post to the forum. 1) Is the Power LED on when you apply power? 2) Is your PSoC microcontroller alive and running? 3) Do you have valid firmware installed? Always make sure you have the most recent firmware version. 4) Does it play audio at all?
128kbps stereo music test file 1 128kbps stereo music test file 2 You should hear stereo music with a fade-in, fade-out and no glitches. Sparkfun MP3 Trigger and serial monitor. How to set up your MP3Trigger/RN-XV the EASY WAY! :) So I am still super new to these Arduino micro controller boards, add ons and various shields.
I don't really do any programming yet, but get the idea of modifying someone's example code. In any case, I've been messing with this MP3 Trigger board for a long time now (a few years on and off), and have been trying to introduce WiFi or Bluetooth into the mix. The end goal was to give my robot sounds via wifi connection from my cellphone or tablet. Seems that everyone I've asked just could not give me a straight out answer to get a NOOB going.
So I am going to share what I have working so that others may have a slightly easier time making this work. Materials used:Sparkfun MP3 Trigger (Firmware v2.54 hex file (zip))MicroSD card (I used a 2Gb card)Sparkfun WiFly RN-XV (with 4.41 firmware, request the update when ordering)SparkFun XBee Explorer RegulatedSparkFun XBee Explorer USBHeadphones (for testing purposes) Updating the firmware:At this point we need to use the XBEE Explorer USB. Using Arduino to control Sparkfun Mp3 Trigger? MP3 Trigger V2 + Arduino Uno. In my “Advanced Projects in New Media” class, we did a collaborative project – SLAM MAN 3000.
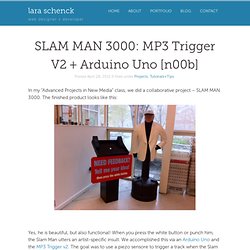
The finished product looks like this: Yes, he is beautiful, but also functional! When you press the white button or punch him, the Slam Man utters an artist-specific insult. We accomplished this via an Arduino Uno and the MP3 Trigger v2. Interactive environments lab » Robertsonics / Sparkfun mp3Trigger v2. Sansumbrella/MP3Trigger-for-Arduino. MP3 Trigger V2 + Arduino Uno. View topic - Arduino + MP3Trigger lib = Won't Compile. View topic - mp3 Trigger & Arduino. I'm using an Arduino to control an Mp3 Trigger, but with limited success.
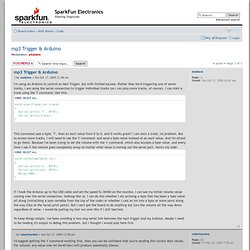
Rather than hard triggering one of seven tracks, I am using the serial connection to trigger individual tracks (so I can play more tracks, of course). I can start a track using the T command, like this: Code: Select all void startTrack(int track){ Serial.print('T', BYTE); Serial.print(track);} This command uses a byte, 'T', than an ascii value from 0 to 9, and it works great! Void setVolume(byte vol){ Serial.print('v', BYTE); Serial.print(vol, BYTE); delay(500);} If I hook the Arduino up to the USB cable and set the speed to 38400 on the monitor, I can see my initial volume value coming over the serial connection, looking like vÿ.
To keep things simple, I've been avoiding a two-way serial link between the mp3 trigger and my Arduino.