
GNU GRUB Manual 2.04. Table of Contents This is the documentation of GNU GRUB, the GRand Unified Bootloader, a flexible and powerful boot loader program for a wide range of architectures.

This edition documents version 2.04. This manual is for GNU GRUB (version 2.04, 24 June 2019). Copyright © 1999,2000,2001,2002,2004,2006,2008,2009,2010,2011,2012,2013 Free Software Foundation, Inc. Permission is granted to copy, distribute and/or modify this document under the terms of the GNU Free Documentation License, Version 1.2 or any later version published by the Free Software Foundation; with no Invariant Sections. 1 Introduction to GRUB 1.1 Overview Briefly, a boot loader is the first software program that runs when a computer starts. GNU GRUB is a very powerful boot loader, which can load a wide variety of free operating systems, as well as proprietary operating systems with chain-loading1. 1.2 History of GRUB Erich then began modifying the FreeBSD boot loader so that it would understand Multiboot. 1.4 GRUB features E.g. !
BootProcessSpeedup. Desktop workstations commonly tend to be rebooted more frequently than servers, and laptops more often than either.

A few simple steps can do a lot to shorten the wait while the machine gets from power-on to login. Using readahead to load files from disk The readahead package runs at boot and populates the kernel disk cache with the files that are going to be needed during boot. To activate it, install readahead, touch the file /etc/readahead/profile-once and reboot once. The profiling boot is very slow, and will tune the list of files loaded to match the list of files used during the profile run. aptitude install readahead touch /etc/readahead/profile-once In squeeze, this is /.readahead_collect Using a faster system shell *now default* The standard system shell /bin/sh was once provided by bash. Dpkg-reconfigure dash Using sleep mode It is also possible to take advantage of the system's swap space to obtain very fast booting via sleep mode. Using kexec for warm reboots Using Systemd systemd -- ? Boot-repair-disk / Home / fr.
Details of GRUB on the PC. Abstract This description details the structure at the start of a hard disk in a PC, and how GRUB fits into that structure.

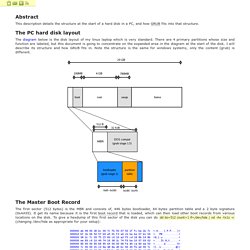
The PC hard disk layout The diagram below is the disk layout of my linux laptop which is very standard. There are 4 primary partitions whose size and function are labeled, but this document is going to concentrate on the expanded area in the diagram at the start of the disk. I will describe its structure and how GRUB fits in.
The Master Boot Record The first sector (512 bytes) is the MBR and consists of, 446 bytes bootloader, 64 bytes partition table and a 2 byte signature (0xAA55). Note there is no mystery about or dissassembly required of the blue section above as GRUB is open source and one can download, inspect and modify its stage 1 source code. The DOS compatibility region This region is optional as far as linux is concerned at least, but is added by default by most partition managers. Réparer Grub quand ubuntu ne veut plus démarrer - Parlons Geek. Ubuntu et beaucoup d’autres distributions Linux utilisent le boot loader (chargeur de démarrage) GRUB2.
Si GRUB2 est corrompu – par exemple, si vous installez Windows après l’installation de Ubuntu ou que vous remplacez le MBR – vous ne serez plus en mesure de démarrer en Ubuntu. Pour corriger ce problème je vais partager avec vous deux méthodes, une méthode graphique, et une autre via la ligne de commande. Méthode graphique : Boot Repair est un outil graphique qui permet de réparer GRUB2 en un seul clic. Ceci est la solution idéale des problèmes de démarrage pour la plupart des utilisateurs. Tout ce que vous avez à faire c’est de télécharger le live-CD de Ubuntu si vous ne l’avez pas dèja et de le graver sur un CD ou le booter dans une clé USB, puis insérer le cd ou la clé USB dans votre ordinateur et le redémarrer. Après avoir démarré dans le live boot de Ubuntu, ouvrez un terminal et exécutez les commandes suivantes pour installer Boot Repair : Réparer GRUB2 via la ligne de commandes :