

Kinect Motion Capture Tutorial. Tutorial 4 : Kinect Motion Capture Recording and Cleanup Disclaimer: This guide was created by Reuben Fleming, a free-lance Animator and 3d Artist.

Kinecthacks.com does not own this guide. Rather, by us sharing this in this in our website, we would like to share Reuben Fleming’s work to aid the Kinect community in better understanding the Motion Capture feature of the Kinect. Also, this move to feature his guide on our site is to give due recognition to creator of this guide. For more information about Reuben Fleming’s work, visit his website at For this tutorial you’ll need a PC, a copy of Motionbuilder and a b. You’ll also need to go to this site: Follow the instructions and download the software. Calibrate the tracking software so you can see white dots over your body. 1: Capture a take in Motionbuilder. 2: Once you’ve captured your animation turn off the live option in the Kinect device and create an Actor (See tutorial 2 for more info on actor creation and editing)
Motion Capture in conjunction with Unity. Animation transfer. <---Back So you need to transfer animations between scenes...
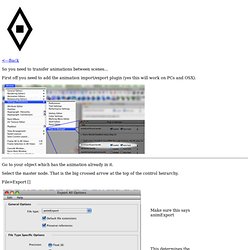
First off you need to add the animation import/export plugin (yes this will work on PCs and OSX). Go to your object which has the animation already in it. Select the master node. That is the big crossed arrow at the top of the control heirarchy. File>Export [] Open your new scene... file, or select a different object within your current scene. Reference! Reference! - free database for animation. Create Film-Like Animations with Autodesk Maya and Adobe After Effects. Step 1: Create Your Composition Before you do anything else, it’s extremely important to plan out your scene.

First, make sure you’re happy with the overall composition. This will give you a better idea of the scene and will keep you on track toward your goal. It will also make it easier to flesh things out later on. For this closing shot, we were as specific as we could be- we sketched out the landscape and environment all the way down to the placement of the flowers and where each would land. Step 2: Create a Matte Painting Once you have your composition laid out, it’s time for matte painting. Step 3: Break the Matte into Layers. Tech Art and Stuff: How To : Animate Cranks and Pistons in Maya. A recent project I worked on required the modelling of an animating crank and a piston similar to those used by steam locomotives.
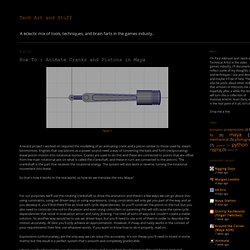
Engines that use pistons as a power source need a way of converting the back and forth (reciprocating) linear piston motion into rotational motion. Cranks are used to do this and these are connected to points that are offset from the main rotational axis on what is called the crankshaft, and these in turn are connected to the pistons. The crankshaft is the part that receives the rotational energy. The system will also work in reverse, turning the rotational movement into linear. So that's how it works in the real world, so how do we translate this into Maya?
For our purposes, we'll use the rotating crankshaft to drive the animation and there's a few ways we can go about this; using constraints, using set driven keys or using expressions. Expressions (unfortunately) are the only way we can solve this accurately. Ultimate Rigs - Maya rigs, Maya Character rigs, Free Maya rigs. Maya Rigging Tips and Tricks 2.43K Views0 Likes Maya Rigging Tips and Tricks by Daryl Obert This is rigging video on Maya tips and tricks Daryl Obert presented at AU/CAVE 2013.

These are aimed at the beginner to Intermediate Maya user but old pro's will probably g... Making of Disney’s Frozen Snow Simulation 44.91K Views0 Likes Making of Disney's Frozen: A Material Point Method For Snow Simulation Snow is a challenging natural phenomenon to visually simulate. 3. Simple Character Rigging - Body. Rigging Wires using Maya. Maya User's Guide: Parent constraint example workflow. Quickly Rig Tentacles & Tails in Maya with Tentacle Script. Maya User's Guide: Pole Vector constraints. Game Rigging - maya rigging wiki. Basically the principles are the same but games are more restricted in what you can use to create the deformations you require. basically we use joints for everything as the engine can build joints cheaply (sometimes we use blendshapes (morph targets) but in some of our engines were limited n the number we can use, and how many can be used simultaneously, so we avoid these if we can). but unless the programmers have coded in support an particular deformer, or setup an in game real time deformer, you cant use things like lattices, clusters, wraps, dynamics.... ect also one of the main things we do is keep the joint hierarchy separate and clean, as in a joint can only be parented to another joint (not a group under another joint with an offset position) well that's how Ive found it although there are some people who stick to anatomy, but when it boils down to it all if it deforms better that's the right position.

(andylt1)