Zoom
Trash

WobiSobi: Re-Style#54, Five Minute Draped Vest #2. This Re-Style will be slightly different, because I am adding video instructions.

Gasp! That's right, I am jumping off the dock and into the dark, cold waters of the unknown. Tutorial Things you need Extra large, Shirt Mens Shirt * I use Hanes Tee-shirts.Scissors Cut where the red marks are. Here is a quick video on how I did itWATCH ME. I hope this video explains it for you. Please leave an Email if you have any questions, so I can reply back to you. How I wore this VestHERE. You can also use it as a scarf , just wrap around your neck and pull one end through the hole. some other vests I have made are Have a wonderful day.
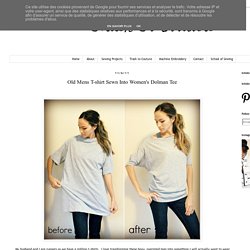
Lots of <3, Anne. Old Mens T-shirt Sewn Into Women's Dolman Tee. My husband and I are runners so we have a million t-shirts.

I love transforming these boxy, oversized tees into something I will actually want to wear other then for a nightgown. I love this heather grey and wanted to make it into my favorite style tee. I love the comfortable, effortless style of the dolman tee... It took me about 15 minutes or so. I played around with seams to get the fit right. Supplies: DIY intructions: Full Video go here (it's old though). Begin by removing the collar of the shirt, pull to create an off the shoulder look. Mark your 1/2 your hip measurement inside the t-shirt so it's even. Pleat about 4 inches up by folding accordion folds and pinning through front and back. Mark your arm hole measurement and pin from the under arm seam to that measurement. When you sew, start at the bottom hem and sew up to the under arm seam in a gradual line.
Cut all the excess interior fabric away or serge the interior. ¿Qué es Furoshiki? Furoshiki es una tela cuadrada, de una amplia gama de colores y diseños, utilizados para el transporte y el almacenamiento de las cosas, así como para envolver regalos.

También pueden utilizarse extendidos sobre el piso, los muebles, o incluso para decorar una habitación. El palabra Furoshiki, proviene de FURO-SHIKI, que significa literalmente "extender en el baño", tiene su origen hace más de 1200 años en Japón, a mediados del periodo Edo (1603-1868). Antiguamente se utilizaba en las duchas tradicionales japonesas (“Furo”), en éstas se extendía (Verbo=”Shiku”) esa tela en el suelo, para dejar su vestimenta encima de ella y no confundirla con la ropa de otro. Por este motivo, fue denominado: “Furo-shiki”. Poco a poco, llegó a ser usado como una envoltura para llevar una muda de ropa y artículos de tocador. Los Furoshiki fueron utilizados durante las bodas también. Hasta hace 50 años, el Furoshiki era una herramienta común para los japoneses.
Kimono DIY. I’ve been seeing kimonos everywhere, so I decided to try a Kimono DIY!

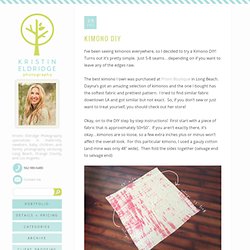
Turns out it’s pretty simple. Just 5-8 seams…depending on if you want to leave any of the edges raw. The best kimono I own was purchased at Prism Boutique in Long Beach. Dayna’s got an amazing selection of kimonos and the one I bought has the softest fabric and prettiest pattern. I tried to find similar fabric downtown LA and got similar but not exact. Okay, on to the DIY step by step instructions! Cut the fabric in half lengthwise and the fold it in half. Pin the right sides together half way down and sew them together. I like to finish it with a french seam (which just means folding the edges in on each other so they don’t fray).
Pin and hem both of the open sides. Fold your fabric in half (right sides together) with the seam in the middle. I decided to leave my arm holes raw since the selvage won’t fray, but you can sew a seam here if you want. You can also leave the hem around the bottom raw or finish with a trim. DIY kimono cape. Continuing with the oriental trend… I wanted to make the garment of the moment.

It was “in” last summer but we see it coming back this spring. The kimono. I wanted to make a simple tutorial for all… It doesn’t matter if you don’t have a sewing machine, you can make yours just using scarves, a needle and thread. It’s a kimono-cape version and I’m sure you will not want to take it off this spring. Materials: 1 large square scarf or 2 small.
Process: Pinterest. Pinterest. Pure Villain: DIY Zipper Tank Top. I've got an easy idea to specialize your random tank top :) You will need : a tank top a zipper pins a sewing machine place the zipper on the straps of your tank top down the back of it with some pins.sew along the sides of the zipper and the strapsadjust the opening of the zipper as low or as high as you want Done :)
