

Interactive materiality. Through extensive testing I found a way to create an ultra thin DIY bend sensor on paper by combining conductive ink and paper creases.
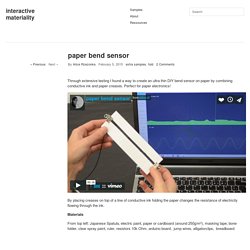
Perfect for paper electronics! By placing creases on top of a line of conductive ink folding the paper changes the resistance of electricity flowing through the ink. Materials From top left: Japanese Spatula, electric paint, paper or cardboard (around 250g/m²), masking tape, bone folder, clear spray paint, ruler, resistors 10k Ohm, arduino board, jump wires, alligatorclips, breadboard 1. 1) To make the stripe of conductive ink cover the parts of the paper that you don’t want to paint with masking tape. 2) Now use the spatula to spread the paint evenly. 3)Once it is dry cover everything with clear spray paint to seal the conductive ink and prevent it from smudging. Printable Matters. FlexiON Alice Rzezonka A simple sheet of paper is turned into a lamp by a clean and straightforward interaction: Simply by folding the light is turned on Drench Glow Dorothee Clasen Using the qualities of paper as an interactive material with it's own aesthetic.

Crease Speakers Carolina Menezes Crease is a concept for a low-cost, portable speaker. David Hartgenbusch RISE combines the aesthetics of paper with polytronic (printable thin electronics) and LED technology. Control Levels of Light with an Electric Paint Bend Sensor - Bare ConductiveBare Conductive. Designer Alice Rzezonka wanted the act of switching a light on or off to be more tactile, and started exploring sensors on paper: “I developed this sensor for the concept lamp flexiON, which was part of the project Printable Matters.
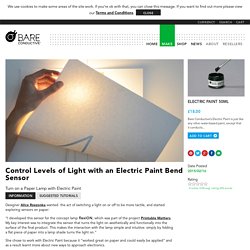
My key interest was to integrate the sensor that turns the light on aesthetically and functionally into the surface of the final product. Crease Speakers « Printable Matters. Crease is a concept for a low-cost, portable speaker.
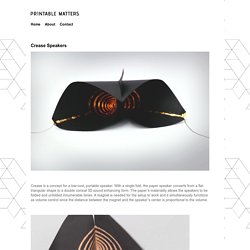
With a single fold, the paper speaker converts from a flat triangular shape to a double conical 3D sound enhancing form. The paper’s materiality allows the speakers to be folded and unfolded innumerable times. A magnet is needed for the setup to work and it simultaneously functions as volume control since the distance between the magnet and the speaker’s center is proportional to the volume. The speaker can easily be transported in its folded shape; inside a laptop sleep, in a folder, etc.
This allows for it to be used in occasions where music is needed without too much of a hassle. The ideation process started with experiments in paper to better understand, the material’s capabilities and qualities. Building on other experimentations published online (highlowtech.org/? Making a Touch Sensitive Circuit with Electric Paint. Glowing Bean Bags with EL Wire. Building a 555 Noise Maker with Bare Paint. Circuit Playground. Magnetic Pendulum.
GRYNX » TicTac flashlight. Paper LED torch light by kazuhiro yamanaka. May 23, 2013.

StarryNight: Paper Circuits and Astronomy for Kids! Ever looked in a sky full of stars and wondered what you were looking at?

Where's the north star? Where's the Great Bear? Well, here's presenting - 'Starry Night' a great educational tool for Kids (and maybe adults) to learn about astronomy and electronic circuits [open and closed circuits] at the same time! This project was inspired by Leah Buechley and Jie Qi's Computational Sketchbook at MIT. 'Starry Night' has one big huge circuit which has all the stars [blue LEDs] connected in parallel in this circuit. To build this, you will need: Lots of Copper Tape 3V coin cells [6] LEDs [about 60 LEDs were used in this project] Copper Foil [since its conductive both sides, it was used to activate switches] Long fingernails [optional but HIGHLY RECOMMENDED - to help smooth the bumps while making a circuit or even to fold the copper tape while making sure its still conducting electricity] Soldering Iron This was done in collaboration with Hitesh Maidasani. Magic Train Puts Kids on Track with Physics of Magnetism.
Assembling a simple wooden train and track with cleverly placed magnetic strips lets kids experiment with a train that levitates off the track and zips effortlessly from one end to the other when pushed.
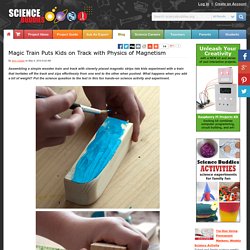
What happens when you add a bit of weight? Put the science question to the test in this fun hands-on science activity and experiment. How to Build a Simple Electromagnetic Train. STEAM Project: Tiny Dancers (A Homopolar Motor) Today we are getting a bit artsy with our science!

Does the idea of making a wire sculpture that “dances” entice you……? Tiny Dancers is the third project in our collaborative series STEAM POWER: Empowering kids to explore the world through creative projects. Today’s topic is HARNESS! Because harnessing refers to making use of resources to produce energy we decided to try making a homopolar motor. A homopolar motor is probably the simplest DIY motor you can make. Make motors that dance! This post contains affiliate links to products I love and recommend to my readers. Neodymium magnets are extremely strong and MUST BE KEPT OUT OF REACH OF SMALL CHILDREN! Also please note that these motors do heat up. Edwin Sanook (makedo/littleBits elephant): a littleBits Project by littleBits.
Step 1.

Based on the instruction sheet inside the makedo Elephant kit, prepare all your materials. Most of the materials can be found in your recycling bins. You will need a shoe box, two paper plates, four plastic cups, two coffee cup lids, one take-out tray, a paper towel tube, and a sheet of cardboard. Although the circuit seems complicated, you'll find it's not too difficult as you start snapping all the pieces together. We know it seems intimidating, but fear not! Step 2. Paper_circuits.pdf.