
26 Fabulous Macrame Bracelet Patterns. [ Close Privacy Policy ] Privacy Policy / Your California Privacy Rights Revised and posted as of November 9, 2015 Prime Publishing, LLC ("Company," "we" or "us") reserves the right to revise this Privacy Policy at any time simply by posting such revision, so we encourage you to review it periodically.

In order to track any changes to this Privacy Policy, we will include a historical reference at the top of this document. This Privacy Policy will tell you, among other things: Your California privacy rights. ACKNOWLEDGEMENT/YOUR AGREEMENT Company websites are not intended for use by individuals under the age of 18 or those who are not legal residents of the United States. HOW DO WE COLLECT INFORMATION AND WHAT INFORMATION DO WE COLLECT?
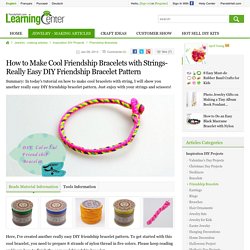
Distribution Partners Website operators that license our ad serving technology pass information to us so that we may serve advertisements to you. Website Registration Forms We collect information about you when you register on one of our websites. 20 Fabulous Macrame Bracelet Patterns. How to Make Cool Friendship Bracelets with Strings- Really Easy DIY Friendship Bracelet Pattern. Here, I've created another really easy DIY friendship bracelet pattern.

To get started with this cool bracelet, you need to prepare 8 strands of nylon thread in five colors. Please keep reading and learn how to finish the easy cool friendship bracelet. Materials for making cool colorful friendship bracelet: 1mm Nylon Thread (5 colors) Lighter Scissors How to make cool colorful friednship bracelet with string? Step1: Prepare the necessary strings In this project, you may need the following thread strands: 120cm Magenta *2 50cm Green *1 50cm Blue *1 50cm Yellow *1 50cm Golden *1 Step2: Make a loop by two magenta strands 1st, find the center locations on two Magenta thread strands and begin to tie Chinese Snake Knots from there.
Step3: Deal with the easy DIY friendship bracelet While handle this easy DIY friendship bracelet, you can either decide to tighten or leave the threads loose with one accord. Chinese Knotting Tutorial- How to Tie a Snake Knot. This is the other way to tie a snake knot, whose process methods are different from the snake knot tutorials we've given before.it does really functional because it makes an awesome chain pattern.

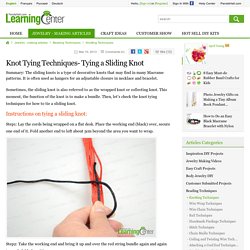
Step1: Prepare two cords, about 80cm long at least. In this Chinese knot tutorial, I adopted two colors, black and red; Step2: Nip one end of both cords in your hand. Next, wrap the black working end for two full turns around the index finger and red cord; Step3: Direct the red working end through the coils from back to front, over the tail of black cord end; Step4: Take off all turns from your fingers, tighten gradually; Step5: Arrange you cord loops and this is a separate snake knot; Step6: To work the next knot, just loosen the latter black loop; Step7: Rotate the red working end in a clockwise direction, passing under the tail of black cord end; Knot Tying Techniques- Tying a Sliding Knot. Sometimes, the sliding knot is also referred to as the wrapped knot or collecting knot.

This moment, the function of the knot is to make a bundle. Then, let’s check the knot tying techniques for how to tie a sliding knot. Step1: Lay the cords being wrapped on a flat desk. Place the working end (black) over, secure one end of it. Fold another end to left about 5cm beyond the area you want to wrap. Step2: Take the working end and bring it up and over the red string bundle again and again towards folded position.
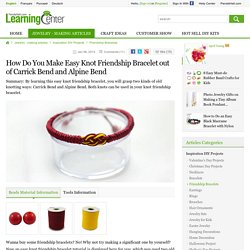
Step3: Do wrapping with the working end continually. Step4: When making the knot in a right size, lead the working end through the loop (folded position). Step5: Pull the secured end inside the knot for more secure. Sliding knots have been finished! How Do You Make Easy Knot Friendship Bracelet out of Carrick Bend and Alpine Bend. Wanna buy some friendship bracelets?

No! Why not try making a significant one by yourself? Now an easy knot friendship bracelet tutorial is displayed here for you, which was used two old kotting ways: Carrick Bend and Alpine Bend. Hope you will like it!