background preloader

DIY: Laundry Room Drying Rack
DIY: Laundry Room Drying Rack
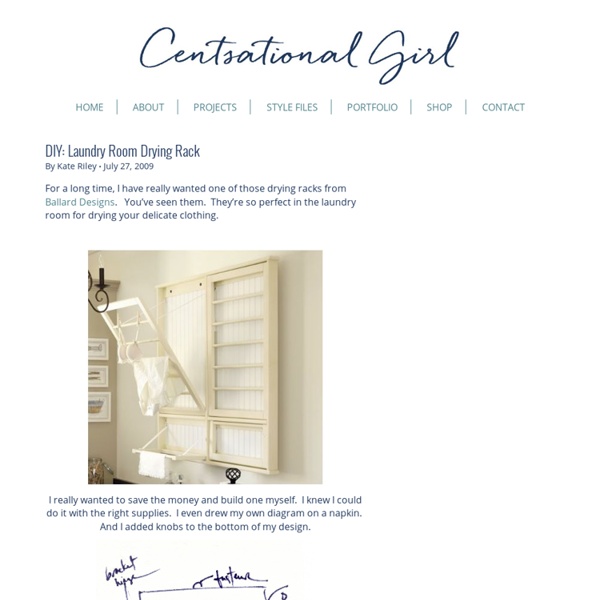
For a long time, I have really wanted one of those drying racks from Ballard Designs. You’ve seen them. They’re so perfect in the laundry room for drying your delicate clothing. I really wanted to save the money and build one myself. Here’s a look at the final result: This is the perfect solution for drying all of my delicates! How to Build a Laundry Room Drying Rack + Supplies: 2 x 2’ precut birch (1/2 inch thick)Two 1/2 x 2” poplar boardsTwo 3/8” dowel rods (48” long)Sash lockNarrow loose pin hinges (set of two)D ring hangers for mounting on wallBracketed hinge for side (or chain with small screw eyes)Three white porcelain knobsPrimer and paint of choice Necessary tools: Drill bit set, including 3/8 inch drill bit, screwdriver, framing nails, a hammer, and a saw. Step One: Measure and cut your 1/2 inch x 2 boards to fit the 2 x 2 precut birch. Step Two: With your 3/8 inch drill bit, drill holes for your precut dowel rods. Step Three: Finish assembling your rack with framing nails.

a handmade mother’s day gift I decided this year, for mother’s day, to do something a little different. My sister in law had a little something like this hanging in her bathroom, and I remember eyeing it about a year ago, thinking I totally wanted to make one: the perfect little garden shelf/jewelry holder/bathroom shelf for the space in need of a little umph. So, what better opportunity than mother’s day? I’ve had this collection of crusty white shutters for a while now. 1. 2. 3. * you will also need: {not pictured but painted blue in the finished piece} a 9″ key rail {you can find this in the hardware section of home depot} • a picture hanging kit + screws *before I began assembly, I attached the picture hanging kit on the back of the shutters. 1. 2. + 3. TADA! *that was a default distraction tactic. And there you have it! I’m linking up! [pinit] Be Sociable, Share!

Steal This Look: Scandinavian Holiday Decor Ideas Older Steal This Look: Scandinavian Holiday Decor Ideas by Sarah Lonsdale Issue 50 · Holiday Gifts · December 14, 2010 Newer Issue 50 · Holiday Gifts · December 14, 2010 Share on email Why is it that the Scandis always seem to nail it when it comes to design, even holiday decorations? Above: Swedish company Ferm Living offers the felt Garland in natural-colored wool for €34. Above: An advent calendar spotted on Emmas Design Blogg features paper-wrapped gifts attached with wooden clothespins to a felt backdrop. Above: Candles in simple clay pots filled with moss via Kjerstis Lykke. Above: A white painted branch with Kraft-paper wrapped gifts makes a minimalist advent calendar, via The Style Files. Above: Simple garland fencing at Axel Vervoordt's recent Winter Exhibition; photo via Belgian Pearls. Above: Presents wrapped with Kraft paper and silver ribbon via Fabulissime. Restaurant Visit: The Tipsy Parson in New York By Allison Bloom Design Sleuth: Simple Red Reading Light By Julie Carlson

DIY: Tree Pedestal Cake stand | DIY Wedding Blog I’ve realized after blogging for a little over a year how much sucker I am for anything rustic. Yes, the theme has been used a lot recently in weddings, but I still love it and I don’t think anything says more “woodland rustic chic” than a cakstand made out of real wood. Are you throwing an indoor wedding and having diffuculty bringing the outdoors in? How about surprising guests with 4- 5 log stands on a dessert table with mini cakes and pies on top and flowers scattered everywhere? Laurie, thank you again for such a lovely project! What You’ll Need A Cross-Cut Wood Plaque (round or oval) A Cross-Section of a Tree Limb (Make sure the top and bottom are parallel) Titebond Ultimate Wood Glue (or a similar extra strong wood glue) A Large Wood Clamp Resources: Cross-cut wood plaques can be found in your local craft store or online at Hofcraft. 1. 2. 3. 4. What it Cost Wood Plaques $3.99 – $5.99 each Tree Limb – Free from our wood pile! Wood Glue – $3.35

Thrifty and Chic: furniture So, this is one of those stories of getting something and having it sit in your basement for years. Like 7 or so years. Yep. Back in the day, we went to a furniture store....I'm sure to get furniture or something :)...but I don't remember what we got, if anything. I actually did do something with two of them. I've been seeing these floor poufs everywhere now, and decided it was about time to make one when I remembered these little cubes. These were so easy to cover. I measured the sides and added an inch for seam allowances. Each side was 10"x17.5" so I cut four of them at 11"x18.5". So, here are all the pieces: I found the best way to cover anything is to do it inside out first. I laid the top down first, and then secured two sides with some pins. Then, secured the other two sides with some pins. Next, I secured each side to the side next to it. Here it is all together. Next was creating the bottom seam. And then turned it right side out, and put it on the mattress cube!

How About Orange I had a fun mail day recently: one of my packages contained a 2013 calendar gift from Italian designer Simone Massoni. Called "Chicks and Types," Simone has illustrated a series of pin-up girls and paired each one with a featured typeface for every month of the year. A few of the ladies are a bit spicy and missing their tops, and I'm too bashful to show you those. But here's a sampling of the more modest pages. There's a Sherlock Holmes girl! I'm completely charmed by the illustration style, the interesting color palette, and the deliciously thick, soft paper stock. Calendars are available in Simone's Etsy shop. P.S. "It's funny how you picked Rosa as the main image for the post, since it's one of my faves. Just for people to know, every pin-up has a story. Fabrizio is named after Federico's father, who the font has been dedicated to. Now we can appreciate this page even more!

A Project for Fall! Hello my blog friends! I'm so pumped to share a project I finished today! It's simple, cheap, quick, and fall-y (yes, that is a word). Anyway... I've been diligently collecting these for what seems like forever: Why? [Side note: please pin from the original source so the credit goes to the right person! But I also love projects involving trees/branches like these: Then, I saw this yesterday and even though it's not made from toilet paper rolls, I thought, hmm.... color behind the toilet paper rolls? So basically... What you need: 1. 3. How to do it: 1. 2. 3. 4. 4. 5. 6. It's so.. fall. And I love that I used things I already had in my craft stuff and I recycled toilet paper rolls! Would it be bad to keep it up all year? Update: here are some more pictures that I took in better lighting! Looking for more toilet paper projects?

High Functioning Coat Hooks Back in Los Angeles, any old coat rack or a few hooks by the door would do. Most of us would just toss a jacket in the back of the car in the winter months. But here in Vermont we need a little more. Many of the vernacular farm houses I visit have at least a half dozen hooks per person lined up in their mud rooms. Materials, for each hanger you'll need: One cleaned or refinished paint can. 2 screws long enough to reach into wall studs. Tools: Long handled screwdriver or screw gun with sufficient extensions to reach bottom of can. Step one: With the handle in a horizontal position, layout and make 2 small mounting holes at the top and bottom of the can within an inch or less of the edge. Step two: locate and mark stud position on wall for upper screw position. Step three: Screw through the upper hole of the can into the wall stud but not quite snug to the wall. Step four: Straighten the can and screw through the lower hole of the can into the wall stud snug to the wall.

Ballard Knock-off I am joining Happy to design for Sunday Favorites which is a chance to re-run your favorite post. I chose the Ballard Knock-off post because it seemed to be my readers favorite. This post received twice the comments of any others. The first two photos below are of a print in Ballard's catalog which sells for $349.00 plus $100.00 in shipping cost. First I searched the free sites for a antique style document I could download. My local copy shop was able to enlarge the print to poster size, approximately 24 x 36. I then stained just the edges of the board and burned the edges of the poster with a match. I applied Mod Podge to the board and the back of the print and then used a credit card to smooth out the wrinkles. My cost break down for Ballard style print: Digital download $ 3.75 Enlargement $12.00 Board $12.00 ______ Total cost $27.75 I had the stain and Mod Podge left from another project . I love the results and it was a really easy project! Sherry

Related: