background preloader

How to Build an Earthbag Roundhouse

How to Build an Earthbag Roundhouse
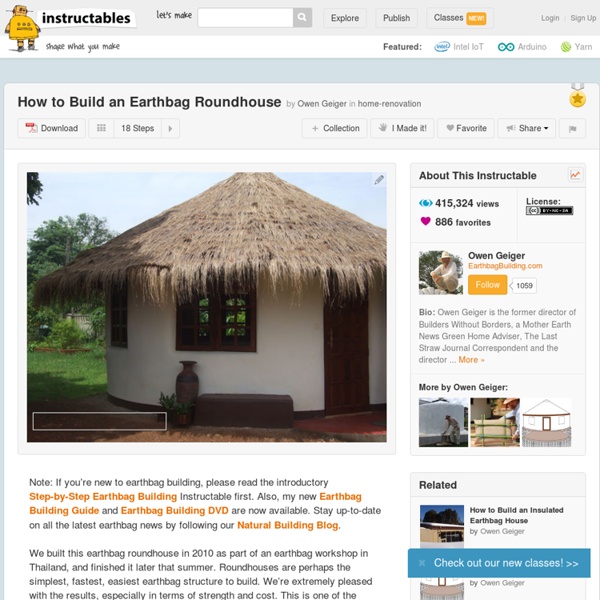
Note: If you’re new to earthbag building, please read the introductory Step-by-Step Earthbag Building Instructable first. Also, my new Earthbag Building Guide and Earthbag Building DVD are now available. Stay up-to-date on all the latest earthbag news by following our Natural Building Blog. We built this earthbag roundhouse in 2010 as part of an earthbag workshop in Thailand, and finished it later that summer. The other key advantage of earthbag is cost. Basic project information: 18’ exterior diameter; 15’ interior diameter; 177 sq. ft. interior floor space; total cost of materials: $2,045, which is about $11.50/square foot The following instructions assume you have cleared and leveled the site, removed topsoil, positioned fill soil around the building site to minimize work, dug a trench to stable subsoil, buried any utilities, put about 12” of gravel in the trench, and added a center pole with stringline to measure the radius.

How to Build an Earthbag Dome Note: If you’re new to earthbag building, first read the introductory Step-by-Step Earthbag Building Instructable and How to Build an Earthbag Roundhouse . Also, my new Earthbag Building Guide and Earthbag Building DVD are now available. We built this earthbag dome at our home in Thailand for Mother Earth News Magazine in 2007. The article that describes the complete building process in detail was published August/September 2009. This earthbag dome Instructable simplifies the process and illustrates each step of construction with photos. This multi-purpose dome can serve as a storage shed or cool pantry above ground, or as a rootcellar or storm shelter below ground. Earthbag structures provide a cool space in summer and an escape from the cold in winter (ideal for humans and animals), which means this earthbag dome is well suited for many purposes, like a quiet space for relaxing or playing music, as well as those listed previously.

Cigar Box Ukulele Materials: Cigar Box. If you have a choice, find one of solid wood. I found a cedar box with a plywood base. I paid 4$ for mine, but it shouldn't really cost more than 2$. Wood for the neck and bridge - for a concert sized ukulele I needed a 14 x 2 x 2.5 inch block for the neck and head. Wood for the lid supports: the cigar box will vibrate with the strings. Wood for the inside supports: These will go around the edges of the box for added strength and for a place to anchor the neck. Wood for the fretboard: I chose red oak. Material for the saddle and nut: I used dominos, which I cut down to size. Material for the frets: I actually bought brass welding wire for the frets, but ended up inlaying crushed turquoise instead. Fret markers: Ukes are usually marked at the 5th, 7th, and 10th frets. Ukulele strings: see your local music store. Tuners (set of 4): I took the tuners from a busted kid's electric guitar I got at a thrift shop. Wood Glue Epoxy Tung oil and mineral spirits (optional)

Step-by-Step Earthbag Building This Instructable explains each main step of construction for building vertical earthbag walls. Videos on my Earthbag Natural Building YouTube channel demonstrate the process. For those who don’t know, earthbag building uses polypropylene rice bags or feed bags filled with soil or insulation that are stacked like masonry and tamped flat. Barbed wire between courses keeps bags from slipping and adds tensile strength. The final plastered walls look just like adobe structures. Thousands of people are now building with bags to create their dream homes, home offices, shops, resorts, rootcellars, storm cellars and survival shelters. I got involved with earthbag building when the Indian Ocean tsunami hit Southeast Asia in December, 2004. Our websites at EarthbagBuilding.com and Earthbag Building Blog explain just about everything you need to know for free.

Tiffin Box from Tuna Cans The can rolling jig consists of two old door hinge pins and a hose clamp. The heads of the hinge pins nest with each other. By applying pressure with the clamp and rolling the can, we can raise a lip on the can's side. Check out the embedded video in the next step to see it in action. Building the jig is very easy. The top pin will stick out further than the bottom on account of the heads being nested. Use a vise to clamp the wood and hold the whole thing steady. 12 Storage Tote Shelving System $50.00 Hello all! Today I wanted to share with you how I made my storage bin shelving system for my garage. It holds 12 totes! I have over 40 totes in my garage. I decided to make one for a lot less then the going price so I went to my home improvement store and did the measurements!

How to Pack: Shipping Big Science Anyone who has ever packed anything, from a homemade ceramic mug that you only need to get across the state, all the way up to this telescope that needs to cross many continents, knows that shipping can be a dodgy proposition. The secrets are to have 1) a structurally sound box -- one that isn't going to crush or crumple, and that is well-supported and braced on the inside and 2) make sure the item you are packing is surrounded -- tightly packed -- with material, or generally otherwise constrained -- so that if the box is impacted, the object experiences little of the force. Packed, literally. The ART crew did all of this with very high quality materials (e.g. no two-by-fours -- all milled lumber), the right types of materials (angle brackets when necessary, stiff foam when necessary), a clear minimum of excess packing material, very exact measurement and fitting tolerances, and a generally all-around incredibly high level of expertise.

Lawnmower Power Generator With A Twist This is a 500 watt power generator big enough to power tools, and home electronics. If you try plugging in kitchen appliances, heaters, window AC units etc....it will shut down, you need a 2k-3k watt power converter for large power comsumption appliances.. It's not difficult to build this project, if you know how to wrench things apart and have a basic understanding of how things work with engines and electrical components then you'll do just fine. If you want to save money on the build, go to junkyards, recycling centers, and landfills which is where I got most of the parts. You'll be surprised the stuff you can find for pennies or better yet FREE. There are a few optional parts not needed to run this little power jewel.

Table belt sander (lijadora de banda, de mesa) Hace unos meses me regalé una lijadora de banda. Es una excelente herramienta, versátil, resistente, poderosa. Pero... siempre tiene que existir un "pero". Ayer estaba a punto de volver a hacer lo mismo, pero se me ocurrió buscar la manera de poder fijarla sobre la mesa de trabajo para no correr más riesgos. Publico este instructable porque estoy seguro de que le será útil a más de uno. A few months ago I bought myself a belt sander. Yesterday I was about to do the same, but I decided to find a way to fix it on the bench, not to take more risks.

Related: