background preloader

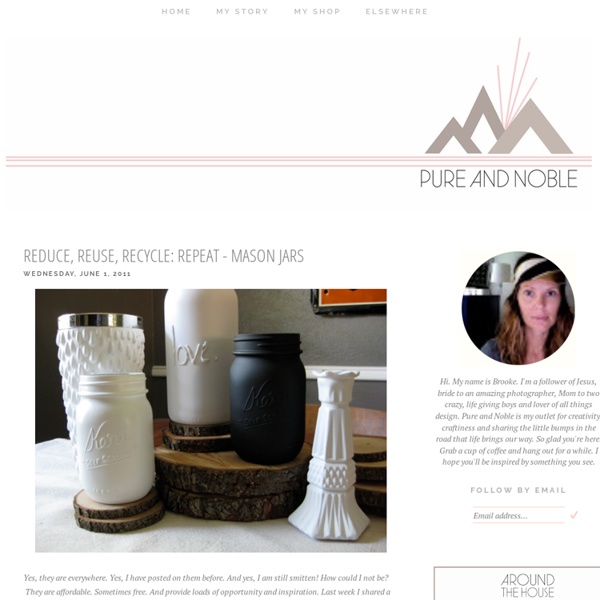
Reduce, Reuse, Recycle: Repeat - Mason Jars

Reduce, Reuse, Recycle: Repeat - Mason Jars
Yes, they are everywhere. Yes, I have posted on them before. And yes, I am still smitten! How could I not be? I should note...I'm a little obsessed with how the matte black came out and have more outside drying as I type this. Then, in my Pinterest crazed obsession, I found this little DIY image. This led me to trying my own version with a milk jar, fabric marker and glue gun.... She's not perfect, but I love that about her. For all you DIYers with questions on how to or the materials used for this project...I did a follow up post that can be found here. Related:  DiY

Colored Mason Jar Tutorial Today's DIY project is painting mason jars your favorite color! I made mine turquoise. I love mason jars! They have an endless amount of uses and really just add an extra cuteness to everything. My favorite are the aqua Ball jars, but they are always so hard to find at thrift stores and shipping prices when buying them off Etsy or Ebay are not friendly. What you'll need: Vitrea paint in the color of your choice Paint thinner (optional) Paint brush Mason jar Small dish Squirt a pea-sized dab of the Vitrea paint onto the small dish. Put your mason jar on a paint-friendly surface. Once the jar is completely painted it needs to dry for 24 hours. After the jar cools you can add some pretty lace and twine if you'd like, and it's ready for flowers, or anything else you want to store in a pretty jar. Enjoy!

» Sweet DIY Votives - Fellow Fellow Here’s what you’ll need: 1. Measure the height and circumference of your jar, and cut strips of fabric to roughly fit (approx. 1cm wide – doesn’t have to be perfect). 2. In your small cup, pour in some glue and dilute it with a bit of water (about 1:2), mix well. It should be the consistency of slightly thicker water.. yes, I know I’m being vague but it shouldn’t make much difference to the end result. 3. Note: – I find that it’s ok to have fabric going above the top of your jar because it can be easily cut off after it’s dried. – I don’t mind the look of the overlapping lines of fabric once the candle is lit, but if you do try not to overlap the strips in the gluing process. ** Please only use only battery operated tea-lights (not real candles). Thank you, your sign-up request was successful! Given email address is already subscribed, thank you! Please provide a valid email address. Oops. Other posts you may like:

The Burlap Bag - High Quality Handmade Goods Shop - Austin Texas December 20, 2011 by Lauren (Check out our new ONLINE SHOP for The Burlap Bag!!) We have two cats. What you need: A container (we used these) Baking sodaEssential oil Foil (or a lid you want to ruin and poke holes in) This gets really complicated so pay attention…. 1. Oh. Well, add a lid if you want. Seriously the easiest thing I’ve ever done. Done. Follow us for instagram for updates! (p.s. we’ve had a lot of people email us asking where to get those jars! Sorry, the comment form is closed at this time.

Glass jars turned vintage Lately I've been intrigued by those lovely vintage blue glass jars you see on the tables of chic outdoor weddings. I did a little bit of research on these, to see how economical they were in bulk, and found that they can range anywhere from $5-$15 per jar, depending on how rare they are. I was a bit surprised by this, and thought there had to be a better way to achieve the same look, so I went in search of a way to "dye" a regular quart sized jar, to mimic the look of the old Ball Perfect Mason Jars. Here's my photo recap: I used a product called Vitrea 160, which is a transparent color for glass, in a shade called turquoise. I flipped my jar upside down and placed it into another plastic tupperware container, then brushed the outside of the jar with the mixture in thin, even strokes from top to bottom. The best part of this project (besides the fact that it's super easy) is that it's cheap. NOTE: This project is best suited for use with flowers and water, rather than with candles.

6 huiles qui favorisent la pousse des cheveux - Améliore ta Santé Généralement, nous donnons beaucoup d’importance à la santé de nos cheveux, car ils sont exposés à de nombreux facteurs qui peuvent les fragiliser et provoquer des problèmes comme la chute ou la sécheresse. De nombreuses personnes recourent à des traitements commerciaux pour revitaliser leurs cheveux et stimuler leur pousse. Cependant, une grande majorité de ces traitements n’apportent pas les résultats espérés et ils sont trop coûteux pour être utilisés fréquemment. Heureusement, il existe des manières plus économiques et efficaces pour réparer les cheveux afin qu’ils soient en bonne santé. Dans cet article, nous allons vous présenter des huiles naturelles qui disposent de nombreuses propriétés pour prendre soin des cheveux et les rendre sains et épais. L’huile de coco L’huile de coco est composée de triglycérides de chaîne moyenne, qui ont la capacité de pénétrer dans la membrane cellulaire des cheveux pour les nourrir en profondeur. Comment l’utiliser ? L’huile d’olive Comment l’utiliser ?

DIY Glow Jars Tutorial Posted on October 19, 2011 by Christina Aren’t these glow jars sublime? They take about two minutes to make and cost only 20 cents a piece. These would look amazing at an evening outdoor wedding. If you like this project, check out my DIY ‘glitterarium‘. DIY Glow Jars Tutorial For each glow jar you will need: a jartwo Glow Sticksscissorsrubber glovessafety glasses Disclaimer: This is a project meant to be done by an adult – not a child! Purchase Glow Sticks (I got a pack of 15 for $1.50) and dig a jar out of your cupboard. Grab two glow sticks and cut at one end.

DIY Centerpieces Made Out of Egg Cartons and Vintage Buttons Posted on June 2, 2009 by Christina I made these whimsical DIY centerpieces from egg cartons and vintage buttons. My Blue Box is nearly always overflowing with egg cartons. I’m always dreaming up ways to turn them into craft projects – and this is one of my latest. These were inspired by my post last month on Cute as a Button weddings. If you are looking for DIY centerpieces that are super cheap and easy to make (albeit a bit time-consuming), give these a whirl. Cost: $2 – $3 per dozen (Assuming you already have acrylic paint and buttons on hand.) Materials: One paper egg carton 12 pipe cleaners 24 gauge wire Buttons Acrylic paint in your choice of colors Floral tape Scissors Paper clip Varnish (optional) Glue (I used wood glue, but regular white glue should do the trick.) Find a paper egg carton. Remove the egg carton cups using scissors. Cut the egg carton cups into various flower shapes. Paint the cups using acrylic paint. Glue the triangular shape to the middle of the flower and let dry. Presto!

Astuce naturelle pour traiter les pieds secs et fendillés L’hiver est terminé et si vos pieds sont secs et fendillés, il est grand temps de faire quelque chose pour pouvoir les découvrir et mettre des chaussures ouvertes. Les pieds secs, fissurés, ayant des callosités ne sont pas vraiment attrayants.Si tel est votre cas, ne paniquez pas. Nous avons la solution parfaite. Le traitement que nous vous proposons est simple et facile à faire à la maison. Avec ce remède, vos pieds redeviendront très vite lisses et beaux. Ingrédients : 4 à 5 L d’eau tiède2 cuillères à soupe de bicarbonate de soudeUn gant de gommage ou une pierre ponceUne crème hydratanteL’huile essentielle de lavande (facultative) Préparation : Ajoutez le bicarbonate de soude à l’eau tiède et remuez jusqu’à dissolution. Faites tremper vos pieds dans ce bain pendant 15 à 20 minutes. Appliquez une bonne couche de crème hydratante contenant de la glycérine, ou tout simplement enduisez vos pieds avec un peu d’huile de noix de coco ou de la vaseline. Ce bain de pieds est relaxant.

Related: