
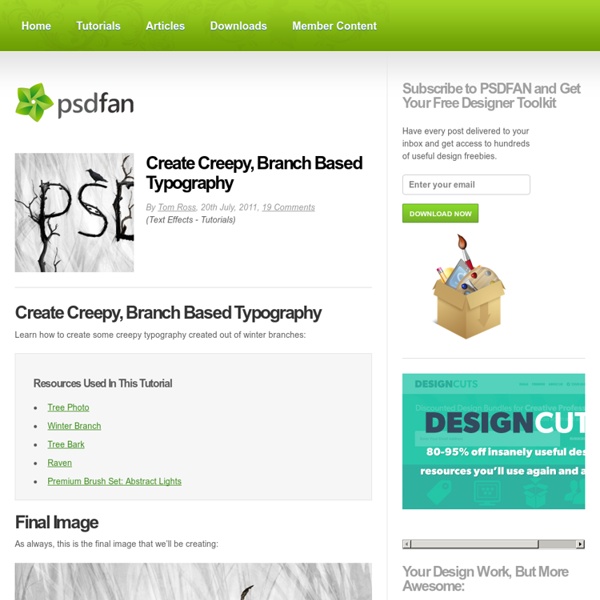
How to Create an Abstract Wireframe Text Effect In this text effect tutorial we will demonstrate how to create an abstract wireframe text effect. Let's get started! Let's start by creating a new document which is 900 px wide and and 600 px high at a resolution of 300 pixels/inch. Make sure the Color Mode is set to RGB. Fill the "Background" layer with Black. Get the Type Tool and type your text. While the text layer is selected on the Layers Palette, hit Command/Ctrl + E to merge the text and the "Background" layers. Now go to Filter > Distort > Wave and use these settings: Type: Square, Number of Generators: 1, Max Wavelength: 635, Min. We'll add another displacement effect to our text and we're going to use Fragment filter for that. Now go to Filter > Stylize > Glowing Edges, set Edge Width to 1, Edge Brightness to 6 and Smoothness to 1. We're going to copy this image to a new alpha channel and make a selection out of it. Now go back to the Layers Panel. It is time to add some lighting effects now. Now we'll create the background.
Vintage Typography Tutorial using Ornamental Styles Vintage and ornamental typography can yield some truly impressive effects for graphic designers, and have applications in everything from poster design to logo design. Vintage typography can involve ornamental or floral elements, vectors, as well as some vibrant colors contrasted against the background. Today, we have a great vintage typography tutorial for you to follow along with. If you like this vintage typography tutorial, check out our other great text effect tutorials: Hope you find this vintage typography tutorial entertaining and informative! In this tutorial we will look at the process of creating interesting work “Vintage Typography”, based on the photo-manipulation and collage. Vintage Typography Tutorial Preview: Vintage Typography Tutorial – Tools Used: Adobe PhotoshopStock imagesTopaz Clean filter Vintage Typography Tutorial – Links & resources: Vintage Typography Tutorial Step 1 Let’s to begin! Vintage Typography Tutorial Step 2 Vintage Typography Tutorial Step 3 PS.
Make Watercolor and Marker Style Portraits with Illustrator - StumbleUpon With this tutorial, we are going to work through ways of creating digital portrait illustrations that have a unique and somewhat tactile feel of marker and watercolor. This tutorial will focus on using a drawing tablet and Adobe Illustrator. There will be a focus on technique and technical settings, but the overall product will rely on your own personal style and taste. Preview Resources Portrait by Lillian Bertram (Creative Commons Share Alike – used here with permission) Step 1: Set up your Illustrator document Start with a print document of 8.5 x 11″. Step 2: Import the reference photo Import the photo you will be using as a reference (File > Place). Size it up or down as necessary—try to size it up to the artboard. Don’t sweat the resolution or pixelation of the image since the reference photo is only a guide. Since the artwork will be imported into the first layer, name it “Photo Reference” using the Layers panel. Your work area should look like this: Step 3: Set up your work area
Creating Smoke In Photoshop From Scratch (Noscope) - StumbleUpon Using Photoshop and a specific technique, it’s rather easy to create something that looks like smoke or fog—from scratch. It’s not as good as actual smoke photographed on a black background, but it’s much easier to come by. Here’s the trick… Doodle Draw a doodle. Distort Use the Liquify tool to distort the doodle. Once you’ve applied the liquify transformation, select Edit > Fade Liquify.... Repeat Now repeat the process until you’re satisfied: LiquifyFade Liquify to 50% If you enjoyed this tutorial, you might also enjoy my Creating Microworlds in Photoshop tutorial. Like this: Like Loading... 8500+ Free Photoshop Brushes. Weekly Roundup from DesignFloat | DesignFloat Blog - StumbleUpon Hey guys, the time for Friday roundup has come and we want to share some useful resources featuring free Photoshop brushes with you. We all know that brushes turn out to be the essential tools for web designers and help to add the desired atmosphere and create stunning websites. Using this Photoshop tool, it is possible to give the design the impressive touch and make it catchy. Of course, you have seen a vast amount of brush sets all around the web, but here you can find the top-notch collection of the most popular among them. Additionally, we’d also recommend you to check out the compilation of 60 free Photoshop gradient sets, which you can easily use to improve your graphics. 1100+ Abstract High Quality Free Photoshop Brushes High Quality and Useful Photoshop Brushes 15 Awesome (Fresh) Free Photoshop Brushsets to Spice Up Your Design 22 Free High Quality Doodle Photoshop Brushes Set 40+ Beautiful Photoshop Cloud Brushes 50 Free Photoshop Brush Sets You Should Bookmark
House with Exterior Made Of Clinker Bricks and Wood This house has an exterior which is made of combination of clinker bricks and African teak wood. It is located near to Moscow, Russia, so the climate could be tough there. Even though there are plenty of snow during winters the house has flat roof and a lot of windows. There are several memorable elements of interior design you could find interesting. First of all there is a transparency glass staircase that gives a sense of soaring when you’re step up the stairs. brick house, clinker brick house, clinker brick house design, modern brick house, wood home, wood house, wood house design Create Abstract Shining Text Effect with Groovy Font in Photoshop Create Abstract Shining Text Effect with Groovy Font in Photoshop In this tutorial, I will show you the methods I use to Create Abstract Shining Text Effect with Groovy Font in Photoshop. This is a beginner level tutorial with lots of tips and tricks about effective text manipulation. Have a try :) Along the way, I will show you a number of methods I use to create nice abstract effect to make the overall design look cool, as well as the use of slice tool to create your own stripe brush. Here is a preview of the final effect: (click to enlarge) PSD File Download You can download the PSD File for this tutorial via the VIP Members Area for only $6.95/Month (or less)! Ok Let’s get started! To complete this tutorial, you will need the following stock: Font Step 1 Create a new document (sized doesn’t really matter here), fill the background layer with the gradients shown below: Hint: don’t paint or render too much cloud, a subtle effect will do. Step 2 Drop Shadow Inner Glow Bevel and Emboss Stroke Step 3
Sustainable House With Raw Stone Exterior Camel Quarry House is built on the footprint of the burnt out ruin of the original house. The site features great views of natural landscape and blends with it very well thanks to the exterior done in raw stones combined with several wood inserts. Its form is simple – a rugged face reflecting the quarry and estuary and a smoother façade facing the more sheltered, rural landscape. The new house is an informal, practical and low energy family home. It uses sustainable sources of energy that includes ground source heat pumps and solar panels concealed in the roof. environmentally sustainable house design, environmentally sustainable houses, McLean Quinlan, modern sustainable home design, modern sustainable house design, rough stone house cladding, stone house cladding, stone house design, stone house walls, stone houses
Create Awesome Black and White Abstract Text Effect in Photoshop In this tutorial, I will show you the steps I took to Create Awesome Black and White Abstract Text Effect in Photoshop. The main focus of this tutorial is the use of layer masking techniques, plus some interesting drawing skills. Have a try! This is an intermediate tutorial so some steps can be tricky – if you’re having difficulty with it, I suggest you go to the basic section of PSD Vault and practice those tutorials first, then come back and do this one. Here is a preview of the final effect I have for this tutorial: (Click to Enlarge) PSD File Download You can download the PSD File for this tutorial via the VIP Members Area for only $6.95/Month (or less)! Ok Let’s get started! To complete this tutorial, you will need the following stock: Font Cloud Brush Smoke Brush Dirt Brush Step 1 Create a new document sized 720*960px, add a Gradient Fill layer on top with a light grey gradient: Step 2 Use the font you downloaded, type one letter on the centre of the canvas: This step can be a little tricky.