background preloader

Pigment Tutorial Part 1 « Nevertoomuchglitter’s Weblog

Pigment Tutorial Part 1 « Nevertoomuchglitter’s Weblog
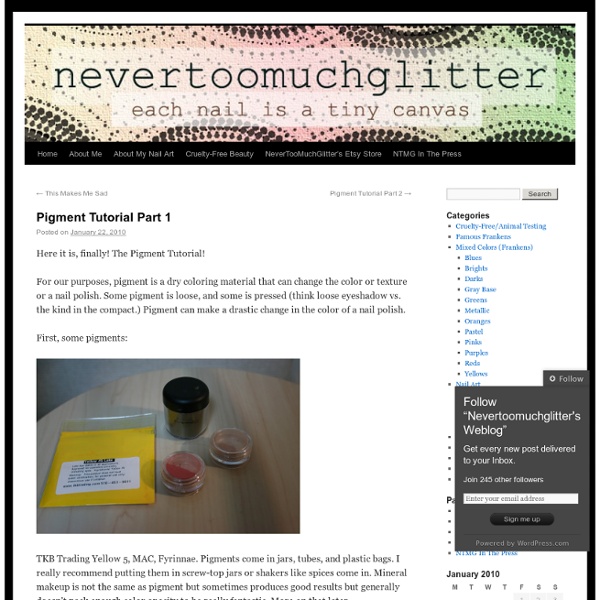
Here it is, finally! The Pigment Tutorial! For our purposes, pigment is a dry coloring material that can change the color or texture or a nail polish. First, some pigments: TKB Trading Yellow 5, MAC, Fyrinnae. Pressed eyeshadows can also be a good source of pigment. However, there is one type of pigment that you should NEVER be putting on your body. Artists pigment. So, if you’ve got your non-toxic pigment, what else do you need? A little teeny spoon (I got this at a Japanese coffee shop) and silicone baking tins. Last, you need a spare bottle of clear nail polish. The most basic pigment mixing is with clear polish. Left to right: MAC Teal, Fyrinnae Aztec Gold, Fyrinnae Boytoy, MAC Green Brown. Next, get ready to mix! 1. 2. 3. Voila! Here’s one coat (over the bright yellow I had on before!) With a coat of Seche. Well, there’s Part 1 for you…next time I’m going to talk about eyeshadows and adding pigment to color polish. Like this: Like Loading... Nail artist.

The Painted Hive: MAGIC Decal Transfer Tutorial with Free Printables! Some of you may remember, a little while back I posted a tutorial for DIY waterslide decals. Among other things, I mentioned how awesome they are for creating custom embellishments without the need for any fancy-pants equipment. Yep, waterslide decal paper is a truly fab product, though as great as it is, there is one drawback – although it’s somewhat tough it’s not especially durable. Magic decal coating paper is a product designed to be used in conjunction with standard decal paper to make the finished transfers super durable – yes, even dishwasher resistant! If you’re already familiar with magic decal coating paper then please excuse my tardy excitement, though for everyone else who is just getting to the party now too, feel free to start throwing the streamers! My recently acquired assortment of SLOM jars from IKEA were awaiting some DIY craftiness and seemed the perfect candidates for my first magic decal experiment. 1 Image to transfer. Use anything you like. 2 Printer. 5 Laminator.

Feather Manicure I bought these feathers a few weeks ago and I knew they'd make a gorgeous mani. Here's how to recreate the look. It'll cost you waaaay less than what you'd pay in the salon! You will need: A base color. Before you start, prepare all of the feathers you plan to use by cutting off the ends. Paint on your base color, let it dry, then add a coat of your thick clear top coat. While the clear coat is still tacky, carefully place the feather on to your nail. When that's completely dry, apply a few coats of your fast drying top coat. Once that's dry, use scissors or cuticle clippers to trim off most of the excess feather hanging off the end of your nail. You can remove what's left with a nail file which also leaves you with a nice smooth edge. I like to clean up around my cuticles with pure acetone and a small paintbrush, especially after piling on all that top coat! And here's the result... What do you think of this manicure idea?

How to draw hearts photos and post by Kristin Ess So Valentine’s Day has come and gone… but it’s never too late to learn how to do this! We got a lot of emails after Valentine’s Day asking how to make a heart on your nails. TOOLS: Toothpick, polish, a piece of paper or foil. PREP: Pour a little puddle of polish on a piece of paper or tin foil. Using your toothpick dipped in polish, make a dot on your nail.Make a second dot next to that.Using your toothpick tip, drag one of the dots down at a 45 degree angle.Drag the other dot down at a 45 degree angle to meet the other side. What else do you want to learn as far as nail art goes? Tags: DIY, heart, how to, kristin ess, mani monday, the beauty department, thebeautydepartment.com Related posts: 25 clever ideas to make life easier Via: amy-newnostalgia.blogspot.com Why didn’t I think of that?! We guarantee you’ll be uttering those words more than once at these ingenious little tips, tricks and ideas that solve everyday problems … some you never knew you had! (Above: hull strawberries easily using a straw). Via: apartmenttherapy.com Rubbing a walnut over scratches in your furniture will disguise dings and scrapes. Via: unplggd.com Remove crayon masterpieces from your TV or computer screen with WD40 (also works on walls). Via: athomewithrealfood.blogspot.com Stop cut apples browning in your child’s lunch box by securing with a rubber band. Via: marthastewart.com Overhaul your linen cupboard – store bedlinen sets inside one of their own pillowcases and there will be no more hunting through piles for a match. Via: realsimple.com Pump up the volume by placing your iPhone / iPod in a bowl – the concave shape amplifies the music. Via: savvyhousekeeping.com Re-use a wet-wipes container to store plastic bags. Via: iheartnaptime.net

Cheetah Printed Nails photos + post by Kristin Ess Cheetah print nails have been around for some time now but we’ve never actually done a tutorial on them. We got a lot of requests after last week’s Mani Monday heart tutorial, so we’re going for it! TOOLS: 2 toothpicks, black nail polish (American Apparel “Hassid”), gold nail polish (American Apparel “Gold Flash”), clear coat. PREP: Use any color your want on the base of your nails. Take your toothpick and tap it on the table or counter a few times to flatten out the tip. Nail strips are great in cheetah print as well, but so often the stores run out of that pattern. Tags: black, cheetah, DIY, gold, how to, kristin ess, leopard, mani, mani monday, manicure, monday, nail dotting, nails, pattern, print, the beauty department, thebeautydepartment.com, toothpick Related posts:

Newspaper Nails A few weeks ago I shared in this post that I learned how to do this amazing thing called "newspaper nails." Since I love words, and reading, and books, it has inevitably become my favorite manicure. Want to learn the how-to? First, gather your supplies. Step one: Grab some newspaper and cut it into pieces big enough to cover your nails. Step two: Paint your nails white. Step three: Dip a piece of newspaper into the rubbing alcohol and saturate them well. Step four: Press the bit of newspaper on your fingernail hard for about three seconds and peel it off. Step five: Top coat time! Now admire your creation; and try not to chip your nails the first day like I all-too-often do.

10 Upcycled T-Shirt Projects Whether you just cleaned out your closet or totally cleaned up at the thrift store, it's pretty easy to accumulate a bunch of old t-shirts with very little environmental impact. Some of those old t-shirts can be cute and campy to wear, but what about the ones that are just dated or maybe even have some stains or holes in them? Never fear! There are lots of fun ways you can repurpose old t-shirts. Check it. 1. 2. 3. 4. 5. 6. 7. 8. 9. 10. I bet that there are a million other fun ways that you can refashion a t-shirt to make it cute and useful again.

Hybrid Manicure I’ve been seeing lots of outrageous nail art lately on pinterest. One hot new product that’s really caught my eye is adhesive nail polish strips. I love the funky designs and bold colors with these products, but they’re usually a little spendy for me. I have a great alternative and I’m super-excited to share with you a really fun, new way to use digital scrapbooking supplies! To begin with, you will need the following: light color nail polish (white, light pink, cream, pale green, light turquoise, you get the idea….)rubbing alcoholsmall cup (I used a medicine cup.)digital supplies (laser print or copy)nail polish topcoat 1) Before getting started, quickly measure your fingernails. 2) Open a new Photoshop document and create for yourself 10-15 boxes that are a little larger than your nails. 3) Find some great papers that you’d like to have on your nails. You will likely want to reduce the scale of your paper so that the design will better fit your nails. 4) Print your page. A few thoughts:

How to: Remove Sparkle Nail Polish (aluminum foil method)...it really works! Sooooo I've been obsessed with sparkle nail polish!! Especially OPI's Sparkle icious... Sparkles are so fun and pretty on your nails... Except they are a biaatch to remove. We've probably all been there scrubbing at our nails with a mountain of cotton pads building up. It seemed too good to be true so I wanted to test it for myself.... So onto the tutorial ... these hideously chipped nails are ready for a fresh manicure! What you'll need: + 3 cotton pads + scissors + strip of aluminum foil + nail polish remover So what you do to prep is cut your strip of foil into ten rectangles. Now cut your cotton pads into quarters...I had a picture but I some how deleted it! Now soak your cotton pad quarter in nail polish remover, place it on your nail and wrap it in the foil. Once you have done one hand (or both if you have good hand eye coordination), listen to your favorite song, or do lunges or anything to occupy yourself for 5 minutes. Your nails should look like this.

50 Fun and Cheap Date Ideas! Join us on Facebook and Twitter for our latest recipes and projects! I never knew how difficult it would be to go on dates with my husband once we had a kid! We are lucky to get in a date every month or two! We decided that we would try to have a date night at least twice a month. We've done a lot of these dates and have had a blast! 1. 3. 4. 5. 6. 7. 8. 11. 13. 14. 15. 17. 18. 19. 20. 23. 24. 25. 27. 28. 30. 31. 32. 33. 34. 35. 36. 38. 39. 20 questions. 40. 41. 42. 43. 44. 45. 47. 48. 49. 50.

Related: