background preloader

DIY string-tie envelopes

DIY string-tie envelopes
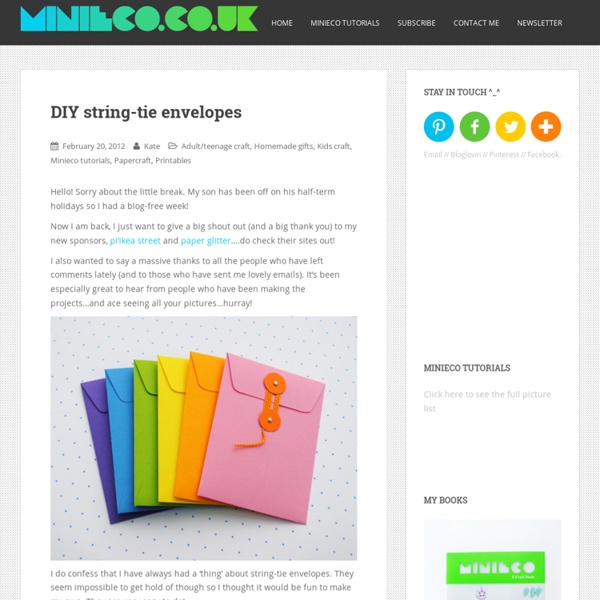
Hello! Sorry about the little break. My son has been off on his half-term holidays so I had a blog-free week! Now I am back, I just want to give a big shout out (and a big thank you) to my new sponsors, pi’ikea street and paper glitter….do check their sites out! I also wanted to say a massive thanks to all the people who have left comments lately (and to those who have sent me lovely emails). I do confess that I have always had a ‘thing’ about string-tie envelopes. These dinky little envelopes are great for all-sorts of things (storing paper ephemera, housing invitations/gift cards, storing seeds). By the way, now my kids are getting better at using scissors they have been really enjoying making their own envelopes using the template from my previous post. You will find a full tutorial and templates below! You will need: Paper Card String Glue stick Scissors Tiny brads/split pins (the heads of the brads I used were 3mm in diameter) How-to 1. 3. 5. Job done!

Song Lyric Wall Art / D.I.Y. Project A couple weeks ago, I found a paint-by-number at an unbeatable price. I can't pass these things up even though I already owned this particular design. I thought that I could maybe use it to make a fun D.I.Y., but my new rule is that all thrifts that I purchase with the intent of restyling need to get done right away. Here's how I did it... I displayed our piece in our bedroom, on Jeremy's side of the bed. A couple weeks ago, I found a paint-by-number at an unbeatable price. Woven gift-wrap // pastel edition ^_^ By Kate on August 8, 2012 I noticed that the woven gift-topper I made last year was doing the rounds again on Pinterest so I thought I would make an updated pastel version (pastels seem to be the new neon at the moment). I bought some quilling strips (0.5cm) to use this time which reduces the labour by about half (I’ve also been working on some more intricate woven ‘things’ for another project…more to come soon). Anyway check out the previous post if you want full instructions. Above: Mischevious hands – the unseen backdrop in all my photo’s ^_^ While I took photos today my boys were making their own presents by wrapping boxes in newspaper. Finally, the font used on these images is called soymilk and it’s free to download …yay!

DIY Paper Popsicle Memory Game As a kid I adored the game 'Memory'. The truth is, I still do. Sure, it's not exactly what you would define as 'challenging' but there's something charming about it's simplicity. So, for a bit of cute fun I decided to re-create the game with a slight twist. I've replaced the cards with paper popsicles. Who doesn't love popsicles, right? Scatter these at a summer ice-cream social, bbq or picnic for a bit of interactive fun for guests! Smooth white A4 card (x2)Popsicle sticks (x12)ScalpelRulerCutting boardScissorsDouble-sided tapeColour printer Download and print out 2 pages of your popsicle designs. Use a scalpel and ruler to gently score along the dotted lines. Before you start cutting out your popsicles, keep in mind that you should be as precise as possible with your cutting as you want all your popsicles to look as identical as possible from the back. Cut out around the straight edges of your popsicles using the scalpel and ruler. { all images by Amy Moss }

DIY Cereal Box Stationery Organizer Tutorial & Review of Tombow Glue for Crafts I saw a great DIY Tutorial for a Cereal Box Stationery Organizer on Pinterest and I thought I would share my take on it! Materials a cereal box (I used an 11oz. one that's about 7" wide)scrapbook paperTombow Craft Gluepencil or Sharpie markertransparent tapeUtility knife Step One With the Craft Glue, glue the top of the box closed, then reinforce both the top and bottom with tape. Step Two We're going to be cutting the box in half to make 2 boxes for the organizer (the sides will be cut at an angle), so we need to measure and draw the cut line on the cereal box. On the front of the box, measure about 5 1/2" from the top and make a mark along one side and then the other. Turn the box over and draw marks about 4 1/2" from the top, and draw another line. Step Three With the Utility knife (I used a box cutter from work), cut the front of the box along the line and also the sides. Step Four We need to cover the boxes with paper. I lined up the paper and creased the edges around the sides.

Paper Calla Lilies DIY by Chiara Alberetti Milott Usually when I think of calla lilies, I think of plain old white ones. But there is a whole world of colored calla lilies out there. Materials needed: various colored paper, tape, stapler, hole punch, yellow crepe paper streamer, scissors. Step 1: Begin by cutting a square of paper in the shape of the top left image shown above. Step 2: Cut a 5 inch piece of crepe paper, fold it in thirds width wise, then in half length wise (I made a bunch of these all at once, production line-style). Step 3: Repeat, and staple this flower to your first flower. Step 4: Punch a hole through the leaf and flowers, for your ribbon, twine or string to go through. Step 5: Wrap your gift and tightly tie your flowers on top. You can put as many flowers on each gift as you like – check out the photos below where I went kind of nutso with the flowers! Happy Wrapping!

DIY Origami Heart Love Note Sigh... I had all these plans to create a plethora of DIY Valentine's Day projects for Eat Drink Chic. However, plans for my impending engagement party have taken up so much of my time that I've had to put these ideas on hold. A few days ago I created these little origami heart invitations for our engagement. However, in a last ditch effort to get at least SOMETHING up for Valentine's Day (as last-minute as it may be), I've removed the invitation text and provided them for you to download to write a little love note to your Valentine. Continue to read more about the project and to download your freebies! The concept for these little hearts was to keep the design as minimal as possible and instead rely on the merits of poetic words, origami craftmanship, delicate hand-stitching and some simple but beautiful materials. Throughout the process of planning and designing my engagement, I've come to realise that I am far more partial to small, intimate gatherings.

Craftastic Tuesday: Cereal Box Fun I've been interested for some time in creating storage with cereal boxes. I looked online and found some fun ideas. A great one is creating a box with a top. I really like this one. It is made from a Cocoa Puffs box. Isn't it cute!!! You can also make some nice magazine holders. Tip of the Day Purchase some contact paper with your choice of colors and cover your projects easily and quickly. Check Out These Cool Sites

14 Days of Love! Heart Favor Box DIY! | Wonder Forest: Style, Design, Life. Are you enjoying the Valentine's day series so far? Yesterday Heather showed you how to create a cute and super easy valentine note card using a paint swatch, and before that, I showed you how to create a lovely fabric flower bouquet! Today I have a project that you can even do with your kids as a craft. It's really easy and all you need is some thicker coloured paper, scissors, and glue! Isn't it cute? Fill it up with some little heart candies and give these as valentines! After you've printed it out, trace the edges onto a piece of card stock with a pencil. Cut out the box! Now fold up both the top and bottom edges according to the lines on the template. The rest is pretty self explanatory. Grab your glue stick and secure the bottom flaps together, as well as the side tab. Then all you have to do is slide the two heart pieces together to form the top and voila!!! Feel free to pin! What would you put in your little heart box?

Inspiration, ideas and original details for babies and kids such as decoration, accessories, toys, crafts, gifts, parties and recipes Dresser Organizer If your husband is anything like mine, he has a pile of stuff on his side of the dresser and elsewhere throughout the house. Since I've started to organize, I had found a box and was just putting all his stuff into the box. That wasn't working well. So I decided to make him a dresser organizer. Any guesses as to what I used to make it? Every time I walk into our room now, it shocks me how clean his side of the dresser is. Tip of the Day Clean small areas like dressers every morning or night. Linked To:

How to Make ... Washi Tape! Are you like me and just can't bring yourself to spend a lot of money on things that even though they are really pretty, will probably just sit there for ages without use? I've always loved the look of washi tape but find it so expensive and hard to justify. So, I decided to get creative and make my own.. All you need is some double sided tape and tissue paper! Too easy!

Related: