The shape of things to come: A consumer's guide to 3D printers CES 2013 proved to be something of a coming out party for consumer-facing 3D printers. Sure MakerBot earned a fair amount of attention at last year's show with the announcement of the Replicator, which snagged its share of awards from various press outlets. This year, however, saw a relative deluge in 3D-printing representation, with strong showings from 3D Systems, FormLabs, MakerBot and the cloud-based 3D printer, Sculpteo. Even with so many companies rising to prominence, the dream of truly mainstream 3D printing still feels a ways off -- if that is indeed where we're inevitably heading. These nascent days are an exciting time, with a diverse array of companies and organizations vying to be the first to bring the technology to our homes. Most of these work by melting plastic (largely Lego-like ABS or biodegradable PLA) and squirting it out through extruder heads. 3D Systems 3D Systems has been in the 3D-printing game since before the term was coined. Bits from Bytes Eventorbot Fab@Home
simplement KIT | Printrbot The Printrbot Simple Maker’s Kit is an exercise in 3d printing minimalism. It includes only what is needed to get started in the world of 3D printing. Our Printrbot Simple Maker’s Kit is $349 , and we think you will agree that it is both tiny…and a really big deal. Features of the Printrbot Simple Kit: The 2014 model comes standard with Aluminum Extruder and Aluminum print bed for $3490.1mm resolution (and beyond)100mm cube of printing volume (~4″ cube)Printrboard electronicsPLA only (no heat bed)Ubis 1.75mm Hotend200lb. test fishing line – the X & Y “belts”12v 6A laptop style power supplyOuter dimensions: 7″ x 8″ x 9″~5.25lb total weightSample of 1.75mm PLA filamentFan and end stops includedLaser cut wood parts are standard 1/4″ (6mm) thick Printrbot does not guarantee the technical proficiency of it’s customers. Simply stated; If you order a Printrbot kit, we cannot guarantee that you have the technical ability to assemble and calibrate the Printrbot.
Nouvelle fabrique | le blog Choisissez un modèle de petites voitures à moteur à élastique qui sera découpé avec la fraiseuse numérique. Après le montage de la voiture, les courses peuvent enfin débuter dans le 104, qui ira le plus loin ? le plus vite ? Une fois chez vous, vous pourrez alors transformer chaque pièce de la maison en circuit automobile. En savoir plus A partir de 6 ans les 23,24, 30, 31 mars, 6 et 7 avril de 14h à 16h les dimanche 14, 21 et 28 avril de 11h à 13h inscription par mail : contact@nouvellefabrique.fr / objet : inscription atelier poche + date. Expérimentez des parcours de billes grâce à des modules aimantés pré-conçus, puis dessinez votre propre parcours, la fraiseuse numérique les découpera. En savoir plus Conçu et animé par par Faubourg 132 3 demi journées organisées en collaboration avec Emmaüs Défi Avril 2013. Ré-inventer avec vous, une vie aux objets mis au rebus. En savoir plus En savoir plus En savoir plus Avec Mattia, Louka et Gaspard.Merci au papa de Mattia pour les photos. En savoir plus
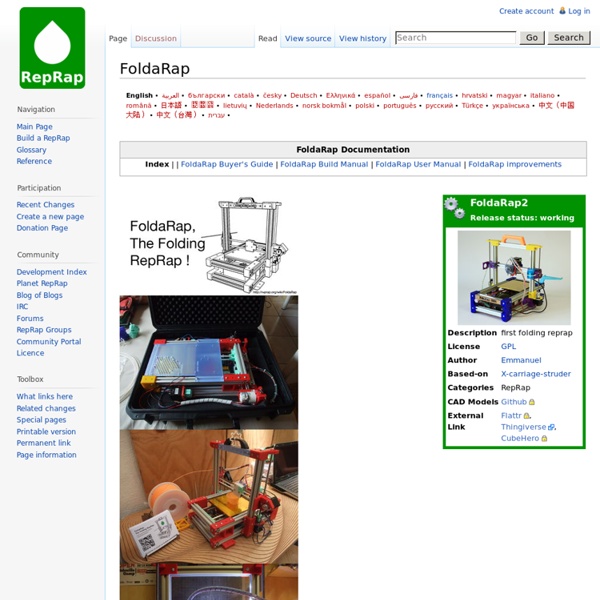
FoldaRap User Manual The Open-Hardware logo Preliminar readings Softwares As per CAM_Toolchains here is a little overview of the toolchain : Download and install Slic3r and Pronterface if not already done. Slicer Here is a great manual : and some translation (French) of the interface Notice Slic3r v4 From Slic3r, go in File > Load config, and choose these config file (or take them from the github repo). You may have to tweak some parameters like Z-offset if you think you are too close from the bed when starting, or bed-center if the print seems offset by a few mm. Host Could be Pronterface / Cura / Repetier / Repsnapper Pronterface In Pronterface settings, set the following essential settings, or place these config files in the user's folder (e.g : ~/.pronsolerc (GNU/Linux) C:\Users\yourname (Windows)). Build surface to 140x140mm XY mm/min : 9000 Z mm/min : 115 Heater temp : 195°C Bed temp : 55°C Cura Repetier Firmware : Marlin Here are some of the main settings, in case you upload a new firmware.
Metamáquina - Metamáquina - criamos máquinas que criam máquinas Prusa i3/fr Prusa i3 Release status: Working Introduction La troisième version de la Prusa (itération 3) est la nouvelle et actuelle imprimante 3D conçue par le noyau de développeurs Prusajr. Caractéristiques Pièces imprimées : Clone Wares sur GitHub ou sur Thingiverse ~45€ Pièces non imprimé : Version "simgle frame" Thingiverse ~50€ en bois / ~90€ en acier Ramps 1.4 assemblé (sans les contrôleur Pas à Pas): ~80€ 4x assemblage de carte contrôleur de Pas à Pas avec radiateur : ~6€ /pièce pour 5; ~xx€ /pièce pour 4 (5 cartes si 2ème extrudeur) 5x moteur Pas à Pas NEMA 17 : ~12€ / pièces (6 moteur si 2ème extrudeur) Buse d'impression : Jhead ~40€ Plateau chauffant : Heated Bed ~10€ (ajouter ~16€ pour la plaque de verre borosilicate) Système de guidage & entrainement : ~40/50€ (NDT : à vérifier) Visseries : ~40€ Coût du matériel : ~390€ à 480€ estimation Zonne d'impression: 200mm x 200mm x 180mm (8"x8"x7.25" sur MakerFarm) (Dimensions Mendel 200x200x140mm). Principales améliorations Développement
parametric ressources | Ressources for Parametric Modelling in Architecture Mendel90 Mendel90 Release status: Working Mendel90 is a design by Nophead that replaces many of the threaded rods and printed parts of the Prusa Mendel with flat sheets of MDF, Dibond, Acrylic or any other stiff sheet material. This simplifies construction, stiffens the frame, and always keeps the axes at 90 degree angles, hence the name. Advantages Compared to the Prusa Mendel, which it is based on: Fully parametric across build area, motor size, rod size, and sheet material. Disadvantages If you drill a hole wrong, it is much harder to fix than to adjust a nut on the Prusa Mendel Less room for adjustment-only a few mm MDF expands and contracts with changes in humidity unless sealed well. Why so many types of screws? Development The Mendel90 is designed solely by Nophead, and he has shared his design through his blog and GitHub. The source code, the latest STL files for both variants, and an excellent build guide can be found at GitHub. See Also Category:Development
3dkits: Kits mecánicos para impresoras 3D hechos en España | MADfab A través de 3ders nos enterábamos de la existencia de estos kits hechos en España con un aspecto muy profesional y limpio. José, de 3dkits ha accedido a contestar unas preguntas para los interesados. Hola José, muchas gracias por atendernos.No se merecen. Siempre es un placer atender a una comunidad como la vuestra. ¿Dónde se fabrican vuestros kits? Parece sencillo acoplar una fresadora al soporte, aparte de un extrusor de plástico. ¿Hay resultados mediales de la resolución que se consigue? ¿Qué posibilidades de ampliación hay? Se echa en falta en vuestra Web algún resultado. ¿Qué motores se usan y qué electrónica y software los controlan? Si hay algún lector de madfab interesado en probar una, ¿cuánto cuesta y qué incluye el kit? José nos promete más material según lo vaya generando por lo que seguiremos informando. Publicaciones relacionadas Dos nuevas impresoras: Cartesio CNC/3D y Pocket Printer
fr RepRap est la première machine autoréplicable de production d'usage général fabriqué par l'homme. RepRap se présente sous la forme d'une imprimante 3D, pilotée par un logiciel libre, capable d'imprimer des objets en plastique. Puisque la RepRap est composée de plusieurs pièces de plastique et que la RepRap a la capacité d'imprimer ces pièces, la RepRap peut être considérée comme autoréplicable — tout le monde peut la construire avec du temps et le matériel nécessaire. Le concept RepRap relève de la production de machines autoreplicables, ainsi que de les rendre librement accessibles au bénéfice de tous. RepRap.org est un projet collectif, vous êtes donc cordialement invités à modifier presque toutes les pages de ce site, ou mieux, créer de nouvelles pages personnalisées. RepRap a été la première imprimante 3D à faible coût. RepRap est devenue l'imprimante 3D la plus largement utilisée parmi les membres mondiaux de la Maker Community :
Tutorials | parametric ressources OBJECTIF >Générer une surface qui « réagisse » à sa proximité avec des points ou des courbes STRATÉGIE UTILISÉE >On crée une trame de point sur une surface de référence, la distance de chacun de ces points aux objets réacteurs (pattern reactor) est évaluée (pattern reporter), puis utilisée (pattern mapping) pour générer une nouvelle altitude de ce point. La surface réactive est créée à partir de cette nouvelle famille de point. > récupérer un objet rhino dans GH > créer une trame de points sur une srf de ref > mapper des valeurs > faire réagir la définition d’un objet à la proximité d’un autre objet Dans un premier temps, il faut récupérer sur GH une surface qui servira d’emprise pour la surface réactive. Puis pour créer la trame de point, utiliser le composant Divide Surface (dans Surface/Util). La suite du modèle utilise les points que l’on vient de créer, mais dans une nouvelle organisation: nous les utiliserons « à plats », c’est à dire rassemblés dans une même liste de donnée.
3000d/Printrbot-Jr