

Idée Déco 13 : Les boîtes de conserve - Déco en nuances Que faire des dizaines de boîtes de conserve utilisées chaque année ? Les recycler ! Voici quelques idées. En les peignant en blanc et en les cerclant de vieux journauxl et de dentelles, vous obtenez de charmants pots où vous rangerez votre matériel de loisirs créatifs. En les recouvrant de vernis incolore et en nouant autour un gros ruban assorti aux fleurs, ils deviennent vases. Recouverts d'un joli papier peint fleuri, ils renaissent aussi en vase. Peint, recouvert de toile de jute et de boutons, un joli vase. En conservant leur jolie étiquette d'origine, référence à Andy Warhol, ils sont pendus dans la cuisine. Bruts, vous y ferez pousser vos plantations. En les peignant en noir et en y faisant des petits trous, vous les transformerez en lanterne. Avec un gros pot de peinture au centre, vous créez un organizer de bureau. Des pots de fleurs peints en doré et bronze.
Segreti d'Artista: DIY tutorial bracciale con strass Revolutionaries: A Project for Fall! Hello my blog friends! I'm so pumped to share a project I finished today! It's simple, cheap, quick, and fall-y (yes, that is a word). Anyway... I've been diligently collecting these for what seems like forever: Why? [Side note: please pin from the original source so the credit goes to the right person! But I also love projects involving trees/branches like these: Then, I saw this yesterday and even though it's not made from toilet paper rolls, I thought, hmm.... color behind the toilet paper rolls? So basically... What you need: 1. 3. How to do it: 1. 2. 3. 4. 4. 5. 6. It's so.. fall. And I love that I used things I already had in my craft stuff and I recycled toilet paper rolls! Would it be bad to keep it up all year? Update: here are some more pictures that I took in better lighting! Looking for more toilet paper projects?
BM - Activité manuelle, Loisirs créatifs, Arts créatifs DIY Macrame Bracelet Growing up by the beach in Southern California, the ability to knot a macrame bracelet was practically a right of passage. Although those days are long behind us, we’ve never forgotten the ever-so-simple square knot technique. This time, however, we’re replacing hemp and wooden beads for more updated elements like colorful nylon cord and glossy metal charms. You’ll need: Start by cutting the knotting cord into two 30 inch, two 20 inch and one 10 inch lengths. Center the 30 inch cord under the two middle strands. Pull tightly and slide the knot up to the top. Finish the 2nd half of the square knot by folding the left cord over the middle strands and under the right cord. Pull tightly and repeat the steps – left, right, left, right . . . To finish the knots, thread one of the cords onto a needle and sew up the center of 3-4 knots along the backside. Repeat the same step on the other cord. After sewing up both knotting cords, trim away any excess.
Make your own jellyfish in a bottle. ~ Note for Thai fans ~ เป็นโพสเก่าที่มีแฟนบล๊อกจากต่างประเทศขอมาให้เขียนเป็นภาษาอังกฤษนะคะส่วนแฟนบล็อกที่ยังไม่เคยอ่านเรื่องนี้เลย ฉบับภาษาไทยดูที่นี่ค่ะ The other day, while I was thinking to get something to put in the water bottle for Bhoom to shake for fun. I saw a plastic grocery bag next to me and then this idea popped up. With some trials and errors, my little jellyfish comes alive just like I thought it would be. : ) When daddy and son first saw it, they’re surprised with their jaws wide open. Things you need to make your own jellyfish (Hope you can find all these in your kitchen) : 1. Instruction: • Flatten the bag and cut off the handle and the bottom part (see picture 1) • Cut along both sides (see picture 2) to split into 2 plastic sheets – by the way, we only use just one of them. • From the center of the plastic sheet, fold it like a tiny balloon to make the head part and tie it with the thread – not too tight (see picture 3). Like this: Like Loading...
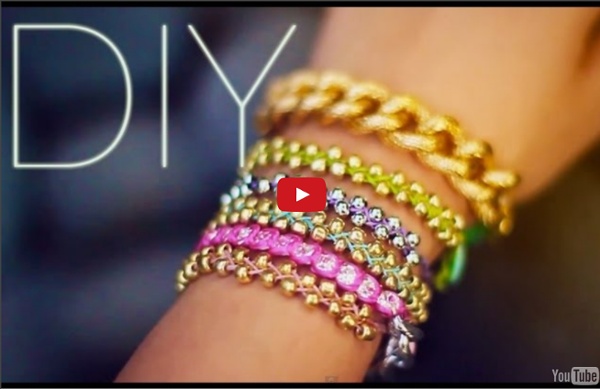
Des découpages de papier rétroéclairés Le duo d’artistes Hari & Deepti découpent des strates de papiers qui, lorsqu’elles sont éclairées par l’arrière, créent des scènes avec des petits personnages grâces à leurs différences d’opacité. [Via] DIY Braided Bead Bracelet It’s been awhile since our last bracelet DIY. I don’t know about you, but our wrists have been begging for another colorful addition for months now. So after playing with some materials that were already on hand, we’ve created a tutorial for a braided bead bracelet, which is a not so distant cousin of the hex nut and wrap bracelet. Because honestly, you can never have too many . . . You’ll need: Cut the waxed linen cord into a 26″ and 19″ piece. Tie a knot about half an inch down from the loops. Start braiding the strands. Push the bead against the base of the braid, and cross the left strand over the middle. Keep a finger at the base of the braid, holding the beads in their place and keeping the braid tight. Finish the bracelet with another inch of braided cord, measuring it against the wrist. Thread on a two hole button – two strands through one hole and one strand through another. Trim the end. Your bracelet is finished! (all images by HonestlyWTF)
Schemas de bijoux en perles 18 créations en papier découpées à la main par Catfriendo 18 créations en papier découpées à la main par Catfriendo Des créations en papier découpées à la main avec beaucoup de précision par l’artiste canadienne Catfriendo. Images © Catfriendo