background preloader

Inspiration Realisation

Inspiration Realisation
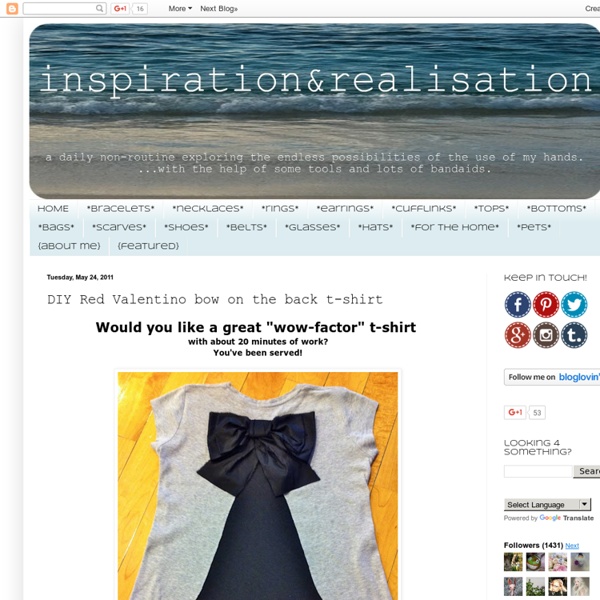
with about 20 minutes of work? You've been served! I made it last year and sure enough I'm going to wear it over and over again this summer :) It all begun with some internet browsing, and when I look for t-shirt inspiration, the Red Valentino label is a great source. ... Yeah, a bit excessive price tags, agreed. I had everything on hand: * a sewing machine (but can be sewn by hand since it's really not much) * cut the back of the t-shirt in the middle, leaving about 3" at the top uncut * round the edges (optional, the original doesn't have round edges) * cut a piece of black mesh in a sort of triangular shape with a round base (the two extra parts sticking out at the bottom won't be necessary if you don't round the edges) * place the mesh inside the shirt and pin the sides onto the side of the cut * trim the excess mesh underneath * make a bow and pin it with a safety pin (so you can easily remove it to wash your shirt) ... probably even less then 20 minutes, right? xox, d.

Grey Luster Girl So it has been a while since I have done a refashion for my Wardrobe Revamp and Refashion. I am just getting over pneumonia- who gets pneumonia in the middle of summer?! Apparently I do. I could blame the pneumonia on the fact that I haven’t done a refashion in a while which would definitely be true, but for some reason this shirt from SheInside was tripping me up. I snagged a grey shirt of my husbands that didn’t fit him well and everything else fell into place. I really like the combination of the grey shirt with the black chiffon bottom. The tube of chiffon that I added was way too long so I needed to cut it down to size. I cut off the end of the long sleeve and used that to make my pocket. Much better than the purple people eater that was holding me up! Linking to:

Grey Luster Girl Moving along in my attempt to refashion and revamp my wardrobe, I get to check off my number three shirt refashion. The Anthropologie Pattern Pop Tee shirt. I literally made this shirt 4 times before I got it right. Let’s start at the very beginning, a very good place to start (I am channeling my inner Fraulein Maria). The top fabric already had a place in my mind. I thought that since I was using an existing t-shirt, then half my work was already done right? The patterned fabric is not at all stretchy. Cut out your back piece making sure to allow plenty of extra fabric. At the center of the back piece, add a pleat. Pin in and sew in the back section along the top and the sides stopping a little before the end on both sides. Serge or zig zap stitch the patterned fabric hem starting at where you left off of sewing the sides. It should have been so easy! Linking to: Tatertots & Jello

Cath Grace I recently noticed the Expanding Universe Tank on Anthropologie’s website and thought it was a really interesting treatment of the striped fabric. I happened to have a striped knit here with me in Alabama, and thought I would give it a go. Here is Anthro’s Tank Top (the picture is a link to the site.) And then here is mine (gotta love the bad cell phone picture on the hotel room bed….sigh, not pretty blog awards for me!!!) I pretty much just folded the pleats up on one side, and then stitched them in place along the bottom, I then added a gusset to create the angled line at the neck like on the Anthro version. And then the worst picture of all!

Cupkateer Remember this? Due to quite a few requests I am posting the tutorial, even though I haven't completely finished mine. I have a somewhat good excuse as to why it's taken me a month to get this posted, and why I've been absent so long. But that will be another posts. Well, here's the tutorial: You will need a cardigan and an old t-shirt. Next print my pedal pattern, or draw your own. Cut out as many flowers as you can from your t-shirt. Unless you want to be board out of your mind I suggest you find something to entertain you during the next part. Now, set your machine to a medium zigzag and drop the feed dogs. If you couldn't find a t-shirt the same color as your cardigan, like me, you can throw the whole thing in a bath of RIT dye when your finished to give you a monotone look. Unfortunately I don't have a finished picture.

Fashionrolla 14 artistic ways to knot your belt After “12 awesome ways to knot your belt” and “13 awesome ways to knot your tie” here comes a new great tutorial that every Fashionista needs to have on her phone, computer or Pinterest. This guide is very unique and doesn’t exists that way nowhere. Cotton Candy Castle I noticed that the link to the tutorial of my rib cage T-shirt (which I descided now is a spine T-shirt :p ) is no longer active so I made my own tutorial now. Here goes, have fun! 1.You'll need a T-shirt (I HIGHLY recommend a 100% or at least almost 100% cotton T-shirt with as little Lycra as possible in it), scissors (do yourself a favour and get some tailoring scissors if you are into crafting, they will make your crafting life so much more easy, I personally did this FAR too late), a ruler and a pencil for light material/(tailor)chalk for dark material. 2. 3.OPTIONAL: I always like my T-shirts without the seams (the collar and the bottom seamline), so if you like just cut them off. 4. 5. Then draw lines between the center lines, not all the way to the center and the outside of the T-shirt though (see picture 6). 7. 8. 9. Ignore the very top strap, the neckline so to say. Push the strap under the second strap that you just skipped, then bring it up and weave it over. 11. 12.

College Fashion This summer, cutout and low back t-shirts have been extremely popular - you can find them in almost any store! These shirts are a perfect way to achieve a summery vibe and beat the heat. One of my favorite styles is the bow back t-shirt (see above); it creates such an effortlessly girly and chic look, and can easily be tucked into a skirt or worn with your favorite denim cutoffs. This DIY will show you how to make your own bow back t-shirt from an old tee you have lying around. What you'll need: An old t-shirt - although any cut will work, a scoop or crew neck will work best for this DIYScissorsNeedle and thread OR sewing machineSeam ripper (Optional - for fixing mistakes!) How to: 1. 2. 3. 4. 5. 6. 7. You could also add more bows if you want, or even cut out the entire back and make bows all the way down. Your thoughts? What do you think about cutout and low back shirts?

My Two Butterflies As I mentioned, I had some left-over crocheted chain from yesterday's project. So I did a really quick refashion of a plain black cardigan. I hand-stitched the yarn chain along the button placket and neckline. The sweater was also doing this: Sweaters that do this drive me crazy!!! nice flat hem - no more rolling My Two Butterflies I saw this tutorial on Grosgrain's blog the other day and was just itching to try it out (by the way, check out her Embellish Knits Month - she's doing some amazing things!) I've seen sweater to cardigan refashions before but have always been too intimidated to cut into knits. But Kathleen's tutorial looked pretty easy to follow. I pulled out this $2 thrift store sweater: I bought it because I loved the embroidered detail - but overall, it was still kind of blah - maybe it would work better as a cardigan. seam tape sewn on - all I had on hand was brown but you won't see it so it really doesn't matter Then I sewed on some mismatched vintage buttons - they're purely decorative since there are no button holes. my favorite button I think it's definitely something I'll wear now.

Fashion Diva Design Hey there my fashionistas and diy lovers! How are you? If you are looking for some new projects to make in your free time, then I need to say that you are on the right destination. For today, I have made of a wonderful collection of 10 diy summer projects every lady should try to make. Are you excited? SEE ALSO: 10 Amazing DIY Shorts Ideas You Need To Try This Summer These pieces of clothes, fancy shoes and jewels that you will see in a short are very easy and quick to make and you don’t need to possess any special skills. Outstanding and Very Fashionable DIY Off the Shoulder Top You can Make in Less Than 10 Min Fantastic Idea to Embellish Any Summer Shirt with Old CDs Perfect Way to Wear Your Low Back Shirts Without Showing Your Bra Strap Fascinating DIY Cherry Blossom Boyfriend Jeans Stylish Ombre Shorts to Wear This Summer Season Stunning Easy to Make Scalloped Denim Shorts Beautiful Tassel Earrings to Make Easily and Quickly Lovable Fringe Necklace to Complete Your Summer Outfit

Fashion Diva Design Looking for something a little bit different to keep you entertained this summer? DIY projects have become one of the biggest rising trends. I promise it will be fun, simple, and creative. Every family has some old t-shirts lying around that need to either get thrown out or up cycled into something new. DIY craft has become so popular nowadays, so check out what we have to present you and get inspired to turn your old shirt in a new fashionable piece. source source source source Just cut down each side and tie at the bottom. Get the directions here Take it one step further and cut the shoulders off. source Get the directions here Get the directions here Pretty Providence I have been seeing cute things with “hello” written on them in various ways all over the place and thankfully this is an easy trend to get in on. So, I took matters into my own hands. I found a plain shirt at Target on sale for $7 and I used a freezer paper stencil to paint it. This project was so easy that now I have been going around my house looking for other things I can do this with. What you need: freezer paper (it’s by the foil at the grocery store) fabric paint sponge brush iron plain shirt or other fabric item to stencil pencil access to a printer scissors or x-acto knife piece of cardboard (part of a cereal box or the back of a notebook will do if you can’t find any other cardboard around) What to do: Step 1: print hello or oh hey image Step 2: heat up your iron Step 4: cut your design out carefully. the way you cut the design out is the way it will look on your final product. Step 7: paint! Step 8: let it dry for a few hours or overnight. remove stencil pieces carefully. you are done!

JoAnn Babyville Boutique®: 1-1/3 yds Playful Friends Owls PUL fabric 1 yd. red FOE 1 red snap set Snap Pliers Dritz®: Tape Measure Hem Gauge Mark-B-Gone marking pen Styling Design Ruler Fray Check Pen or pencil Red & green thread Sewing machine Iron & pressing surface Basic sewing supplies RST = right sides together. 1. Cut PUL to 31-1/2" wide (half width of fabric) x 48" long. For older child, increase width and length as needed. Fold in half widthwise then fold again lengthwise to find the center of fold. Fashion Diva Design Hey there my lovely people! How are you? Are you enjoying the beautiful days? I’m always here to give you some ideas to follow the latest fashion trends. For today, I have some super clever clothes hacks that will ease your life. Are you excited? All of the ideas are amazing and will keep your underwear, socks, tank tops, jeans, shoes and jewels neatly organized. Branch Clothes Rack If you don’t want your clothes to get wrinkled, here’s an easy, cheap and fun trick for you! Tank Top Organization Summer is almost here, so hurry up and update your wardrobe with some tank tops in cheerful colors. Jeans Drawer Organization Jeans and pants can be kept organized in your drawer. Scarf Organization Love wearing scarves? Bra Storage You can use an old wooden hanger and a few shower curtain rings to display your bras. Shoe Storage We all have many pair of shoes that need to be stored wisely! Jewelry Organization Don’t know how to organize your earrings, bracelets, necklaces and sunglasses?

Related: