La photo HDR : tutoriel complet pour créer des images HDR avec Photomatix, Photoshop ou Gimp
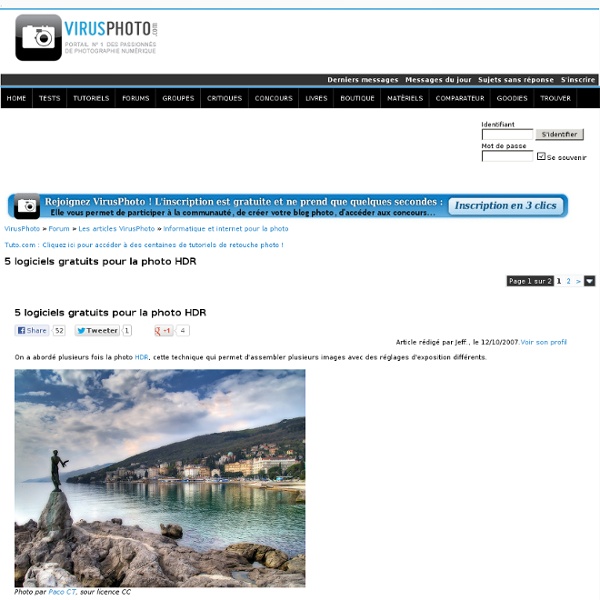
HDR pour High Dynamic Range : mais c'est quoi ? HDR (high dynamic range, grande plage dynamique ou grande gamme dynamique) est devenu au fil du temps un terme photo un peu fourre-tout, qui regroupe des méthodes et des techniques permettant de réaliser des images à grande plage dynamique. On rencontre souvent les dénominations « photo HDR », « image HRDI », « prise de vue en HDR »… mais de quoi parle-t-on, au fond ? La plage dynamique d'une photo, c'est l'écart qui existe entre les ombres les plus sombres et les lumières les plus fortes dans l'image (on parle parfois d'étendue des tonalités). Au final, ce n'est pas la photo réellement dont on évalue la plage dynamique, mais plutôt le média ou l'instrument qui la capture et la restitue : œil humain, écran, papier, capteur d'appareil photo numérique, film… Principe de la photographie HDR Avant toute chose : savoir ce que l'on veut faire avec le HDRI ! Il y a grosso-modo deux raisons qui peuvent motiver un photographe à faire du HDR : Conclusion
5 Ressources pour des photos gratuites et libres de droits.
Et comment les utiliser pour attirer plus de visiteurs ! 1. Picjumbo Viktor, le créateur du site est webdesigner, il connait donc la difficulté pour trouver des images de haute qualité à utiliser dans ses projets. Il a décidé, pour aider ses confrères, d’offrir ses propres photos gratuitement. 2. Le site New Old Stockphotos regroupe les photos des archives publiques qui sont sous la licence « Aucune restriction de copyright connue ». Le copyright tombe dans le domaine public suite à une expiration ;Le copyright tombe dans le domaine public pour d’autres raisons (non-respect des formalités ou des conditions requises par exemple) ;L’institution détient le copyright, mais ne montre aucun intérêt à en exercer le contrôle ;L’institution détient suffisamment de droits pour autoriser des tiers à utiliser l’œuvre sans aucune restriction. Vous pouvez surtout trouver des photos en noir et blanc avec un look très « vintage ». 3. 4. 5. Comment utiliser les images pour attirer plus de visiteurs.
Comment régler son reflex numérique en cas de faible lumière
Le sujet de la photo par faible lumière revient souvent dans les discussions sur notre forum, aussi nous avons pris le temps de compiler les différentes informations fournies par ceux de nos membres qui maîtrisent le sujet afin de vous proposer ce tutoriel collectif. Après « la prise de vue en meeting aérien« , premier tutoriel du genre, voici donc quelques conseils pour photographier lorsque la lumière à votre disposition est faible. Quel mode utiliser lorsque vous devez faire de la photo « reportage » par faible luminosité ? La plupart des sondés répondent : le mode A, ouverture moyenne f/8 Mais si toutefois, en adoptant ce réglage, on se retrouve avec une faible vitesse comme le 1/40ème de sec., que faire ? : ouvrir plus le diaphragme toujours en mode A ou bloquer une vitesse en mode S ? Une possibilité offerte par les reflex numériques est de passer en mode ISO auto. Le réglage ISO Auto Méthode de réglage Résultat Précautions De même, ISO auto et flash ne font pas bon ménage.
Apprendre la photographie avec The SLR Camera Simulator
"SLR camera simulator" est un outil dédié à la technique photographique, reprenant l'ensemble des contraintes qu'un photographe peut rencontrer. Ludique et gratuit, le simulateur est accessible sur la page de l'éditeur pour l'utiliser. La scène est une animation, telle une séquence réelle, que l'on doit immortaliser. Ce qui est étonnant, c'est la faculté de l'animation à s'adapter à tous les paramètres modifiés : Flou du sujet : visible si vous n'utilisez pas le trépied par exemple, ou que vous optez pour un temps de pose trop long. Profondeur de champ : en modifiant l'ouverture du diaphragme, le fond est plus ou moins flou. Sur le site, vous trouverez également "The SLR camera explained". A voir également Dans la même catégorie Communautés d'assistance et de conseils.
cours gratuits et tutoriels en ligne pour apprendre la photographie numérique
e-book gratuit bourré de conseils pour photographes amateurs
Phototrend est un blog consacré à la photographie, animé par une équipe de jeunes passionnés. Ils présentent un e-book qui reprend leurs principaux articles pratiques, destinés aux photographes amateurs. Tous les mercredis dans la rubrique intitulée "Mercredi pratique", Phototrend publie ses conseils à tous ceux qui ne maîtrisent pas la totalité des fonctions offertes par leur appareil photo numérique. L'équipe de Phototrend a eu l'excellente idée de regrouper ces articles dans un fichier pdf, qui en fait un e-book téléchargeable, avec liens cliquables. Les auteurs ont ainsi regroupés 102 articles, présentés par ordre chronologique. La théorie. Le livre lui-même est d'ailleurs placé sous licence Creative Commons, ce qui le rend diffusable, adaptable, modifiable. L'e-book fait près de 300 pages ! Une excellente initiative, qui permettra à tous de faire de magnifiques photos et d'optimiser les appareils numériques aux possibilités insoupçonnées.
Dimanche Critique Photo mai/juin 2012 : la pose longue
Bienvenue sur Apprendre la Photo !Si vous êtes nouveau ici, vous voudrez peut-être faire un tour sur la page Par où commencer, qui vous aidera à vous y retrouver parmi tous les articles.Merci de votre visite, et à bientôt sur Apprendre la Photo ! :) Un peu en retard en raison de la sortie de ma formation Devenez un Photographe Accompli, voici le Dimanche Critique Photo mai/juin 2012, qui était sur le thème de la pose longue. Je suis un peu déçu par rapport à la dernière fois, le thème semble vous avoir moins inspiré, je n’ai pas eu beaucoup d’images correspondant au thème malheureusement. Peut-être parce que ça nécessitait la plupart du temps un trépied ? Mais ce n’est pas grave car j’ai quand même trouvé de quoi vous régaler les yeux, et une photo qui mérite une critique construite. Mais avant ça, je peux d’ores et déjà vous annoncer le thème du Dimanche Critique Photo suivant, qui tient en un peu plus que 2 mots. Commençons par des utilisations « classiques » de la pose longue.
Tutoriel pour réaliser une photo de lévitation | Le Bon Reflex
Suite aux essais que j’ai fait sur le thème de la lévitation, beaucoup m’ont demandé comment faire ? De plus, depuis Google (mon ami et le votre) je vois que beaucoup de personnes cherchent comment réaliser ce type de photo et arrivent donc sur le premier article que j’avais écrit « En lévitation » : Je vais essayer de vous décrire la méthode que j’ai utilisée pour réaliser la photo très simple d’une lévitation. Dans ce tutoriel, rien d’exceptionnel esthétiquement , c’est juste pour la partie technique. Le matériel nécessaire : - Un appareil photo - Un trépied Pour faire ce type de photo, il est obligatoire d’avoir l’appareil photo placé sur un trépied. La première photo qui va être prise sera celle du décor, c’est à dire sans personne et sans objet en mouvement. Ensuite la personne que vous voulez faire léviter va se placer sur la photo (ici ça sera moi) en montant sur un tabouret, un escabeau, ou autre et vous déclenchez.