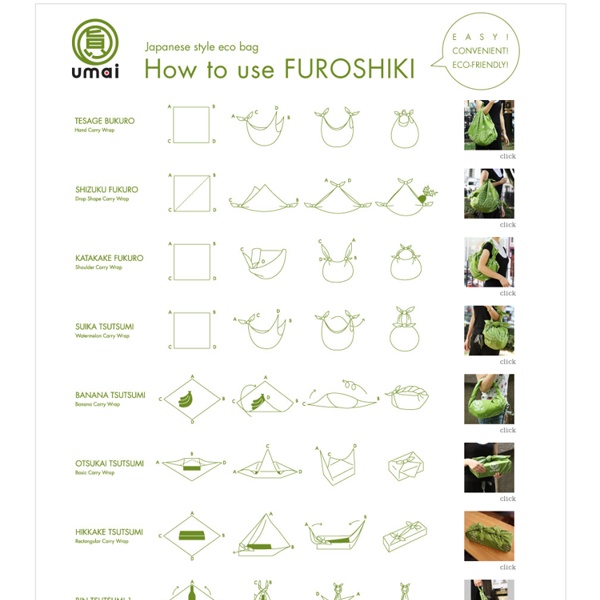


http://www.umaifactory.com/info/furoshiki
Related: A voir, d'urgence...Caldera: dream-like animated short about mental illness Evan Viera's lovely short "Caldera" explores the ambiguous reality inhabited by people experiencing psychosis, through the tale of a young girl suffering from mental illness. Viera, who also composed the film's lovely ambient electronic score, explains: CALDERA is inspired by my father's struggle with schizoaffective disorder. In states of delusion, my father has danced on the rings of Saturn, spoken with angels, and fled from his demons. He has lived both a fantastical and haunting life, but one that's invisible to the most of us. Dump A Day Do It Yourself Crafts With Wine Corks - 40 Pics Sources – Top Inspired – Indulgy - Crafts By Photos – Eat Well 101 – Good Housekeeping Dumpaday's Funny T-Shirts»
Institute for the Public Life of Arts and Ideas Students Come PLAI With Us! At IPLAI you will get to do the kind of learning and research that you can’t do elsewhere. “Batgirl” to feature first transgender character The character Alysia Yeoh will come out to Batgirl as a transwoman in the current issue of of the comic “Batgirl.” The gender reveal is a first for a featured character in a mainstream comic series, and for plenty of other cultural mediums devoid of trans representation. “Batgirl” writer Gail Simone told Laura Hudson at Wired that the inspiration for the character came from a conversation with a fellow writer — and a desire to mirror the diversity of comic readers themselves: “I looked out into the audience, saw dozens of faces I knew well — LGBTQ folks, mostly — all avid comics readers and superhero fans and DC supporters,” said Simone.
The Cutest Amigurumi — Easy Patterns and Tutorials You've likely heard of the crochet style of amigurumi (or seen it in your interweb travels) -- it's the crafty equivalent of those adorable photos of puppies and kittens that make you go "aww." Traditionally, amigurumi is the Japanese art of knitting or crocheting small stuffed animals and anthropomorphic creatures. If you knit or crochet, it is very easy to get started with amigurumi, even for beginners. There are thousands of amigurumi patterns out there that range from easy to advanced, and come in every shape and size.
“Didn’t you get tested?” One morning last fall, my son sat on the subway platform and refused to get up. It was rush hour, and there were puddles of dirty water on the concrete. As the stream of commuters pushed around us, several people stopped to ask if they could help. I thanked them and shook my head. “Henry,” I said brightly. Our Thrift Store Chair Project Hand over two crowns and a couple of over-sized chairs, because we have been the king and queen of procrastination. Although you may think I am also the queen of exaggeration, this project started back in September of 2012! I guess that is why it feels so fabulous to finally call it done.
Cute Baby Practices Life-Saving Skill If you ever find yourself in the unfortunate position of needing emergency CPR, hopefully this adorable baby girl is nearby to help resuscitate you. It would appear the tiny tike knows exactly what to do, as she's seen in this video giving a practice dummy CPR. She slowly scoots towards the dummy on her bottom, then begins multiple chest compressions, takes a pause to look questionably up towards the camera as if she's asking, "Am I doing this right?" then proceeds to breathe air into the dummy's mouth while holding its nose. "I'm sending my kid to CPR," Josh Elliot joked on "GMA LIVE!." "That's incredible," Lara Spencer added.
9 DIY Prescription Bottle Hacks You Haven't Thought Of 1 of 2 9 DIY Prescription Bottle Hacks You Haven't Thought Of 9 DIY Prescription Bottle Hacks You Haven't Thought Of by rozin.abbas from Creative Ideas in House & Home Page 1 of 2 George Takei Calls For Peace Between ‘Star Trek’ And ‘Star Wars’ Fans The renewed rivalry between ‘Star Trek’ and ‘Star Wars’ started when William Shatner said ‘Trek’ was superior because ‘Star Wars’ was derivative and lacked story. At the end of the interview, he said Captain Kirk would have wooed Princess Leia. His statements about Princess Leia got the attention of Carrie Fisher. In her response, she defended the quality of ‘Star Wars’ and challenged Shatner to a “costume-off.” Determined to have the last word, William Shatner released a video that repeated his views about ‘Star Wars.’
editorial spring 06 You have cast one stitch on to needle #1. 5. Bring needle #2 over the yarn tail on your thumb, around and under the yarn and back up, making a loop around needle #2. Last Christmas (Wham!) Step-by-Step Ukulele Lesson Learn to play "Last Christmas" by Wham! on Ukulele Browse the Full List of UU Song TutorialsDownload the TABS for Last Christmas:Please login to access the Picking TAB for this song (.pdf) Hey UUers! It's the first of the month, and like every first of the month we've got a brand new episode of Uke Lessons just for you.