Raspberry Pi and Arduino
Raspberry Pi meets Arduino - part 2
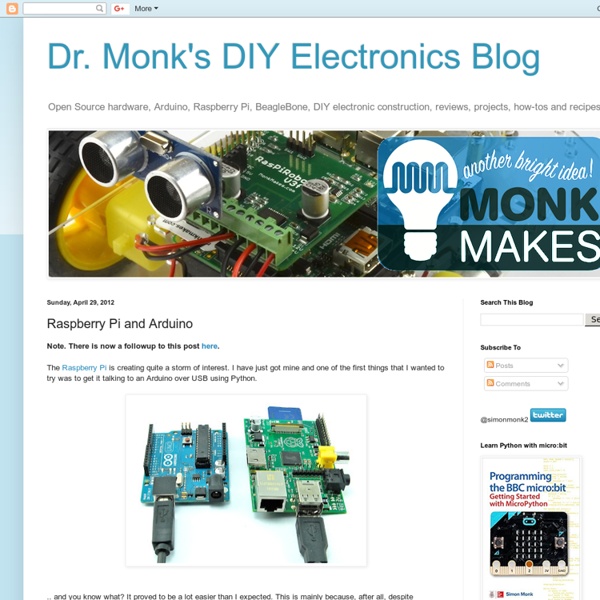
I gave a short talk and demonstration yesterday evening at the #raspberryjam event in Preston. I demonstrated the Pi raising some servo driven flags attached to an Arduino. I would have demonstrated communication in the other direction using a ultrasonic rangefinder, but I ran out of time. That can be my next post. Here is the code and details of the electronics for all this. Flags First of all the electronics. The servo control pins are wired to D2 and D3. The Arduino is powered by a separate power supply into its DC power socket. Arduino Here is the Arduino sketch. #include <Servo.h> #define MIN_ANGLE 30 #define MAX_ANGLE 160 #define SERVO_1_PIN 3 #define SERVO_2_PIN 2 Servo servo1; Servo servo2; int servo1pos = MIN_ANGLE; int servo2pos = MIN_ANGLE; void setup() servo1.attach(SERVO_1_PIN); servo2.attach(SERVO_2_PIN); Serial.begin(9600); void loop() if (Serial.available()) char ch = Serial.read(); if (ch == 'a') servo1pos = MAX_ANGLE; else if (ch == 'A') servo1pos = MIN_ANGLE; servo1.write(servo1pos); Python
Introduction: Pinewood Derby Race Finish Line: 14 Steps
AdWords We use AdWords to deploy digital advertising on sites supported by AdWords. Ads are based on both AdWords data and behavioral data that we collect while you’re on our sites. The data we collect may include pages you’ve visited, trials you’ve initiated, videos you’ve played, purchases you’ve made, and your IP address or device ID. This information may be combined with data that AdWords has collected from you. We use the data that we provide to AdWords to better customize your digital advertising experience and present you with more relevant ads. LiveRamp We use LiveRamp to deploy digital advertising on sites supported by LiveRamp. Doubleclick We use Doubleclick to deploy digital advertising on sites supported by Doubleclick. RocketFuel We use RocketFuel to deploy digital advertising on sites supported by RocketFuel. Twitter We use Twitter to deploy digital advertising on sites supported by Twitter. Facebook We use Facebook to deploy digital advertising on sites supported by Facebook.
Arduino Preprocessor Directives Tutorial
In Lightweight Arduino Library for ROHM Sensor Evaluation Kit, I introduced RohmMultiSensor – Arduino library that allows you to easily interface with multiple sensors in the ROHM Sensor Evaluation Kit. One of the core features of this library is that the program size is noticeably minimized by only compiling the parts of the library that contain the code specific for the sensor you want to use. This means that when you use less sensors, the overall program size and memory usage will be smaller. Hardware Arduino UNO Software Arduino IDE Almost everyone who has ever used Arduino has used a library. Arduino beginners should already be familiar with #include which “adds” the library to the main sketch. After you press “Upload” Let’s do a quick experiment first: start your Arduino IDE, open one of the example codes (e.g. Arduino IDE performed something called “syntactic check”, to make sure what you wrote is actual C/C++ source code. Preprocessor basics Adding extra code: #include directive or and
Arduino RPi Communication
Desktop CT and 3D Scanner With Arduino: 12 Steps (with Pictures)
CT scanning requires a source of radiation (e.g. x-rays or light) on one side of an object and detectors on the other side. The amount of radiation that makes it to the detector depends on how absorptive the object is at a particular location. A single image acquired with this setup alone is what produces an X-ray. An X-ray is like a shadow, and has all the 3D information projected into a single 2D image. To make 3D reconstructions, a CT scanner acquires X-ray scans over many angles by either rotating the object or the source-detector array. The images collected by a CT scanner are called sinograms, and they display absorption of X-rays through one slice of the body vs. angle. The same principle is applied for the optical CT scanner with a camera acting as the detector and the LED array acting as the source. Photogrammetry requires the object to be illuminated from the front.
Related:
Related:
