background preloader

Geo Data Logger: Arduino+GPS+SD+Accelerometer to log, time-stamp, and geo-tag sensor data

Geo Data Logger: Arduino+GPS+SD+Accelerometer to log, time-stamp, and geo-tag sensor data
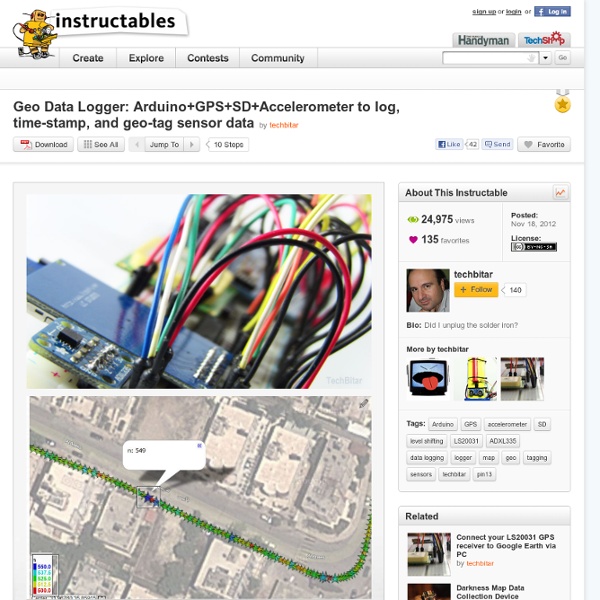
UPDATES Oct 17, 2013: I have published a guide on using your Android phone to accomplish a similar task by leveraging your Android device's built in GPS and sensors. Feb 6, 2013: Featured on GeoAwesomeness Nov 24, 2012: Featured on Hackaday Nov 21, 2012: Featured by John Boxall @ Freetronics Nov 20, 2012: Featured on Dangerous Prototypes INTRODUCTION I thought it would be educational to build a prototype that I can take on the road to log, geo-tag, and time-stamp sensor data to be analyzed later with mapping and/or data analysis applications. This prototype is a generic sensor logging/geo-tagging gadget which means the accelerometer can be replaced with any other sensor(s) to log and map anything anywhere. As a matter or fact my next adventure with this logger is to replace the accelerometer with a pollution sensor to visualize levels of air quality around town.

8 Hour Mini Recycled Survival Candles in 10 steps! 8 Hour Mini Recycled Survival Candles This Instructable will show you how to make 8 hour survival candles out of everyday items. These candles can be made for next to nothing, bring light in dark times, and bring warmth to you and your family when survival situation takes place. Just follow the following steps and you will become hooked on recycled survival candle making! 1. 2. 3. 4. 5. 6. 7. 8. 9. 10. That's it your done! Atelier pratique : Capter et mesurer une intensité sonore | Œuvre | Imaginaire | Numérique L’Atelier, FabLab en devenir a vu le jour il y a tout juste un mois… L’heure est à un premier point d’étape après un lancement tout en douceur. La fréquence de ces billets n’est pas encore déterminée même si il est probable qu’il s’agisse d’une feuille de route mensuelle. Concernant le format, la première partie sera consacrée à un résumé des activités qui ont eu lieu durant le mois, la seconde partie, plus technique, détaillera la procédure à effectuer en vue d’accomplir une tâche spécifique avec le matériel mis à disposition. Activités Mardi 22 janvier 2013 Séance consacrée aux concepts fondamentaux de la programmation illustrés grâce à l’utilisation de la plateforme Arduino et quelques LEDs. Mardi 29 janvier 2013 Présentation de 3 projets : Light Painting interactif. En vue de réaliser ces projets, certains composants électroniques basiques tels que les photo-résistances, potentiomètres, interrupteurs, capteurs piezo ont été présentés aux étudiants. Mardi 5 février 2013 void loop() {

Photoshop - Correcting Color Shifts First of all, before we get into correcting color shifts, we have to understand them. Most cameras these days have an automatic white balance setting to control this issue, but everyonce in a while it can be inaccurate. Color shifts are caused by different color temperatures in light, we call these "Kelvin temperatures." Daylight has a Kelvin temperature of 5000, and is the most neutral you can get your photo to look. Have you ever photographed something in your house under a typical house bulb and the whole photo turned out orange or yellow? That's because typical household lights have a Kelvin temperature of about 3000, which can look yellow, but because the human brain is so sophistocated, it corrects this to daylight temperature for us. Tungsten bulbs tend to have a magenta shift to them, while fourescent bulbs can turn a photograph green.

Cheap Accelerometer with the Wii Nunchuck As you’re probably well aware, the wiimote and nunchuck have a vast array of sensors built into them. Instead of buying pre-assembled breakout board for $35, or attempting to solder a tiny surface mount accelerometer, learn to exploit the features of the Wii Nunchuck and have a fully assembled accelerometer, joystick, and pushbuttons for just $12.50 shipped (on ebay). Why use the nunchuck insead of the actual WiiMote? Wiimotes can be about $40 and have a lot of extra features you wont need at the moment. 1. The Nunchuck communicates through 6 bits of data. 2. If you don’t already have it, download the Arduino software (free). 3. By using the serial monitor of your Arudino software (or other serial monitoring software), you’ll see the above output. 4. Watching numbers steam in (step 3 image) is fine and dandy, but sometimes you just need something more to create a truly new perspective.

Bentwood Rings This is my first Instructable, so I hope that I do not forget anything. I was commissioned by a close friend to make a set of rings for a surprise engagement and a set for wedding bands. I started off with solid wood blanks and a drill press. After making what I thought be a perfect ring, it broke after a couple weeks of wear. At this point I went back to the drawing board and started to research bentwood rings. This not only solved the issue of strength, but also allowed for the beautiful wood grain to show. 1. 2:Making the Ring: Cutting: Start of by selecting the veneer. it-architect.wikispaces Background More and more computing devices like smart phones are adding GPS capabilities as their base function. Even Latest Desktop browsers are adding Location Aware facilities as part of their core functionalities and websites are trying to leverage it to enhance the end user experience. But Location Aware services on a desktop/laptop environment, may not be accurate enough as they extract location information from nearby wireless access points and your computer's IP address. However, accurate location detection will be the key to several interesting and useful applications like this. Till the time computer manufacturers decide to offer embedded GPS chip in mainstream computers, you can use following approach to augment your computer with accurate Location Service. What you need Hardware and Logistics A Desktop/laptopArduino Microcontroller. Software This step will help you installing TinyGPS and NewSoftSerial library module in Arduino IDE. Setup Component Interaction When GPS is offline

Kee Klamp Shelving My original idea was to simply copy the shelves I'd seen, so I started looking for scaffolding poles and a way to cut them. This lead me to Kee Klamp ( an awesome system of poles and clamps - or Klamps :) - that you can literally build anything with as long as you have an Allen Key. The original design I'd seen had each shelf supporting the next by using the flange bases ( The only problem with this was that I'd need to do a lot of pole cutting and the height between the shelves would be forever fixed.

DIY Battery: Power an LED Flashlight with Pocket Change! We must prepare the barriers which will sit between the nickels and pennies in our pile. With a sharp knife, like an X-Acto knife, carefully cut some thin cardboard or similar material to the size of a penny. How many wafers you must prepare depends on how many coins you end up needing. This amount may vary due to a number of factors. If you're young, clumsy, or for any other reason think you might have problems then please do this with supervision or ask for help. Brake drum blacksmith forge This is the basic design. A 2" floor flange was bolted to the underside of the brake drum to which a 2" coupler was used to attach it to a 2" T-connector. A longer coupler was attached to the side to accept the hair dryer and a bottom pipe was attached to the bottom to collect the ash. This is usually capped with a 2" cap so the air can't escape that direction but I didn't want to have to wait until the forge cooled to unscrew the cap and empty the ash and I was concerned the cap would become permanently attached by rust since the forge would be stored outside in the rain. Note: The brake drum was free but it took visits to several garages to find it because brake drums are harder to find now that disc brakes are becoming more common on the rear wheels of new cars.

Make a working lock and key Firstly, I'm going to run through the basics you need to keep in mind when preparing a model for 3D printing. If you have already used 3D printers, then feel free to skip on to the next page, or take a quick look at the bold writing to double check the basic rules. There are several types of 3D printer available, and depending on what one you're using will affect the way you make your model. For example, a printer using photopolymerization uses light to harden a liquid resin in layers, so when completed the model is simply pulled from the liquid, allowing for all types of undercuts/ interlinking items. However, Thermal Extrusion printers heat plastic and print each layer on top of the previous, meaning that it has to create supports to reach any undercuts in the model. So, for thermal extrusion here is what you need to keep in mind. 1. 2. 3. 4. Phew.

USB Freeform Arduino All the parts are about the same as used in it predecessor, "Freeform Arduino" except that I used film canister instead of the antistatic tube, with an addition USB type A connector. Schematic shown below is comprised of the minimum components and could be used FTDI cable to upload the sketch. On the actual USB Freeform Arduino did not included the 1K resistor and 3mm LED that connected to pin D13 as in the schematic. Parts These are the minimum components to get Arduino up and running. (1x) ATmega168/328 preloaded with Arduino Bootloader (1x) 16 Mhz Resonator (2x) 0.1uF Ceramic Capacitors (1x) 3mm red LED (Only needed for testing purpose only)(1x) 1K Resistor (1x) 10K Resistor (1x) 6-pin Male Header (as the connector to FTDI cable to upload the sketch) (2x) 1x14 Female Receptacle Additional Materials: Hookup Wire 35mm Film Canister USB Standard type A cable (Male Connector) Tools Solder iron and Solder station Diagonal Cutter Pliers X-Acto Knife Wire Stripper SolderSucker

Related: