
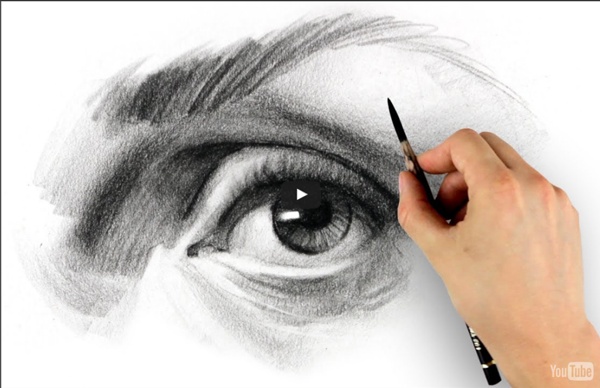
How to Draw Wrinkles on Face| Realistic Portraits Tutorials So I was just going over the comments (I read every single one of them) and I saw a request for a tutorial on how to draw realistic wrinkles. It came from Bobbie – “shading is my hardest, and how to put wrinkles that don’t just look like lines” So, I’ve created this tutorial for you (and Bobbie ) on how to draw the wrinkles under the eye. In this video, my co-instructor Michael will go over some tips and techniques for drawing the wrinkles and then he will demonstrate it by showing you the drawing process. I’ve had to speed up some part of the video in order to keep the running time from getting too long. We will be using a 2B and 4B pencil for this drawing (Michael will talk more about that in the video). Here are the references we’ll be working with in this realistic pencil portrait tutorial: Click To Enlarge I hope you enjoyed this video. It’s a complete training on how to draw truly realistic portrait… made especially for beginners and intermediates. ===> Click Here To Learn More
Multiple Point Curvilinear Perspective Drawing Lessons : How to Draw Figures and Buildings and Shapes in 4,5,6 Pt Perspective with Easy Tutorials 5 Point Perspective Drawing Tutorial Learn how to draw in perspective with a compass and some knowledge of 2 and 3 point perspective already under your belt. 5 Point Perspective : Curvilinear Perspective This is a complex but dynamic system for rendering certain 3-dimensional situations in a 2-dimensional medium! Advanced Perspective : Curvilinear Video Tutorial Check out this video to learn how to use curvilinear perspective. Aerial and Four Point Lineal Perspective on Location (en plein air) This is me or you lining up a painting to an image sixty degrees wide on the horizon line. Creating a Spiral Staircase with Multiple Perspective Points Joe Sparano, a student from Omaha, asked about creating a spiral staircase using linear perspective. Curvilinear Perspective Curvilinear perspective allows much greater field of vision than traditional rectilinear perspective. Fish-eye and Curvilinear Perspective Taking it Even Farther: Multiple Point Perspective! One Point Perspective Drawing Lessons
Drawing the Human Eye - OnlyPencil Drawing Tutorials We can all probably draw the human eye, we draw the oval shape with the iris and pupil. I consider that to be a basic sketch of the eye. Before you draw a realistic eye you must first study what it really is. Take a look at the pupil(the black area in the center), this area contracts in size when light hits it. Tools Used: 2h wood cased pencil2b 0.5 Mechanical PencilKneaded EraserColor BlenderSmooth Bristol Paper This is the final drawing of what we’ll be working on. Step 1 Well we will start by drawing the outline, this can be a fast sketch, but enough detail to show the shape. Step 2 Start by filling in the pupil using the 6b progresso pencil. Step 3 Take your 4b progresso pencil and put down some graphite on a separate piece of paper. Step 4 Using your mechanical pencil draw the lines that you see around the area that was shaded previously, try to make them quick and light. Step 5 Using your mechanical pencil lightly fill in the area around the pupil. Step 6 Step 7 Step 8 Step 9 Step 10 Step 11
How to Draw Eyes | How to Draw Eyelashes Welcome back! And congratulation for making it this far into the series. Our drawing is almost complete! In this lesson, we will continue learning about drawing realistic eyes. And I promise you will be very happy with the end result. OK, so in this video, I’ll show you how to draw in the eyelashes. (To download this video. So, as I said yesterday, I’m getting ready to launch a brand new training course called, “How To Draw Realistic Portrait From Photographs… In Just 4 Weeks!” The course will be officially open for enrollment tomorrow and I will go over all the details of what’s inside. But if you would like to get a head start and “cut in line”, you can find all the details here: Click here to learn more and get priority registration. Now, be sure to check back tomorrow and we will put the finishing touches on your drawing and I’ll tell you more about my new advance portrait drawing program. Thanks for watching and I’ll see you soon!
Tutorial: Fashion Sketches I’ve been so flattered with your sweet words about including my sketches in my refashion/sewing posts. Seriously, every time I read your comments I get a big smile on my face. Often times I share them with Chris and say, “Look, Chris!! People like what I do!” That made me think that she might not be the only one wanting to know how. Now let’s get started! pencileraserpapera model or mirror I draw the figure from my head most of the time, but I’ve practiced drawing the figure loads of times. First, you want to mark down your reference points. Now that you have the angles down, sketch in all of the joints with lines & circles. Now that the figure is starting to take more shape, connect the circles. Remember in art class in 7th grade how you were taught to start drawing the figure with the head & make the body 7-8 heads tall? I leave the hands for last because they’re pretty tricky. Now your drawing is ready to accessorize. As step 6 suggests, you can also download my drawing.
Sketching Tips - How to Draw Eyes In this lesson, we look at the anatomy of the eye and discover some useful tips for getting the eyes right in portrait drawings. By learning what is under the skin, you will know what to look for when you are drawing an eye, and will achieve accurate, realistic results in your drawings. If you want a simple eye drawing to copy step by step, take a look at this drawing an eye step by step. The Anatomy of the Eye When you learn to draw eyes, it is useful to think about the anatomy of the eye. How you draw the eye also depends on the angle of your subject's head. Copyright Notice This article is COPYRIGHT (C) of Helen South, licensed exclusively to About.com, Inc.
How to Draw Eyebrows Realistically | Pencil Drawing Lessons | Portrait Drawing Over the past few lessons I’ve told you about Pillar #1 & #2 of portrait drawing. In this lesson, we will cover Pillar #3: Capturing The Likeness Of The Portrait. Pillar #3 is all about getting all the subtle details of your portrait right so that when some one looks at your portrait, he/she will instantly recognize who you drew. Now the shading and drawing techniques that I’ve showed you in the previous lessons will help you to make your drawing much more accurate. And that alone will capture the likeness to some degree and make your portrait more recognizable. But in order to take your drawing to the next level, you need to pay attention the the subtle details of the subject as you are drawing. This aspect of portrait drawing is not encompassed by a single technique. But I will do my best to point out the important details to you and tell you what you should pay attention to. (To download this video. ‘Till next time, please hit the “LIKE” button and share this post with your friends.
Drawing the Eye - Teach Yourself to Draw Faces Step 1 - The Outline of the Eye Close observation is very important when starting the line drawing of an eye. You must pay particular attention to the difference in shape between the upper and lower eyelids. Each eye is unique and the more acute your observation, the more accurate a likeness you will achieve. Step 2 - Drawing the Iris You should note how the upper eyelid covers the top of the iris. Step 3 - The Surface of the Eye There are two main elements to consider when drawing the glassy surface of the eye: 1. 2. Step 4 - The Eye Socket The final step is to render the solidity of the eye socket and surrounding area using graduated tone. The upper eyelid casts a shadow which forms a dark curve across the top of the eyeball. Graduated shading is used to cover the outline detail and build up the tone of the eyelids and surrounding area. Eyebrows and eyelashes are formed by soft, delicate hairs, so draw these lightly and pay particular attention to the direction of their growth.
How to Draw an Eye Learn to Draw Art Lessons Art Books Charcoal Oil Lessons Wetcanvas Drawing for Beginners Female Eye by Faith Te Here is the first tutorial from Art Studio — a female eye. My method in graphite pencil drawing aims to render subjects as realistically as I can. The following is a step-by-step demonstration of how I draw eyes. While I very much hope that it helps you in drawing realistic eyes, do experiment and develop your own way of drawing. Step One The outline on Canson Grain. Step Two Using a soft brush dipped in small amounts of graphite powder, I cover the outline with two or three layers of tone. Step Three Using a smaller version of the brush I used in the previous step, I begin forming the shapes of the eye by defining the darker areas.. Step Four With a kneaded eraser, I cleaned up the highlights. Step Five I used a Dong-A 0.5 mm 2B mechanical pencil to draw the darkest areas like the pupil, shadow on the upper part of the iris and the crease of the upper eyelid. Step Six Step Seven
How to Draw Eyes & How to Draw the Face Drawing Tutorials: Drawing & How to Draw Learn Step by Step How to Draw Human Eyes Drawing Lessons Step by Step Techniques You Might Also Like Our : How to Draw Eyebrows ... How to Draw Eyelashes Tutorials Page How to Draw Realistic Eyes with Step by Step Drawing Tutorial in Easy Steps I will show you how to draw a realistic eye using pencil, charcoal, or even digital pen. How to Draw Realistic Eyes from the Side Profile View – Step by Step Drawing Tutorial We showed you how to draw the eye from the front, and now we are going to show you how to draw a realistic looking eye from the side/profile view. How to Draw Realistic Eyes with Easy Step by Step Drawing Lessons Being able to draw realistic human eyes looks like it would be near impossible to attain. How to Draw Manga Eyes Step by Step Drawing Tutorial There are many ways to draw Anime eyes, the other day we showed you one way. How to Draw Anime Eyes with Easy Step by Step Manga Tutorial Find out how to draw amazing Manga eyes with the following drawing tutorial. Drawing Cartoon & Illustrated Eyes Reference Sheets Drawing Shapes of Eyes and Their Emotions
Graphite Pencil Drawing Tutorial: Female Eye | Artistic Realism Art Studio Here is the first tutorial from Art Studio — a female eye. My method in graphite pencil drawing aims to render subjects as realistically as I can. The following is a step-by-step demonstration of how I draw eyes. While I very much hope that it helps you in drawing realistic eyes, do experiment and develop your own way of drawing. I myself sometimes do not follow some of the steps exactly as I like to experiment and try to find better ways of achieving a specific texture or effect. Step 1: The outline on Canson Grain. Step 2: Using a soft brush dipped in small amounts of graphite powder, I cover the outline with two or three layers of tone. Step 3: Using a smaller version of the brush I used in the previous step, I begin forming the shapes of the eye by defining the darker areas. Step 4: With a kneaded eraser, I cleaned up the highlights. Step 6: Concentrating on the iris for now, I use a hard pencil (5H Staedtler) and fairly hard pressure to draw spokes originating from the pupil. Faith