How To Make Bubble Paper/Art
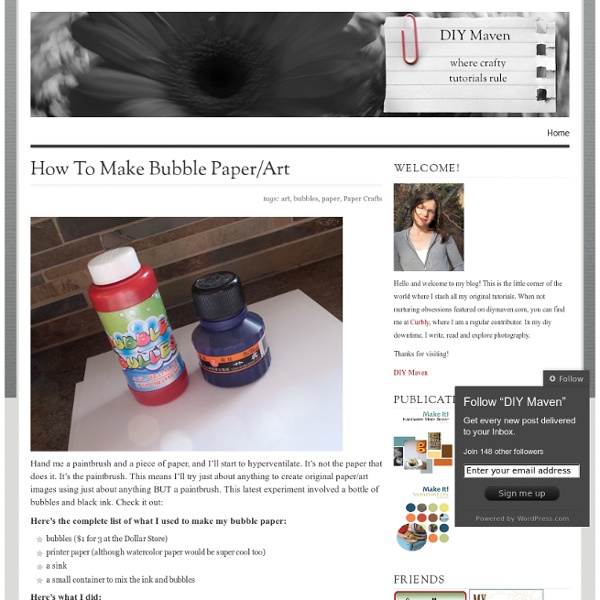
Hand me a paintbrush and a piece of paper, and I’ll start to hyperventilate. It’s not the paper that does it. It’s the paintbrush. This means I’ll try just about anything to create original paper/art images using just about anything BUT a paintbrush. Here’s the complete list of what I used to make my bubble paper: bubbles ($1 for 3 at the Dollar Store)printer paper (although watercolor paper would be super cool too)a sinka small container to mix the ink and bubbles Here’s what I did: Mixed about 1 part ink to 4 parts bubbles in a small container. Laid the paper in the bottom of a dry sink. Started blowing bubbles over the paper. Now, there’s not much control here. Then something like this happens, and life is good. I used one such bubble burst to make this card, centering the burst inside the cut area. I’m definitely going to do this again using different colored inks. Like this: Like Loading...
Create kids crafts in your kitchen - Frugal Village - Frugal Village
Craft recipes are fun to make. They’re ideal for preschool classrooms or as boredom busters for kids at home. In a previous column (www.frugalvillage.com/2011/02/14/make-craft-recipes-for-kids/), I shared recipes for chalk and mock silly putty, and readers requested more. While some craft recipes aren’t cheaper than their retail counterparts, it’s still a lot of fun and educational for kids to create and explore. Mix 9 cups extra fine, colored play sand. 1/2 cup white Elmer’s glue 2/3 cup warm water food coloring 1 teaspoon Borax 2 glass bowls In a small glass bowl, mix together glue, 1/3 cup warm water and food coloring (add enough drop until desired color). You’ll need 1/4 cup of cornstarch, 1/2 cup water and food coloring. Mix together equal parts dish washing liquid and washable liquid paint or powdered tempera. Mix first 4 ingredients in large bowl. Combine nongel shaving cream with a couple of drops of food coloring. Mix the sugar and cornstarch in a small pan. Stir together.
Make-up Magnet Board
We all know with craft blogs that original ideas are often hard to come by, we find ideas we love and make them our own but we didn't come up with the idea ourselves. I feel like I've finally done something original here and I'm excited about it. I'll show you the finished product and then explain. Behold my Make-up Magnet Board. I have a friend who is beautiful and stylish and has always loved make-up but recently took a course that intensified her love. Her renewed interest has worn off on me and it made me remember eye shadows I'd hidden away that were gathering dust. The basket was a mess and I was overwhelmed with all my choices never knowing what to use, digging through to see what I had and find what I wanted was a pain. I painted it (The hard way, with a brush instead of spray paint. I went to the hardware store and picked up some metal and had them cut it to fit inside my frame. Here comes the brilliant part though. Next I wanted a place to store my brushes and liners though.
Fun with Foam Printing - Easy Tutorial
I loved this idea because not only can you recycle these horrid polystyrene containers, but the process is really simple. You could even use tracing paper and trace your design so you don't even need to be able to draw. You could make a whole series of cards like this or just a colorful print to hang on your wall and cheer up the place. Materials needed: Foam or polystyrene container pencil paint or ink small roller 1. 2. 3. 4. 5. Happy printing! Original image courtesy of themetapicture
52 Weeks Project
HOW TO: geometric ornaments + GIVEAWAY | Snow and Graham
I love a good paper ornament project, and I especially like one that allows you to use up bits and pieces of paper that are too big to toss and too little to use. This ornament takes a bit of time, but I truly believe that the sum is greater than the parts in that you are left with a keepsake that will hang from your tree for years to come. A little background on this project: Years ago we developed a holiday kit series that included this ornament as its crown jewel. It was darling and we had lots of customers who were ready to stock them in their stores. TO BEGIN: Download our project templates HERE and select an ornament size. STEP 2: Build the top and bottom caps by gluing 1 flap each of 2 circles together. STEP 3: Create the center ring by gluing 10 the flaps of circles together so that the triangles point in opposite directions. STEP 4: Complete the ornament by gluing the flaps from the top top and bottom caps to the center ring. Tags: Christmas, diy, wrapping paper
DIY Braided Bead Bracelet
It’s been awhile since our last bracelet DIY. I don’t know about you, but our wrists have been begging for another colorful addition for months now. So after playing with some materials that were already on hand, we’ve created a tutorial for a braided bead bracelet, which is a not so distant cousin of the hex nut and wrap bracelet. Because honestly, you can never have too many . . . You’ll need: Cut the waxed linen cord into a 26″ and 19″ piece. Tie a knot about half an inch down from the loops. Start braiding the strands. Push the bead against the base of the braid, and cross the left strand over the middle. Keep a finger at the base of the braid, holding the beads in their place and keeping the braid tight. Finish the bracelet with another inch of braided cord, measuring it against the wrist. Thread on a two hole button – two strands through one hole and one strand through another. Trim the end. Your bracelet is finished! (all images by HonestlyWTF)
Simple Ideas That Are Borderline Crafty - 27 Pics
Click Here For More Fun Craft Ideas
41 Easy Things To Do With Mason Jars
25 Repurposed Magazine Projects - DIY
It's time for another installment of 'My Favorite Things'. This time I've scoured the net and found 25 of the best repurposed magazine projects. These repurposed craft and DIY ideas range from easy to advanced, some come with tutorials, and others you get to figure out for yourself (or even buy in the case of a few). Ready to be inspired? beads boxes drink coasters placemats wrist purse wallet wall art (leaves) decorative bowl photo frame hanging mobile clock mirror frame wall art flowers a wall of stacked magazines! wreath end table vases portrait art portfolio/briefcase starburst mirror art extra seating stool hanging stars Until next time... Michael Stumble this post
Related:
Related: