DIY packaging ideas + tutorials
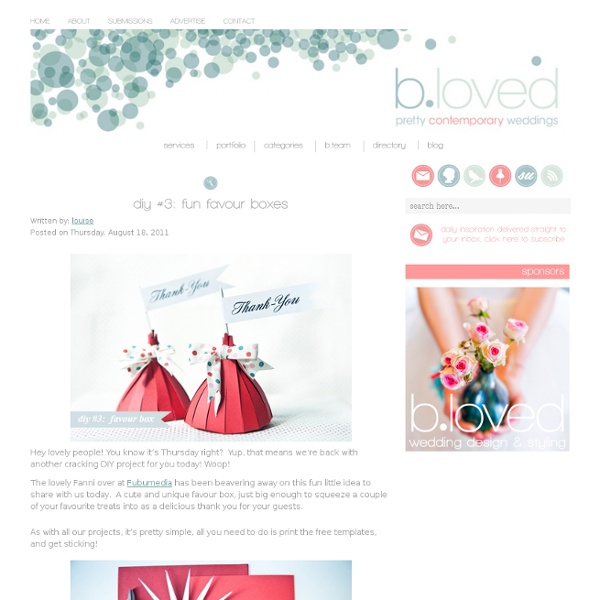
EnglishSince I love packaging ideas and tutorials I’ve put together this little collection. Really hope it will give you some fresh inspiration to package your own creations/products, or just to spice up your gift wrapping! :) This lovely package is made creating a bow with beads. Love the idea! These were born as favour boxes but I found the idea adorable also to “wrap” and package other products. At Bijoux Bride you’ll find the tutorial plus the templates of the box and the thank you flag. And aren’t these ruffled papers absolutely sweet? And, butterflies or not, this “cone” paper bags are a must. This project is by posh-paperie.com and you can find the tutorial here, at Style Me pretty. xoxo ItalianoOggi ho messo insieme un pò di idee di packaging e relativi tutorials, perché come ben sapete tra le mie varie fisse c’è anche quella del packaging/delle confezioni per i prodotti/dei pacchi regalo, quindi… eccone un pò. Questo carinissimo pacchetto è creato con un fiocco di perle. Baci!
Make New Year’s Eve Party Hats {free printable 2012 template}
UPDATE: I’ve updated this template for 2013. Get the 2013 New Year’s Eve printable hat here. Enjoy! This New Year’s Eve Party Hat free printable template is inspired by my clock-obsessed 2-year-old, Elise. It occurred to me while looking at our hallway clock with Elise that this year’s new year will turn into a 12 when the clock hits the 12. So based on Elise’s pink monkey birthday party hat free printable template I designed these New Year’s Eve Party Hats in purple and blue featuring a 2012 countdown clock, stars, and “Happy New Year” in the Lavanderia font from the Lost Type Co-op (via howaboutorange). This quick and easy free New Year’s Eve Party Hat is for you to cut out, make and enjoy at your own New Year’s Eve party. WANNA MAKE IT? Supplies for making a New Year’s Eve Party Hat: For all free printable templates, you can either print it at home or send it online to FedEx Office. Please post a comment and let me know how this craft idea works for you. Using your X-Acto knife
DIY Paper Popsicle Memory Game
As a kid I adored the game 'Memory'. The truth is, I still do. Sure, it's not exactly what you would define as 'challenging' but there's something charming about it's simplicity. So, for a bit of cute fun I decided to re-create the game with a slight twist. I've replaced the cards with paper popsicles. Scatter these at a summer ice-cream social, bbq or picnic for a bit of interactive fun for guests! Smooth white A4 card (x2)Popsicle sticks (x12)ScalpelRulerCutting boardScissorsDouble-sided tapeColour printer Download and print out 2 pages of your popsicle designs. Use a scalpel and ruler to gently score along the dotted lines. Before you start cutting out your popsicles, keep in mind that you should be as precise as possible with your cutting as you want all your popsicles to look as identical as possible from the back. Cut out around the straight edges of your popsicles using the scalpel and ruler. I've stored my popsicles in this cute jar- a local purchase from Daiso.
A Modern Train Party: Part 1 | The Party Dress |
A Modern Train Party: Part 1 | The Party Dress. About these ads Like this: Like Loading...
Backyard Shenanigans | Spark
Big fan of the repurposed pallet table. 11 Reclips 2 Likes In love with this canopy made of painters drop clothes. 9 Reclips 2 Likes Vintage biergarten tables. 1 Reclips 0 Likes I've lusted after globe string lights for years. 2 Reclips 1 Likes Never been a huge fan of croquet, but I'm willing to give it another try. Let the festivities begin! 3 Reclips 0 Likes Super-cool idea: DIY moss graffiti. 4 Reclips 3 Likes Backyard camping (or just napping) is better in a watermelon tent. Love this DIY planter! 2 Reclips 0 Likes Funky take on backyard lighting. Pre-mixed cocktails in Mason jars. 13 Reclips 2 Likes Lights + streamers for the perfect backyard birthday party. 6 Reclips 0 Likes This painted deck is the coolest. Amazing how good colored paint cans with holes can look. 8 Reclips 0 Likes Beach ball lights! Magic hour. Whitewash a boring table with gray stain for a beachy, weathered look -- as any garden table should have. 0 Reclips 0 Likes Popsicle lights for summer nights! 12 Reclips 2 Likes 24 Reclips 0 Likes
Spring Flowers from burlap and baby wipes!
Ya know what makes me crazy? Finding a perfectly good pack of wipes totally dried out and worthless. Anyone else hate throwing that money away? (Edited to add: Yes, I realize you can just add water, but it’s still frustrating.) Well good news. It’s Spring now and those dried out ghosts of diapers past just happen to make a mean gerber daisy. Seriously. I’ve been wanting to make some white felt flowers to brighten up my enough-of-the-red-already upstairs, but as it turns out, I was almost out of white felt. Toss in some burlap scraps, a coat hanger and a quick repurposed vase and voila! Soft, natural colored flowers perfect for that dark living room … … and a bright punch of color for my new office … all made from stuff I was going to toss anyway! Want to make your own? You’ll need: As always, I hope you Rock What Ya Got and adapt this project to use what you have on hand. Open up a metal hanger, straighten out and cut stems. Bend the top 1/4” of each stem 90 degrees and set aside. Love ‘em both.
Transportation Party!
I've been busy as a bee these days creating some new designs for my shop, and today I'm so happy to reveal the photos from the new TRANSPORTATION PARTY SET. Brittany from Grey Grey Designs contacted me to collaborate on a PLANES, TRAINS and AUTOMOBILES party for a sweet 2 year old boy who loves trains. Drawing inspiration from the "Ready, Set, Go!" fabric from Robert Kaufman, I got to work creating a printables set perfect for all those little boys who love things that GO! I was thrilled to see the photos from the party and hear more from Brittany on her creative details. Starting at the front door, Brittany gave the guests a sneak peek of the fun inside with an adorable door sign made with the TRANSPORTATION PRINTABLES and some orange craft foam. For the party table, Brittany explains, "I wanted the backdrop to be a literal sky. And, I strung the banner from the back of the airplane to suggest the airplanes that fly messages through the sky." FABULOUS JOB, Brittany!
Entertaining Made Lovely: DIY Glass Centerpieces **Featured on KCMag.com!**
**Featured on French Marie Claire website!** **Featured on KCMag.com!**Recently while perusing Nell Hills for some decorating inspiration, I spotted some beautiful, brightly colored grouped vases. I fell in love and set out to recreate this look for myself. I headed to River Market Antique Mall, where I found three interesting clear glass bottles at a great price, and then headed home to start my project. I washed and dried all of the vases and jars. All I needed to get started on my project was some enamel paint made especially for glass. The painting process was surprisingly quick and easy. (TIP: I didn’t wear gloves, and after the first few minutes into the process, I immediately regretted it as my hands were completely stained. I was so pleased with the results that I decided to make a dining table centerpiece out of one of the groupings. I took my fabric and cut a long table runner the length of the table with a little overhang on each side.