
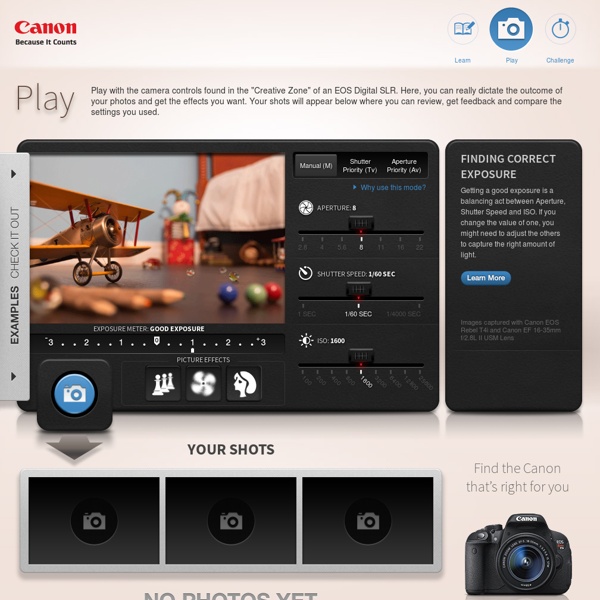
The original DSLR camera simulator | CameraSim Lighting Lighting is the single biggest determinant of how your camera needs to be set. With only a few exceptions, you can never have too much light. Use this slider to experiment with different indoor and outdoor lighting conditions. Distance Use this slider to simulate how close or far you are in relation to the subject. Focal length Moving this slider is the same as zooming in and out with your lens. Mode The exposure modes of an SLR let you control one setting while the camera automatically adjusts the others. ISO refers to how sensitive the “film” will be to the incoming light when the picture is snapped. Aperture Aperture, or f-stop, refers to how big the hole will be for the light to pass through when the shutter is open and the picture is snapped. Shutter speed Shutter speed is how long the shutter needs to be open, allowing light into the camera, to properly expose the image. Happy simulating!
Digital Video Repair download Quem nunca teve problemas com arquivos digitais que atire a primeira pedra. Hoje em dia a situação felizmente é menos comum, mas há alguns anos a internet estava infestada de arquivos digitais corrompidos – ou que se corrompiam durante o processo de download. Se mesmo assim você é insistente e tem alguns desses guardados, ou que quer se precaver caso isso aconteça contigo, uma boa opção de download para constar em seu set list de programas é o Digital Video Repair. Sua função é reparar de forma rápida e descomplicada arquivos no formato AVI. Todo o processo, desde a instalação até a utilização, é bastante intuitivo e certamente o usuário não terá maiores problemas durante a sua configuração. Depois de baixar o arquivo, dê um duplo clique sobre ele e siga o passo a passo da instalação. No entanto, a facilidade de utilização compensa esse ponto negativo. Para executar o processo clique em “Check Errors”. Durante a instalação, pode ser que seja oferecido algum software adicional.
Blog | Pixate We’re really excited to announce the release of Pixate Studio 1.0. We’ve been working on it for many months now, and after some great feedback from our beta users, we’re very proud to make it available to all Pixate users. Pixate Studio is everything you know and love about Pixate, in a completely standalone app that runs on your Mac (Windows coming soon). With integrated iOS Simulator support, Pixate Studio can run your native prototypes on the desktop using the same tool iOS developers use — seamlessly and automatically and without coding. Of course you can also use your real devices — any combination of iOS or Android devices can connect directly to Pixate Studio. Pixate Studio is included in all Pixate Premium and Enterprise accounts starting today, just visit your apps page. Paul Colton Co-founder, CEO
burn magazine Exposing to the Right Explained Exposing to the right, or “ETTR,” is an approach to photography that is as helpful as it is controversial. On one hand, exposing to the right is yet another technique to remember while shooting, and it can potentially ruin your exposure if utilized incorrectly. On the other hand, at least in theory, ETTR is the epitome of digital exposure. With proper ETTR, your images have as much detail in the shadows as they possibly can, without any of the highlights losing information along the way. It is important to know that this article is not for beginners. NIKON D7000 + 24mm f/1.4 @ 24mm, 1/80, f/3.5 1) Overview The basis of ETTR is simple: optimize your exposure, and get the highest-quality image possible. By darkening an exposure in post-processing, you are effectively using a lower-than-base ISO. Look at the histograms below (from the photo of the columns at the top of the page): 2) Image Quality Comparisons Of course, ETTR is only useful if it has noticeable effects on an image. 6) Bracketing
Só Dicas Quentes: Como reparar um vídeo danificado As vezes baixamos vídeos e por algum motivo eles estão danificados, geralmente porque eles estão incompletos (como vídeos baixado via eMule, eDonkey) resultando em artefatos na imagem, vídeo travando ou não sendo possível adiantar nem retroceder o vídeo. Há uma maneira fácil e simples de resolver esse problema, o software Digital Video Repair , que analisa o vídeo e faz as correções necessárias deixando o vídeo na qualidade que ele deveria estar se eles não estivesse danificado. Veja um passo-a-passo explicando como reparar o vídeo. - Baixe e instale a mais recente versão do Digital Video Repair - Depois de instalado, logo ao abrir o programa, clique em Input File e escolha o arquivo que você deseja reparar. - Logo abaixo há o botão Output File, clique-o e escolha onde o arquivo reparado será salvo. - Agora clique em Check Errors e verifique quais são os erros. - Após verificar o erros, clique em Check & Repair e espere até que seu vídeo seja corrigido - Pronto! Por: Tom - Só Dicas Quentes
UXPin - Wireframe Tool of The Future Photo/video thoughts from the largest rental house I have a couple of things to talk about today. First, is to announce the winner of our name the new machine contest. Second is to answer about 1,000 people’s questions regarding optical testing and adjustment. The New Machine’s New Name First, if you don’t known what we are naming then you can find out about it here. We quickly realized that, once again, we’d started a contest without establishing any criteria for winning. Continue reading First and foremost, if you aren’t at least a little Geeky, this post is not for you. For the last 18 months or so I’ve been on a Holy Quest, trying to find better ways to optically analyze and adjust bad lenses. I can use any of several tools we have to generate MTF charts that tell me the lens is decentered. We discussed things with some very high-power optical consultants who said exactly what many photographers have been saying all along. Nadar Rotating Portrait. “He is a man of wit without a shadow of rationality . . . Continue reading Packer
The Invisible Black Backdrop - Photography Technique - Glyn Dewis Over the past few weeks in preparation for the launch of my new ‘InSight Photography Workshop’ I’ve been running ‘testers’ (mini workshops) with groups of photographers to teach a range of lighting techniques and also to get brutal honest feedback. One of the techniques I’ve been teaching has become affectionately knows as ‘The Invisible Black Backdrop’ and without doubt has proven to be one of the most popular techniques amongst attendees. So, this got me thinking…why not write a tutorial, post it on the blog and then encourage those who give it a go to submit their photographs?…I mean, what better way to judge your teaching than by seeing the results achieved by others? So…what is the ‘Invisible Black Backdrop’? So, how do we achieve the ‘Black Backdrop’? There’s only ‘5 Steps’ to it… 1. 2. 3. 4. 5. Triggering the flashAs this technique uses ‘off camera’ flash we need to have a way of triggering our flash. In Summary: 2. 3. 4. So, that quite simply is all there is to it. 1. 2. Enjoy.
DLL Archive download O DLL Archive vai limpar seu computador, livrando-se de DLLs inutilizados. Todo mundo que usa um PC já desinstalou algum programa vez ou outra. Muitaz dessas vezes, aparece uma caixa de diálogo, perguntando se "deseja apagar alguns arquivos compartilhados". É aí que entra a ajuda do DLL Archive. O DLL Archive é super-simples de ser usado, bastando apenas clicar em "Search" e deixar que o computador faça o trabalho. E então selecione aqueles os quais você não quer mais e arquive-os. Teste mais uma opção para livrar espaço e melhorar a performance de seu computador. Antes de instalar o " DLL Archive " você pode criar um ponto de restauração do Windows, assim, se não gostar do programa ou se ele não funcionar corretamente, você pode simplesmente restaurar o sistema para um ponto anterior à instalação do programa.Clique aqui e aprenda a criar um ponto de restauração.
A Photoshop CC 2014 plugin RESONATOR 8 técnicas fotográficas para capturar imagens profissionais É verdade que um dos principais atributos que um bom fotógrafo precisa ter é o olhar apurado, porém isso não é tudo. É preciso estudar um pouco a teoria para conhecer e poder usar vários efeitos e técnicas que tornam as fotografias mais bonitas e profissionais. Nós já falamos um pouco aqui sobre alguns truques de edição para quem deseja fazer uma pós-produção e deixar uma fotografia com uma aparência mais profissional. Bokeh O efeito do Bokeh é bastante visível quando existem pequenas fontes de luz no fundo desfocado (Fonte da imagem: Bryan Matthew/Jessica Lee) A palavra “Bokeh” vem do termo original “Boke”, que, em japonês, tem um significado próximo a “desfoque”. O Bokeh é reconhecido principalmente pelo desfoque em forma de disco que é ocasionado pelas luzes ou áreas ao fundo da imagem, parecendo bolinhas, na maior parte dos casos. Máscaras na frente da lente ajudam a criar formas diferentes para o Bokeh (Fonte da imagem: Leo Fung) Lens Flare Golden Hour Regra dos terços e Proporção Áurea