background preloader

Understanding Depth of Field in Photography
Understanding Depth of Field in Photography
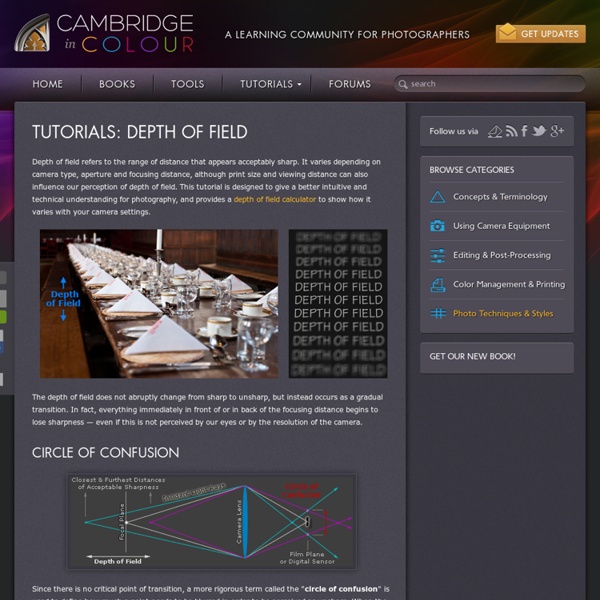
Depth of field refers to the range of distance that appears acceptably sharp. It varies depending on camera type, aperture and focusing distance, although print size and viewing distance can also influence our perception of depth of field. This tutorial is designed to give a better intuitive and technical understanding for photography, and provides a depth of field calculator to show how it varies with your camera settings. The depth of field does not abruptly change from sharp to unsharp, but instead occurs as a gradual transition. In fact, everything immediately in front of or in back of the focusing distance begins to lose sharpness — even if this is not perceived by our eyes or by the resolution of the camera. Since there is no critical point of transition, a more rigorous term called the "circle of confusion" is used to define how much a point needs to be blurred in order to be perceived as unsharp. When does the circle of confusion become perceptible to our eyes?

Landscape Photography I admit it - I am a filter junkie. I rarely take a landscape photo without a filter attached to my lens! For me, filters are not used for gimmicky effects but are used to overcome the main limitation of digital sensors, which is the lack of ability to record wide ranges of contrast. Photo 1c (below) was taken with both a polarizer and a 2-stop hard-edge grad filter (to further reduce contrast between the dark foreground and bright sky and mountains). If you do not know how a polarizer and/or a grad works or how these filters can help your landscape photography I recommend the following articles: Fields of Gold (or was that blue?) This article does not cover what each filter does or how to use filters but is simply an explanation of how to build a filter system so you can use multiple filters for contrast reduction. The Cokin P-Holder Rather than use screw-in filters on my lens, I use drop-in filters that slide into the Cokin P-Holder. Vignetting – A Painful Reality? Go Big!

lomography BNA International Webshop Making the Most of Natural Light in Photography Paying more attention to light is perhaps the single most important step you can take to improve your photography. With many landscapes, having good natural lighting can even be more important than the choice of subject itself. Different types of natural light can also produce a wide variety of subject appearances — even though these all have the same light source. Learn how to achieve the right light for your subject by utilizing the unique qualities of your particular time of day and weather. Flat Natural Light Better Natural Light Three factors influence how natural light renders a subject: time of day, camera direction and weather. Even though all natural light originates from the sun, a subject's illumination is actually comprised of several components: Move your mouse over each lighting component above to isolate its effect. Depending on the time of day, the relative amount of each component changes — resulting in an overall illumination with a different white balance or contrast.

Quick Tips: Instagram your images using Photoshop Instagram reinvented the photo sharing on our social media structure. It's a fast, beautiful and fun way to share your pictures to friends and family. And what I like the most about Instagram, are the various schemes that offers you to filter your pictures with your own little touch. My all-time favorite Instagram filter is the "Nashville" and today, I will show you a quick tutorial about how to achieve that same effect on your images. It's a very simple effect and very easy to accomplish in Photoshop. Step 1 Open your image in Photoshop and double-click on the background layer to make into a layer and named it Nashville. For this tutorial, I've used an image from Patrick Smith from Patrick Smith Photography. Step 2 Create a new layer and fill it with the color (Red: 247 , Green: 217 , Blue: 173) and leave the opacity to 100% and your blending options to "Multiply". Step 3 Click back on the "Nashville" layer and click Image > Adjustments > Curves. Step 4 Step 5 Step 6 Step 7 Step 8 Final Words

International Corporate Governance Network - ICGN Understanding Camera Lenses Understanding camera lenses can help add more creative control to digital photography. Choosing the right lens for the task can become a complex trade-off between cost, size, weight, lens speed and image quality. This tutorial aims to improve understanding by providing an introductory overview of concepts relating to image quality, focal length, perspective, prime vs. zoom lenses and aperture or f-number. All but the simplest cameras contain lenses which are actually comprised of several "lens elements." Optical aberrations occur when points in the image do not translate back onto single points after passing through the lens — causing image blurring, reduced contrast or misalignment of colors (chromatic aberration). Original Image Any of the above problems is present to some degree with any lens. Note: For a more quantitative and technical discussion of the above topic, please see thetutorial on camera lens quality: MTF, resolution & contrast. ZOOM LENSES vs.

Twenty-One Ways to Improve Your Photographs 2005-May-18 by Alan and Mario NOTE: This article was written by Brooks Jensen and posted by Alan and Mario. It was a great read from LensWork magazine so we had to post it. He was young, naïve, just starting. And how do you answer such a question? Twenty-One Ways to Improve Your Artwork 1.) 2.) 3.) 4.) 5.) 6.) 7.) 8.) 9.) 10.) 11.) 12.) 13.) 14.) 15.) 16.) 17.) 18.) 19.) 20.) 21.) That’s about it, although I do reserve the right to amend and modify this advice as I grow older. Brooks Jensen Editor, LensWork Publishing Copyright 2005, LensWork Publishing. Click here to discuss... Share this Article

Capital Gains Tax & Inheritance Tax UK Advice Guide Understanding Digital Camera Histograms: Tones and Contrast Understanding image histograms is probably the single most important concept to become familiar with when working with pictures from a digital camera. A histogram can tell you whether or not your image has been properly exposed, whether the lighting is harsh or flat, and what adjustments will work best. It will not only improve your skills on the computer, but as a photographer as well. Each pixel in an image has a color which has been produced by some combination of the primary colors red, green, and blue (RGB). Each of these colors can have a brightness value ranging from 0 to 255 for a digital image with a bit depth of 8-bits. The region where most of the brightness values are present is called the "tonal range." The above image is an example which contains a very broad tonal range, with markers to illustrate where regions in the scene map to brightness levels on the histogram. Lighting is often not as extreme as the last example.

Wonderful Photos: How to Increase your Depth of Field by Focus Stacking Focus stacking Focus stacking can be used to increase the available depth of field in a shot. You might want to do this where you just can't get the required DOF no matter what aperture you use, or where you are using fairly open apertures to minimize diffraction softening but still want to significant DOF. Marguerite dewdrop refraction First you need to download and install CombineZM. Taking pics for a stack You need a subject which is not moving whilst taking the photos. Below are 3 shot slices for this stack of a damselfly sitting next to its exuvium (empty shell): Close objects in focus Middle objects in focus Far objects in focus Stacking the images Run CombineZM and load the files by clicking on File -> New. Starting CombineZM Load in the images you wish to stack. Loading the images to be stacked To do the stack, click on Macro -> Do Stack Instructing CombineZM to begin stacking The program will then start comparing the shots, aligning them, and color matching them. CombineZM processing

Related: