
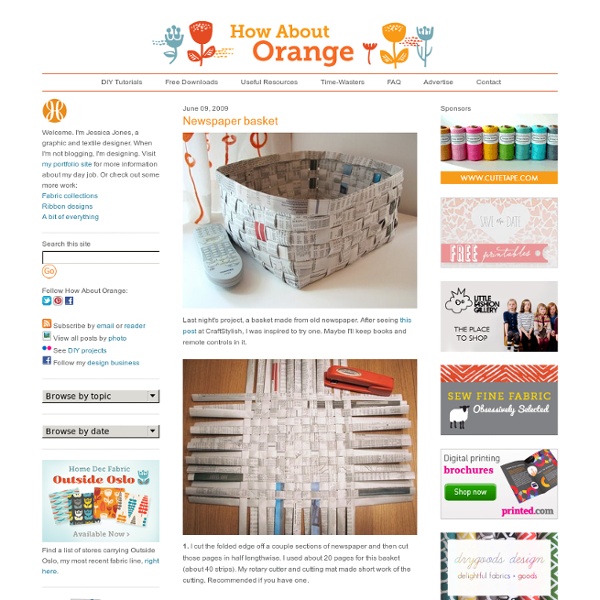
DIY Paper Fruit Basket Yes, you may remember our Easter Basket post. It seemed to be a hit, so much so that we had to create a version two with a summer twist. This basket, again made from a recycled, upcycled paper grocery bag, is a bit taller and without the handle, but could be a template for many other versions. Though it is a natural fit for a fruit basket, this upcycled creation could be used in many ways; a gift basket of cookies, a flower basket, a basket to organize your desk. What a perfect use for your paper grocery bags! ~ Lia Lia Lia is a daily crafter, maker, designer and DIYer. How to make gift bags from newspaper | How About Orange When I bought something at a store recently, the clerk handed me my purchase in a bag made from a newspaper. I liked it very much and had to make some more—thus today's DIY recycled newspaper project: gift bags made from the Wall Street Journal. You can vary the dimensions, of course, but here's what I used to create a bag that's 5" tall, 4.5" wide, and 3" deep. Stack two sheets of newspaper on top of each other. Cut out a rectangle that's 15.5" wide and 8.25" tall. Fold a flap 1.25" down from the top. Cut two pieces of cardstock or chipboard to 4.25" x 1", then glue them on the widest two panels just under the top fold. Put glue on the outside of the 0.5" tab and bring the left-most panel over to form the body of the bag, aligning the cut edge of the panel with the folded edge of the flap. Upend the bag so the 2" flap is now up. Put glue on both flaps and fold them inward to form the bottom of the bag.
Petals to Picots: Green Crocheting: Making Fabric into Yarn In an effort to reduce our household waste, I am always looking for ways to reuse and recycle things. So when I finally decided that it was time to retire a sheet set from my linen closet I was left with a few choices. Donate it? No … After years and years of use — starting in my husband’s bachelor pad, then as our guest set, then as camping sheets — these sheets weren’t in any shape to donate. Throw them out? What you’ll need:flat sheetscissors Cut off the sewn edges from around the sheet (Fig. 1). Fig. 1 Fig. 2 To help give you a better visualization, the illustration below shows what the sheet would look like now if you were to open it up. So far, so good? This next step is a little trickier, but this is what creates one continuous strip of fabric. Fig. 3 Did I lose you? Now, starting from one of the corners that was just cut, start rolling the strip into a ball. Fig. 4
Vertenza CIP6 Vertenza contro l'incenerimentodei nostri diritti! Oltre il 7% dell'importo della bolletta elettrica e' utilizzato per strapagare impianti di incenerimento che bruciano scarti di raffineria e di lavorazioni industriali, plastica dai rifiuti urbani e assimilati e molte altre sostanze inquinanti, che contribuiscono all'incremento delle malattie. L'Italia e' stata sottoposta a procedura di infrazione da parte dell'UE ed e' stata condannata. Se sei un utente, privato o aziendale, titolare di un contratto di energia elettrica, puoi chiedere la restituzione della somma che dal 2001 ad oggi e' stata illecitamente utilizzata, e pretendere di non pagarla in futuro. Quali vantaggi? In caso di vittoria avrai indietro i tuoi soldi. Esistono svantaggi? Nessuno. Quanto costa? Per esercitare un tuo diritto, tutelare la salute e difendere l'ambiente, occorrono la disponibilita' a firmare la richiesta di rimborso e 10 euro a sostegno delle spese affrontate dall'Associazione per portare avanti la vertenza.
DIY Faux Curled Rosewood Wreath {Made From Rolled Recycled Book Pages} I have seen various versions of Faux Rosewood Wreaths in just about every store and catalog for the upcoming season; most with a price tag running upwards of $40 or more. Some are crafted of paper and other of real wood shavings. Last year I made a few rolled flower gift toppers from recycled book pages and they remind me so much of the curled wood roses I thought they would make a good substitute. {with a much lower price tag} Materials Needed:Foam Wreath FormRecycled Book PagesLots of Hot GlueRibbon to Hang The full step by step tutorial I posted last year can be found {here}.Basically you layer three book pages together and draw a spiral circle. Starting with the outside of the spiral, roll the paper inward to create the flower shape. Give the wreath form a light coat of white {or light color} spray paint to help camouflage any see-through spaces. It seriously takes quite a few roses to fill the entire wreath, however I think the finished project has such a unique look. {Simply Lovely}
The Magic With Corks | Home Decorating - Design And Ideas If you enjoy in good wine and you didn’t trow away the old corks you can create interesting home gadgets that are both interesting and creative. Home decorating can be improved using one of the 25 home ideas with corks we presented here. You don’t need to spend money for your home, you can easily recycle and reuse the old corks for coasters, maths and much more. Stamps Thread Spool Corks Wreath Magnetic Cork Planters Cork Ball Key Chains Coasters Cork Letter Placecard Holders Trivet Bathmat Plant Marker Cheese Knives Cork Candles Cork Candle Votives Simple Cork Necklace Embroidered Cork Necklace Wine Corkboard Champagne Cork Knobs Wine Charms Lampshade Fridge Magnets Animal Sculptures Cork Pen Journaling corks arts, corks usage, diy corks
Free Pattern Month Day 11 - Cakies: The A-Frame Tent Hello Monday! We have a great gal to start off a fresh week of Free Patterns! Please welcome Rubyellen from Cakies! I was introduced to Rubyellen's blog a very long time ago! Now she has THREE with one more on the way! What caught my eye was her ethereal photography and adorable softies! All of her projects and posts come from a place where crafting and motherhood intersect. I love reading about her thrifting finds! And clothing for her sweet little girls! Says Rubyellen, "I love making things and this blog originally intended to just document our everyday crafting, but it has turned into so much more. She's also super talented at hand embroidery! Rubyellen's life certainly does seem like a dream! Thank you Rubyellen for joining me in Free Pattern Month on Grosgrain! Hello Grosgrain readers!!! Drawn pattern for reference: Materials for the A-frame: 4- 1'' x 2'' x 48'' whitewood moulding 1- 3/4'' x 48'' poplar dowel drill with a 3/4'' spade bit measuring tape pencil (marker) 1. 2. 3. 4. 5. 1. 2.
Detersivi BioAllegri - Impariamo a conoscere e a usare sewing 101: recycled paper basket Thanks to a few recent online purchases, I had an enormous pile of long brown packing paper strips in my studio. I couldn’t bear to just recycle it; it seemed to have so much crafty potential. So tasked with the challenge of creating a project to help get organized for the new year, I decided to turn that pile of paper into a woven basket. Folded into strips and edged with stitching, the paper took on a whole new quality that calls to mind upholstery webbing or even leather. This project is super easy to do, takes only an afternoon and is a great way to give new life to leftover materials. Read the full how-to after the jump! Materials long lengths of paper (I used packing paper, but wallpaper scraps or gift wrap would work great, too.)sewing machineglue or hot gluepaperclips Instructions 1. Starting with a large piece of paper (mine was 30″ wide), begin folding the strips. Next, sew along one edge of the strip, about 1/8″ or so from the folded edge. 2. 3. And that’s it!
Tutoriel fleurs en filtre à café *Merci à Ludi, membre de la Communauté de mariages.net, pour ce très joli tutoriel. Voici le matériel dont vous aurez besoin : Des filtres à café.Des piques à brochette ou autre objet en forme de tige.Du scotch de fleuriste.Un stylo.Une paire de ciseaux.Du colorant alimentaire liquide de la couleur de votre choix. Voici les étapes à suivre : Commencez par tracer les pétales sur vos filtres à café, de forme pointue, comme sur la photo par exemple, ou encore arrondie, en sachant qu’il vous faudra un minimum de 6 formes pour une fleur, puis découpez-les. Séparez vos pétales en dépliant le bas des filtres : cela vous fait donc 12 pétales, que vous devrez assembler en les enroulant sur une tige recouverte de scotch de fleuriste. Trempez ensuite votre fleur dans du colorant alimentaire liquide pour lui donner sa couleur, puis laissez sécher la tête en haut pour que le colorant descende. *Retrouvez tous nos tutoriels mariage dans notre section Fait Maison.
Knitty Gritty Thoughts: Happy Thanksgiving and Free Fabric Styrofoam Ball Pattern! Supplies are easy, most of them you'll probably already have around the house. You'll need - Fabric - your choice of colors and prints. The amount you need depends on the size of the styrofoam balls you use and how thick you place the fabric. My mileage is between 1/4-1/2 yard per ball. Start by cutting your fabric in 2 inch strips as shown above. After you've cut the strips, cut each strip into 2 inch widths so you end up with 2x2inch squares You'll have a nice pretty stack of squares! Now, pull up a chair, put on a movie and let's get pinning! Now, you're going to learn how to fold the fabric squares. Next, fold the fabric in half again and hold it as shown above. Now, pin. Now, pin the second one. You continue doing this around and around and finish the first round. Start a second round slightly offset from the first and continue on your way, round after round. Continue along to the bottom. Voila! Here's a sampling of the latest balls I've completed. Careful! Happy Crafting All!