
Easy Ripple Afghan - Free Crochet Pattern - Handcrafting With Love by SusanB Materials needed: yarn Worsted weight acrylic yarn in desired colors. About 12 ounces each of 3 different colors (36 ounces total) will make a 40 inch by 60 inch afghan (the ideal size for Project Linus). Gauge: Abbreviations/Stitches: ch - chaindc - double crochetyo - yarn over 3 st dec - 3 stitch decrease (also known as: dc3tog) *yo, insert hook through next stitch, yo and pull loop through stitch, yo and pull through first 2 loops on hook; Repeat from * twice. 2 st dec - 2 stitch decrease (also known as: dcdec or dc2tog) *yo, insert hook through next stitch, yo and pull loop through stitch, yo and pull through first 2 loops on hook; Repeat from * once. Instructions: Chain a multiple of 16 stitches plus 2 stitches. Row 1: Dc in 3rd ch from hook; dc in next 6 ch, 3 dc in next ch, dc in next 6 ch; *work 3 st dec in next 3 ch, dc in next 6 ch, 3 dc in next ch, dc in next 6 ch; Repeat from * across. Repeat Row 2 until afghan is desired length changing, colors as desired. Finishing
Standing Double Crochet - Joining Without the Slip Stitch and Chain! The Standing Double Crochet stitch is one I came to late – and I wish I’d known about it years earlier! It’s not a stitch that you’ll usually find specified in a pattern, and as such it has no standard abbreviation. What it is, is a technique – one that will allow you to start a new row on a crochet project without having to use the telltale “join with a slip stitch and chain 3” – and I can’t wait to share it with you! Video Tutorial: Standing Double Crochet – Right Handed Left Handed Photo Tutorial for the Standing Double Crochet Step 1: Hold the yarn end with the last two fingers of your hook-holding hand. So what do you think? NOTE: Several different people have now written to me, claiming that they invented this technique.
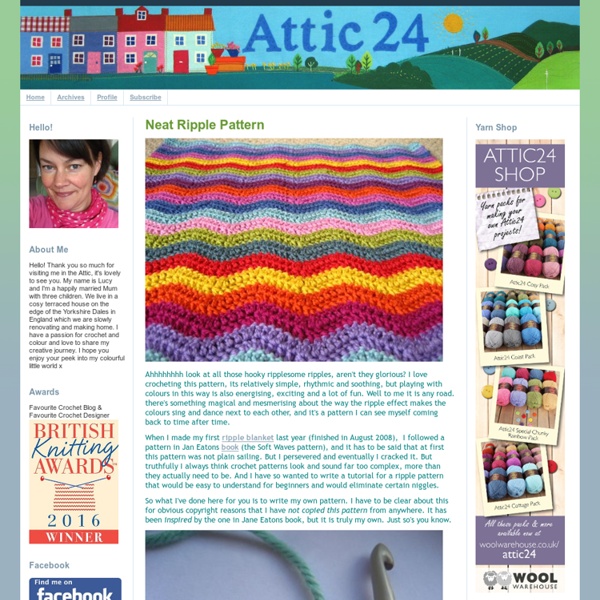
Ripple Blanket Know-how The Neat Ripple pattern is one of my absolute favourites for blanket making and over the years that I've been crocheting I've made several. Picture above from left to right :: Summer ripple :: Interlocking Colour ripple :: Coast Ripple I've already written a full step-by-step tutorial for working the neat ripple stitch which you can find HERE. ♥ For my blankets I generally use a DK weight acrylic yarn worked on a 4mm hook. ♥ I have used 15 x 100g balls of Stylecraft Special DK acrylic with a 4mm hook to make my Coast and Cottage ripple blankets. ♥ If you wish to make the blanket bigger ie to fit a double / king size bed, you will need to increase the number of stitches in your starting chain.....the starting chain should always be a multiple of 14, plus an extra 3. ♥ I'm writing this pattern in UK crochet terms, as follows :: sl st [slip stitch] :: insert hook, yarn over, pull the loop back through the stitch, then through the loop on your hook. YO, draw through 2 loops (2 loops on hook) 1.
How to Crochet 5: Seaming Your Work In this how-to series we could move right on from single crochet to the other stitches (double crochet, half double crochet and triple crochet) but I'm pausing to talk about "seaming" because if you want to make anything other than washcloths or rectangular scarves or afghans (which are all good) you're going to need to seam some pieces together. Seaming is a good skill to have and it can be the difference between a cute sweater looking handmade instead of homemade. I am going to share two different methods. The first is the invisible mattress stitch, which works equally well for knitting or crochet by the way, and the second seaming method uses a single crochet stitch. Click to view the full tutorial. SEAMING WITH THE MATTRESS STITCH: You will need a tapestry needle to do the seaming, which is a large blunt needle and a big eye for threading the yarn. The mattress stitch is so fabulous because it's virtually invisible if you line up the stitches correctly. That is the mattress stitch!
Crochet Wavy Ridge Blanket + Tutorial Crochet Wavy Ridge Blanket + Tutorial Crochet Wavy Ridge Blanket Crochet a special project for those cold, snowy days, introducing the Wavy Ridge Blanket by Yarnspirations. This blanket hooks up quickly with Bernat Blanket yarn and features criss cross treble crochet stitches to make it feel thick and lush. If you pay attention to the criss cross, it’s not the same each row. Super cozy and with hook up in no time, try it today. Tutorial Snowed In Lookbook This project was featured in Yarnspirations Lookbook called Snowed In. Ranging from home decor and comfy afghans to curl up under neath. My favourite projects in this book are the Mighty Miter Afghan, Wave Ridge Blanket and what I think is going to be most popular, the Blanket Cardigan. Check out this Lookbook here and dive into a snow day full force with your yarn and tool of choice. Patterns & Articles related to Crochet Wavy Ridge Blanket + Tutorial
How to Crochet: Double Crochet with Beads By Robin Beers – 19 Comments The materials you need are crochet thread or yarn, beads and a needle. I am using larger beads here so I use a tapestry needle to string them onto my yarn. Note: If you are left handed, just put your mouse over the photo for a left-handed view. First string the beads onto your crochet thread or yarn. Begin crocheting the desired number of stitches, pushing the beads down out of your way. Yarn over, then insert crochet hook into the next stitch. Yarn over, pull loop through stitch. Yarn over and pull through 2 loops on the hook keeping the bead in place. Now bring the bead up from the back to the front of the work with your finger and hold in place. (Bring it around both loops, not through them.) Keep the bead secure in front with your finger while you yarn over and pull through the final 2 loops on the hook to complete the double crochet stitch. This is how you add beads to your double crochet work! If you have any questions, don’t hesitate to ask!
Crochet Pattern Four Seasons Chevron Blanket pattern ready Breaking Amish Mary's Crochet Afghan Pattern ripple Crochet the Lacy Chevron ePattern Use the code ART15 to Save 15% on Patterns The Amish Afghan is actually called a Lacy Chevron (it also goes by several other names if you search for it on Google). I tried the pattern with a few random scrap colors for practice and found it’s was fairly easy to crochet once you got the hang of it. It reminds me of crocheting a repeated shell stitch afghan along with granny squares. The sample piece I made is shown in the photo above on the bottom of the photo. FREE Projects at Joann.com If you are looking for the printed version of Afghan Parade You should be able to find it here on eBay.
Addicted to Chevron Afghan close Terms & Conditions You must enter into this Agreement if you want to submit digital images or other content to Prime Publishing through Sharing Customer Images (the "Service"). 1) Eligibility. 2) Definitions. 3) License Grant for Materials. 4) Removal of Materials. 5) License for Name, Trademarks and Likenesses. 6) Specifications and Guidelines. 7) Representations, Warranties and Indemnities. 8) Restrictions. 9) No Obligation. 10) Changes to Agreement. 11) Prime Publishing Intellectual Property. 12) Communications. 13) Waiver. 14) Disclaimer. 15) Miscellaneous. Sharing Your Own Images Who can share images? You! What should I share? Please share images that will help other visitors. Do include captions for your images. What shouldn't I share? Behave as if you were a guest at a friend's dinner party: please treat the Prime Publishing community with respect. The same guidelines apply to your captions and notes. What image formats and sizes are supported? Where will my image appear?
Crochet Through the Forest Afghan + Tutorial Crochet Through the Forest Afghan Crochet this Through the Forest Afghan for your home decor. Perfectly for non-bulky look on a sofa or even use for someone in a wheel chair. This afghan is 32″ wide by 44″ Long. Using 2 strands of Caron Cakes together. Download the Pattern Here. More Pictures of This Afghan Tutorial Crochet Rectangle Afghan + Tutorial Crochet Rectangle Afghan Using Caron Chunky Cakes, crochet this simplistic but beautifully coloured granny rectangle afghan. January 19, 2018 In "Afghan Patterns" Crochet Breaking Waves Afghan + Tutorial Crochet Breaking Waves Afghan Introducing the Crochet Breaking Waves Afghan designed by Mikey of The Crochet Crowd aka me. December 29, 2017 Crochet Caron Cakes Entrelac Afghan + Tutorial Crochet Caron Cakes Entrelac Afghan Have fun with Caron Cakes and Entrelac Afghan Techniques at the same time.
How to crochet granny ripple I am sure many of you who can crochet fairly well may not know how to crochet a granny ripple. While I was crocheting my vibrant pillow 3 I thought I would make a tutorial on granny ripple but for some reason I couldn't do it then. Here it is now. Once you get started and go in the right direction granny ripples are fun to make, but getting started is what irks me a lot. The major problem here is deciding upon the number of chains to start with. So to start with, make chains of length that you desire. 1. 2. 3. 4. 5. 6. 7. 8. 9. 10. Since some of you are having doubts about ending and starting a row I have included these additional instructions and photos to elaborate on them. In the above picture you can see that I have made 5 turning chains and made 3 dc (cluster) into the space between the two clusters in the previous row. 11. 12. 13. 14. 15. 16. 17. The below picture shows the end of row 4. And end of row 5. Now you can see the edges of the pattern evolving. This post has won me an award
The Dude Blanket- Free Crochet Pattern - Two Brothers Blankets When I started the Dude Collection I knew I wanted to include a blanket. The Dude Blanket is simple, durable, and not too frilly, just like most guys like things. I used Hobby Lobby’s I Love This Yarn, but any soft worsted weight yarn will be great for this project! This is one of those projects that is mindless and easy to work on when watching TV or chatting with friends. The Dude Blanket can be made in any color combination you like or make it solid! Grab the ad-free pdf copy HERE. 4,130-4,500 yards worsted weight yarnI (5.5mm) crochet hook or hook to obtain gaugeScissorsMeasuring tapeTapestry needleEasy15 sts within the pattern x 11 rows = 4”55” x 65” Starting chain does not count as first stitch, unless stated otherwise within the pattern. Color changes in sample are: 10 rows with first color, 5 rows with second color, 10 rows with third color, 5 rows with second color, and repeat. Change the size of the blanket by working your starting chain in a multiple of 2+1. ch(s)- chain(s) Ch 209
Lacy V-stitch Ripple Afghan This is a simple but elegant pattern for a throw. The sample is made in worsted weight, but it would work well with lighter weight yarns. This is a particularly good pattern for a boucle or homespun style yarn because after the first row, all stitches are made in chain spaces. (For a version where even the first row is made in chain spaces, go here.) Size: Sample is a 30 by 32 inch lap blanket in worsted weight acrylic yarn, but pattern can be easily adjusted to make a throw or full sized blanket. Materials: For lap blanket size, 400 grams/14 ounces/750 yards worsted weight yarn. Special stitches: V-stitch: in stitch or space indicated, 1 dc, 1 ch, 1 dc Shell: in stitch or space indicated, (1 dc, 1 ch) 3 times, 1 dc There is also a tutorial video. The beginning chain should be a multiple of 22 plus 17. Lap blanket size (30″) is started with chain of 149. Row 1: V-stitch in 5th chain from hook. Repeat rows 2 and 3. There is a chart available of the first two rows.
V-Stitch Crochet Ripple Afghan Pattern It’s afghan season so of course I wanted to get stitchin’ on something cozy for curling up with on these chilly Autumn evenings! I decided to put a contemporary twist on an old classic with this ripple afghan pattern. Here I used V-stitches to created a more lacy, open design to the traditional ripple. You can find the matching pillow pattern here Here’s what you need: 5 coordinating colors of bulky weight yarn, approx. 2 skeins (272 yards) of eachK hooktapestry needle, scissors Click here to reference Crochet Abbreviations or here to reference Crochet Stitch Symbols. Finished afghan measures approximately 50 in. × 64 in. The size of the blanket can be easily customized by changing the length of the beginning chain. Save this pattern to your Ravelry queue. Special Stitch: V-stitch (V-st): double crochet, chain 1, double crochet. Do not fasten off at the end of each row; carry colors along side of blanket. With CA, ch 186. Rows 7 through 51: Rep rows 2 through 6. Fasten off all colors.