background preloader

Pleated Pouch Tutorial

Pleated Pouch Tutorial
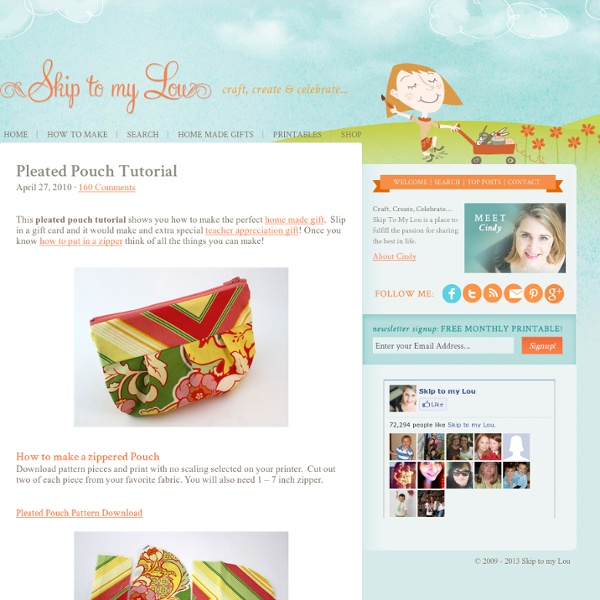
This pleated pouch tutorial shows you how to make the perfect home made gift. Slip in a gift card and it would make and extra special teacher appreciation gift! Once you know how to put in a zipper think of all the things you can make! Download pattern pieces and print with no scaling selected on your printer. Pleated Pouch Pattern Download Mark fabric from pattern where it should be pleated. Place outer top piece face down on pleated piece, line up edges and stitch across 1/4 inch from the edge. Make a zipper sandwich. With a zipper foot sew across the top between the edge of your zipper sandwich and the zipper teeth (closer to the zipper feet). Bring lining and outer fabric to the same side. Make another zipper sandwich on the other side of the zipper. Open up and it will look like this. Bring both pieces of lining to one side and both pieces of the outer fabric to the other side. Pinch zipper towards outer fabric, making sure it is laying nicely as you pin. Turn right side out.

Crafting a Corset, Part 1: Getting Started : Daily source of DIY craft projects and inspiration, patterns, how-tos | Craftzine.com By Alaina Zulli Corset-making may seem like a job only for the professionals, but anyone who can sew a straight line on the sewing machine can do this project. Over the course of three lessons for the next three Mondays, I will teach you all the techniques I learned as an apprentice to an historical corsetiere. In this first lesson, you’ll get your shopping list, pattern, and instructions for layout and cutting. (The image above is from the Long Island Staylace Association.) Materials Decorative outer fabric 1 yardLining fabric 1 yardAll-purpose thread12″ straight buskRoll of 1/4″ spring steel boning (aka white boning). Directions Download the Pattern PDF (Right click to save the PDF to your desktop. The pattern allows for about 2″ of ease (also known as “spring”) at the back, so don’t freak out if when you measure the pattern it seems small. Step 2: Prepare the fabric. Related

Petite Purls - Fall 2010 4” (10 cm) wide x 4 ½” (11.5 cm) deep. Linen (shown: natural) 1 rectangle measuring 5 ¾" x 10 ¼" (14.5 x 26 cm) for the shell Various cotton 1 rectangle measuring 5 ¾" x 2" (14.5 x 5 cm) for the front band 2 rectangles, each measuring 6 ¼" x 2" (16 x 5 cm) for the frame casing 1 rectangle measuring 5 ¾" x 10 ¼" (14.5 x 26 cm) for the lining Fusible Fleece 1 rectangle measuring 5 ¾" x 10 ¼" (14.5 x 26 cm) 4" (10 cm) purse flex frame 1 large cover button for decoration Hera marker Note: All seam allowances are 1/4” (6 mm) unless otherwise indicated. Step 1: Fuse the fleece to the linen piece per the manufacturers instructions. Step 2: On the front band piece, fold over the long sides by ¼" (6 mm), toward the wrong side, and press; set aside. Step 3: Place the linen shell flat in front of you so that the short edges are at the top and bottom and the long edges are to the side. Step 5: Topstitch the cotton strip to the other layers along both folded edges, 1/8” (3 mm) from the edge; set aside.

Troubleshooting Interfacing... Interfacing is one of the things that can transform your fabric and make the difference between a home-made "soft bag" and a fabulous "I can't believe I made it" fashion accessory. It's also something that people find intimidating. A few hiccups and people think it's too hard.Believe me - it's NOT too hard. There are a few simple rules of thumb and a lot of suck-it-and-see experimentation. There is lots of help available if you need it. Once you see the effects of quality interfacing applied properly, you'll be thinking "interfacing" as soon as you think the words "make" and "bag" in the same sentence. The most common problems people have are that the interfacing doesn't stick... ...or that it bubbles in areas where it hasn't stuck to the fabric. This mostly happens with heavier interfacings, and is usually a result of one of the following - 1. 3. This is just annoying. 4. 5. 6. It happens when the iron is too hot. There are several ways to deal with this - 2. 3. 4.

Simple Bow Tie Top I'm so happy about how this turned out. This is one of those projects that's been on my to do list forever and now that I finally got it done, I wish I had done it a long time ago. This is such a simple project. One of the easiest I've ever made. Don't have much sewing experience? Give this a go, I promise it's a piece of cake and any mistakes made are hardly noticeable because of the gather. Materials: 5/6 + yard knit & 1/3 yard silk, cotton, etc. My knit is 60" wide and my dusty pink silk (faux) is 45" wide. Your fabric doesn't have to be exactly as wide as mine, just keep in mind that if you buy a fabric that is less wide you may need to purchase more to compensate. Cut two large squares to the dimensions of 30" x 30" If you bought 5/6 yd of 60" fabric all you have to do is cut along the fold line. **Edit- 30" length gives you a long top. Make a casing at the top of each square. Sew down with a zig zag stitch (so it can stretch). Start working on your sash. Cut off extra fabric Voila.

subversive cross stitch: mind your fingers Circle Zip Earbud Pouch Tutorial | Dog Under My Desk I use a little zippered pouch to carry around my earbuds since they are the fancy microphone ones and I don’t want them to break or get tangled. Some of you have commented that you are looking for some small, simple gift ideas. This is definitely simple to make, and a little more fun than the typical rectangular zippered pouch! UPDATE: I have completely re-written this tutorial with twice as many bright, clear photos and more detailed instructions and it is available as a pattern in my pattern shop. First, download the pattern template HERE. Cut from main fabric: 1 circle 2 half circles 1 tab Cut from lining fabric: 1 circle 2 half circles Cut from batting (or medium weight interfacing, if you prefer): 1 circle 2 half circles You will also need a 1″ wide nylon 5″ or longer zipper. Place one lining half circle right side up and place the zipper right side up on top. Place a main fabric half circle wrong side up (right side together with the zipper). Sew with a 1/4″ seam allowance.

the people have spoken - artsy-crafty babe With an overwhelming majority, the aqua purse won! Thanks for all your input. I should have listened to my gut - that was the bag I intended to make available in the first place, but then I started playing around, resulting in the orange one. I do plan to revisit the design of the orange one, but in a larger size. It really is a cute bag, but too small for me. As you can see, I whipped up another one. Do you recognize the fabric? Over the weekend I'll make another one and take photos for the tutorial. ***The pattern is ready, the Phoebe Bag!

Travel Duffel by StudioCherie Fantastic & easy to follow pattern ! June 22, 2013 tropicals1396629 I absolutely loved making this bag, The pattern was very clear and easy to follow step by step. Trendy is as Trendy Does: Suitcase Conversions Today is a tandem post with Craft Magazine. Over there you will find a fun little project I did called the Going to Grandma’s Laptop Case. Remember those groovy floral printed suitcases of our youth? Why do they make suitcases so barfy and boring now? No need to fret, scoot over to Craft to figure out how to revamp an old suitcase into something fantasticly floral and handy. In the meantime I also have some tasty suitcase nuggets for ya right here. You might remember the original laptop suitcase project was right here on Naughty Secretary Club. Vanity Case over on Etsy has some of the most clever suitcase conversions I have ever laid eyes on. I always loved this side table from Budget Living. Why not a suitcase chair and ottoman to match your suitcase side table? Over on the Bitter Betty Blog you can find out how to turn an old suitcase into a mobile craft studio. If you took the tour of my house on Apartment Therapy you might have noticed I have a few vintage suitcases around my digs.

Sewing Machine Maintenance Susan Wright, Extension Clothing and Textiles Specialist Jewell M. Limacher, Retired County Extension Director College of Agriculture, Consumer and Environmental Sciences New Mexico State University A well-made sewing machine-traditional or serger, new or old, used often or only occasionally-will sew perfectly for many years if it is given proper care. Sewing machines generally require the basic maintenance of cleaning, oiling, and lubricating. If you do not have an instruction booklet for your sewing machine, contact your local sewing machine center to obtain one. When you have trouble with your sewing machine, a good rule to follow is "Clean it first." Simply brushing lint and dust from the machine each time it is used is a good way to prevent many problems. In time, lint and dust that are allowed to accumulate in a sewing machine can become soaked with oil and/or lubricant and interfere with the operation of the machine. You need the following equipment and supplies for the job: Needle

Related: