8 Completely Awesome DIY Home Energy Projects | Ecoble
Small-scale renewable energy is a must for a sustainable home – but converting your home to clean energy options can carry a huge initial price tag. We’ve scoured the web for some of the most innovative examples of homemade energy solutions to compile a collective list of DIY projects to make your home greener and more energy efficient without costing you a fortune. From solar water heaters and gadget chargers to homemade super-efficient refrigerators, you’ll find links (with instructions) to some of the best projects you can make at home… Homemade Energy-Save Fridge The ‘Ambient Air Fridge’ isn’t quite a year-round green appliance but when things cool down in the winter, this homemade fridge will definitely shave a few dollars off the electric bill! The insulated wood box fits snugly in an out-of-the-way doorway and even controls the temperature with an inexpensive thermostat and a couple of computer fans. DIY Electric Lawn Mower Make Your Own Wind Turbine Low Cost Solar Water Heater
DIY Friendship Bracelet
For several months now, we’ve been receiving emails requesting a friendship bracelet DIY. Well, friends, ask and you shall receive! Today, we’ll give you a step by step tutorial on the classic chevron pattern. If you used to whip up friendship bracelets like a champ in grade school and have since forgotten how, consider this a refresher course. And if you can make these with your eyes closed and arms tied . . . umm, can we still be friends? You’ll need:embroidery threada safety pin or tapea pair of scissors Start by cutting several strands of embroidery thread at about 24 inches each. Start on the left side with the outermost color (shown here in red) and make a forward knot by creating a 4-shape over the 2nd color, loop it under and back through the opening. Pull up and to the right to tighten. Now pick up the outermost color on the right side (show here in red) and make a backward knot, creating a reverse 4-shape over the 2nd color, loop it under and back through the opening.
DIY Picture Tiles - You Will Never Buy a Photo Frame Again | Crunchy Betty
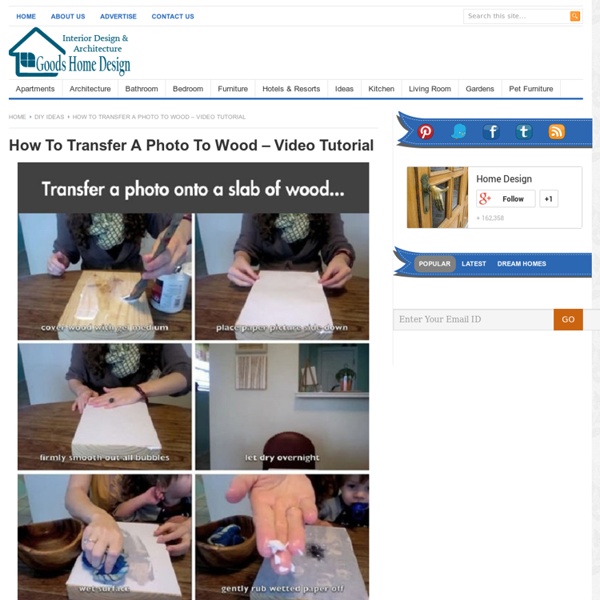
Lately I’ve been having this huge urge to decorate the house. This is big news. I do not decorate. Arguably, one of the reasons why is because I. absolutely. hate. to. buy. mass. produced. decor. Anyway, this extends to photo frames. Nope. Long story short, I discovered this method of transferring my photos cheaply, quickly, and beautifully to something uncommon and unique. Tiles. The only thing that’s not particularly crunchy about this is that it uses Modge Podge or similar (and I’m not sure what’s in Modge Podge). It’s just grainy and doesn’t dry clearly. Boo. BUT, if you can overlook that one minor issue, I think you’ll love this. And it will be glorious. Here’s how you do it. First, you need to go to Home Depot, Lowes, or something like it. (FYI, I found that Lowes prices on tiles were cheaper than Home Depot. I like the stone tiles, because they have texture. So you pick out your tiles in the sizes you want. And then you get home and gather what you need. Cut them out. Go go go! Love me?
How to cut glass
I posted a picture about 1 week ago on Instagram, Facebook and Twitter of me cutting glass using just string. I got LOT’S of requests for a tutorial on how I DID THIS! So here it is. I want to warn you. It’s best to triple your yarn because it will burn longer! Soak it GOOD! I like to tie my yarn where I want my glass to “cut” then quickly pour polish remover over the string again. Get a big bowl with ice and water ready. VERY IMPORTANT! Slowly turn your bottle. You can’t let the flame go OUT then dunk it in the ice water. YAY!!! I reallly hope you enjoyed this tutorial because I had ALOT of requests for it! © Copyright jaderbombllc, All rights Reserved.
DIY Autumn Leaf Bowls | Hello!Lucky Blog
As we mentioned before, this is our favorite time of year for DIY decor. The chill is in the air and the leaves are changing color, and there's no better way to preserve the delight than by welcoming it into your home. Yes, the craft stores overflowing with autumn decorations can be intimidating, but there are ways to turn those faux autumn leaves into something beautiful and functional. Materials: Craft store leaf garland, Mod Podge (matte finish), Foam Brush, Balloon, Scissors, Mixing bowl *Tip: try to find thin, paper-like leaves for your garland. How To: 1. 2. 3. 4. 5. 6. 7. 8. 9. **Attention readers! Looking for more DIY projects and free downloads?