
Red Velvet Kit Club: Ya'll Ready For This? Jen has some wonderful creations to share and a pretty neat tutorial. Ready? I hope so. Bedside Journal (the overnighter) I'm one of those girls with too many notebooks but nothing to write on, especially when I think of something in the middle of the night. 1. 2. 3. 4. 5. 6. 7. I don't know about you but I'm gonna have to make one of those! journals | curiously crafty. welcome to the wonderful world of journalling! i promise, if i can make one then you can too. the following instructions will make a journal that is 5 3/4″ x 4 1/2″. (view more journals here) Materials: 60 – 70lb. paper (i use 20 sheets per journal) one sheet of white paper for the cover guide, cut to 5 3/4″ x 9 1/2″ decorative paper for end papers (I used scrapbook paper: you will need 2 papers that measure 5 1/2″ x 8 1/2″ each)cardboard covers are 5 3/4″ x 4 1/4″ eachspine is 5 3/4″ x (width of pages; to be discussed later)fabric (1/2″ wider than cover guide on all edges)pencilscissorsgluewax paperclothespins/paperclipsrulersewing needlestrong thread (you can buy bookmaking thread, or just use hand-quilting thread)bone folder (*optional)awl (*optional) Part 1: Sewing the pages Cut pages in half, leaving you with 40 – 8 1/2″ x 5 1/2″ papers. 2. Each group becomes a signature. 3. You can now cut the spine cover at this width. 4. 5. 6. 7. 8. Allow this to dry for at least 1/2 hour. 7. tada!
Brisbane Handmade - Charlie and Grace - BrisStyle: How to ... a book tutorial an ‘old book cover’ journal, it's my first tutorial, so I hope it’s ok and easy to follow. Any comments welcome! Also, if anyone actually makes one, I'd love to see it! 1. 2. 3. 4. 5. 6. 7. 7a. 8. Cut your paper to size, mine was 100 x 110mm, so that it fits nicely in the cover. 9.
Paperfection's Art & Craft: How to Make a Simple Cahier or Notebook It is a gorgeous summer in The Pyrenees and many of our Dutch friends are visiting. They come to relax, swim in the lake, enjoy the views and see the vineyards and winery grow. Needless to say, we had fun and I had little time for bookbinding. This was refreshing as many of my painted or appliqued books take me days, even weeks to make.. You will need:15 sheets of paper, white, coloured or both. Step by step: 1. b. c. 2. a. b. c. 3. a. b. c. 4. b. c. d. e. f. g. 5. a. b. c. Et voilà: your own hand-made cahier or notebook, containing thirty pages (sixty counting both sides), ready to use!
recycled scrap paper notebooks we blessing sisters have loved notepads, notebooks and all things paper since our first wide-rule pads we bought in gradeschool. we have trouble letting go of even a single sheet of paper, lest we find a use to reuse or recycle it in the craft room! this time, we repurposed our old faxes and paper scraps into notebooks and made them useful again. we pulled out old wrapping paper, books we didn’t mind ripping pages out of, and other odds and ends to make the covers pretty. this is quick and easy to do with what you already have at home, and you end up with a stack of handy, useful pads that might even give you a tinge of back-to-school nostalgia. –bbbcraft sisters CLICK HERE for the full how-to after the jump! Materials: - 8 ½” x 11” scrap paper (from faxes, printing mishaps and mail) - binder clips - scraps of cardboard cut into 1” inch strips OR 2 wood paint mixers cut to size -elmers glue, pvc or a glue gun - paint brush - decorative scrap paper - masking tape and/or decorative tape
Making a leather journal cover; Tutorial Very picture heavy So this is how I go about making a leather cover for a notebook, complete with a pen holder. All going well after reading through this you should be able to make one of these. First a disclaimer. I am new to leatherwork and have only read a book and some of the tutorials on British Blades so my way may well be the wrong way. So far it works but you have been warned So first step is to catch yourself a cow, alternatively you can but some veg tanned hide. I get mine from www.LePrevo.co.uk .
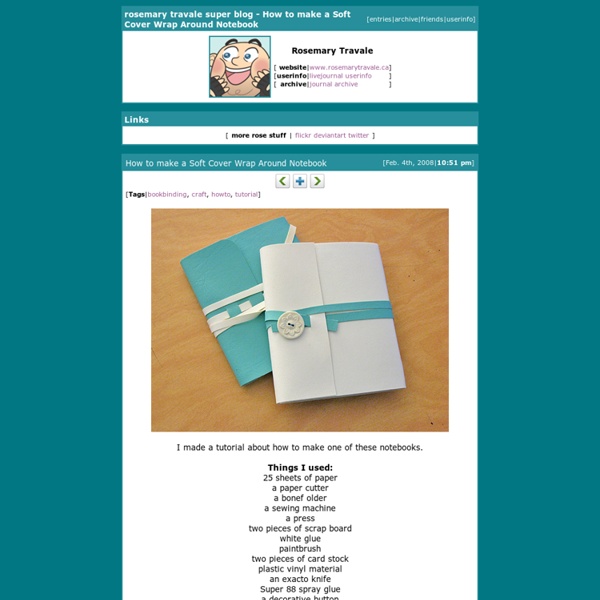
Easy DIY Leather Journal/Notebook - The Nectar Collective Remember my recent visit to Tokyu Hands? I picked up some fun crafting supplies and I’m excited to share this tutorial with you based on the stuff I bought! I love words and literally have about 15 random notebooks floating around my room filled with ideas, quotes, to-do lists, or nothing at all, so making one of my own has always been on my bucket list. Since Spring is starting, I wanted to make a colorful notebook to fill up during this season. Leather (but you can use just about any fabric you want really!) 25 sheets of Paper (I used brown recycled paper, but you can use regular printer paper, too!) 1 piece of card stock (for the inside covers) Embroidery floss (you’ll be able to see this color on the spine, so keep that in mind!) Large embroidery needle Velcro Super glue (choose one that works on the fabric you use) Ruler 1) Depending on how big you want your book to be, you might want to cut regular printer paper in half. Instead of velcro, use a button. Thanks for reading!
DIY Book Jackets I have so many little notebooks floating around the office that are only partially used, but are starting to look a bit worn on the outside thanks to being pulled in and out of bookcases countless times. So I figured I might be more inclined to keep using them if they had nice, new looking covers again.. you know, giving them a fresh, new lease on life ;) They’re dead simple to make, and fun too! So let’s go… All you really need is: - Paper or thin card in colours of your choice - Ruler - Pencil - Notebook you’re wanting to cover (easier if it’s just a stitched or stapled spine) - Scissors - Sewing machine and thread Step 1. For example: Notebook Size: 140mm x 180mm Card Size: 148mm x 260mm *Alternately, instead of only adding 4mm each side of the height (8mm total) you can add the usual seam allowance of 1.5cm to the height (3 cm total) to make it easier to sew later down the track. Step 2. Step 3. Step 4. Step 5. *Note: See Step 1 for alternative to sewing so close to the edge. Step 6.
How to use an awl {DIY} Pocket Size Letterpress Sketchbook Anything pocket-sized is cool with me. Grab it and go types of things. And of course, letterpress is always a plus. So I combined a couple of my favorite things for today’s diy: a pocket size letterpress sketchbook. What do I need to make this? Materials: Needle and thread (or embroidery floss), scissors, blank sheets of paper (consider using a thicker weight than standard printer paper) and blank letterpress cards. How do I make this? Steps (above for images): 1. 2. 3. 4. 5. Looking for more ideas for quick and easy projects? This entry is filed under diy, easy, handmade, lace, letterpress, notebook, notepad, paper, paper goods, party favors, pretty, project, simple, sketchbook, sketching, tutorial, white.
Vintage Book Planner Tutorial I desperately needed a day planner. With so much going on I can no longer keep it all straight in my head ’cuz something’s always falling through the cracks. So on my way home from the morning school drive today, I went to the office supply store to shop for one. Nothing bulky, nothing leathery, don’t need pockets, grid paper, address book or all the bells and whistles, just a plain ol’ planner, but a spiral one for sure, so it will lay flat while I’m planning. Enter: A cute vintage book from my stash, one simple but pretty file folder and this simple tutorial! Find a cool vintage book close to the size and thickness of your planner and either a manila folder, decorative folder or heavy card stock. With a craft knife, gut your book. Save the pages for your craft projects. Trim away any extra scrap along the inside of the book cover, but careful not to cut through the cover itself. Draw fold lines just inside the drawn book line. Cut the folder about 1″ outside the fold line. Start planning.
Miniature Rhino: Weekend Project Make Mail! DIY Button & String Envelope Making and receiving good mail – not bills, not ads, no junk, but a hand written letter – is such a pleasure. I wanted to send a nice package to my mother. You'll need: Paper or card stock (I used a vintage file folder) Old envelope (for template) Pencil/sharpie Scissors Ruler Bone folder Glue 1" circular punch Eyelet & eyelet tool set Craft or regular hammer Cutting board 11" string (I used unwaxed linen thread) Carefully open all the seams of an envelope that you'd like to recreate. My favorite part are the little, vintage details: the gummed label, the screen printed label on the file folder, and of course the button & string closure... Make someone's day and make them a good mail day package!!
Mini Origami Books Tutorial A few people have requested a tutorial on the mini origami book that I posted about a few months ago. Here is my new video tutorial for the books, it is a little simpler, but if you prefer a photo tutorial, keep scrolling To view the tutorial, click on the first image, it should enlarge. You can use the arrows on the left to navigate. To exit the image, click on the white space around the images. I used 6×6 inch paper to start with. 1 piece of 6×6 inch colour paper for the cover, 4 peices of white for the pages. Fold one of the white squares in half. Cut the square in half using the last crease… Align one of the half’s onto the other squares, and cut the whole lot at once… or you could do one by one. A bunch of halfs! Fold a half in half again Fold it again And twice more, so it looks liek a spikey number 3, or a W. Do all 7 pieces. An easy mistake, make sure you don’t join them like this. Join them so that the right hand one over laps the left. They are all joined. You should have this. Unfold.