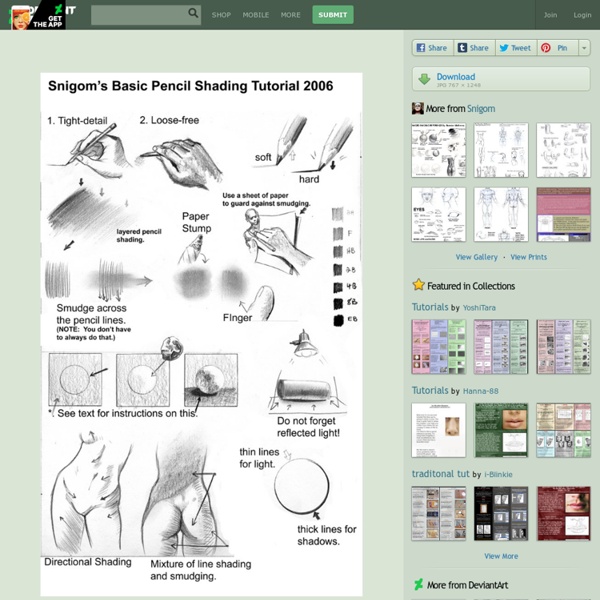


How to Draw 3D Shapes with Shading Home » How to Draw 3D Shapes » with Shading In this lesson we will cover how you can draw 3D shapes with shading. It is all about pressing the pencil down on the paper with different strength, so that the color is stronger or lighter. If you spread these different values correctly, you get an awesome 3D effect. Shading is time consuming. We are going to take a look at three basic geometric figures: The cylinder, the cone and the sphere. How to move the pencil So the goal of shading is to spread different values of color smoothly across the paper, going from dark to light or vice versa. The easiest way to do this is to move the pencil in a zigzag fashion. Different Pencils What sort of pencil you use is very important here! The mines in pencils have different degrees of hardness.This is indicated with letters on the pencils. 5H: Although I pressed the pencil down violently at the left side, you still only see a very slight darker tone. 2H: A bit softer, but still pretty hard. 0. 1. 2. 3. 4.
How to draw and paint step by step and videos tutorial learn from professional concept artists Quickposes: pose generator for figure & gesture drawing practice Shading Techniques With Pencil | How To Draw... Pencil Portraits Once you have mastered the basic pencil drawing techniques from the last tutorial, these can then be used to create different shading techniques within pencil drawings. This tutorial will guide you through the process of creating different shades and a shading guide in which you will be able to refer to throughout this tutorial. A shading guide when learning to draw is a useful tool to have, as you will be able to assess which shade is appropriate for different parts of the pencil portrait before executing it. In time, as you become more familiar with the different shades you can create, you will be able to ditch the shading guide and execute shading as though it is completely natural to you. When you were back at the process of choosing your art supplies, you would have made a decision on whether to purchase a set of drawing pencils in different grades, or just one single pencil in a versatile grade. Again, this is a personal preference, and different people prefer different things. 1.) .)
Online Drawing Lessons - Composition and Design Enhance the effectiveness of our online drawing lessons and improve the quality of your drawings by understanding the importance of Composition and Design. Learning to draw is not only about mastering the ability to draw what you see. Knowing how to create a balanced and harmonious composition within the borders of your page is also an integral part of making art. There are no official "rules" when it comes composing a visually interesting work of art. Simply use the elements of art (line, shape, form, texture & color) to create your desired outcome. For example: Do you want your drawing to be active & dynamic or would you prefer it to feel calm & peaceful? Click here for important tips on how to light your still life For Teachers: How to teach Composition Video! From still life below, several different compositions can be made. A good composition may be traditional or unexpected; complex or simple. Here are a few examples. Principles of Design:
How To Draw How to make an awesome pencil sketch of any photograph To start with, you will need to go to your local art store to get the items that you don't already have. I am going to assume that you are like most people and don't have a single item except maybe a number 2 pencil. Oh, and you will need scissors and scotch tape in a few steps, but I assume that you have that stuff. Here is a list of what i recommend you get in order to successfully complete this instructable: Required supplies: -sketch pencils in different hardnesses: HB, 2B, 4B, 6B (and 8B optional) = $5 -a sketch pad that is 18" by 24" = $10 -1/2" drafting masking tape = $4-a pad of tracing paper 9" x 12" = $3-a good wad of kneaded eraser = $2-a "Tuff Stuff" eraser stick = $2-dry cleaning eraser pad = $4-a foxtail (aka drafting duster) = $3-assorted paper stumps for shading = $2-prismacolor pencil sharpener = $4-erasing shield = $1 Total required supplies: $40 Optional supplies, in order of importance: Total optional supplies: $57 Total recommended supplies: $97
Pastels Plus Links to Tutorials - Hodgepodge Welcome to our Hodgepodge free listing of chalk pastels, acrylics and video art tutorials for all ages. This list of free tutorials is always being updated. Rather than 50, we now have 100+ free art tutorials! Please scroll down for a list of printable lessons. Click on each link to view and print individually… We love pastels. What type of chalk pastels to use? The pastels our children use (above) are Rembrandt. Handmade by Terri Ludwig. Dick Blick. Nana’s advice – start small: The student grade Alphacolor set is a good starter for $10.00. What type of paper is best for chalk pastels? Our very first pastel pictures were made on a roll of newsprint we had close by. How do I store chalk pastels? The small set of student starter pastels come in a plastic sleeve for storage. After we’d been using pastels for about two years, Nana gifted us with a wooden box with drawers for storage. Details in her post, Soft Chalk Pastels: Storage and Cleaning. Nana’s advice for beginning with pastels Seasonal