
Articles sauvegardés. Générateur de motifs de corset personnalisé. Boned Tabs Version. Boned-Tab Version These instructions differ substantially from those for making a corset with unboned tabs.

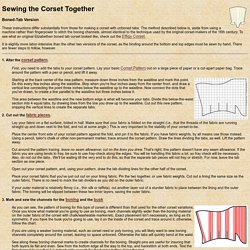
The method described below is, aside from using a machine rather than fingerpower to stitch the boning channels, almost identical to the technique used by the original corset-makers of the 16th century. To see what an original Elizabethan boned tab corset looked like, check out the Effigy Corset. It is slightly more labor-intensive than the other two versions of the corset, as the binding around the bottom and top edges must be sewn by hand. There are fewer steps to follow, however. 1. First, you need to add the tabs to your corset pattern.
Starting at the back center of the new pattern, measure down three inches from the waistline and mark this point. This area between the waistline and the new bottom edge is what will become your tabs. 2. Lay your fabric on a flat surface, folded in half. Cut around the pattern tracing. 3. V346: Comment faire une agitation victorienne - Motif et instructions ~ Duchesse américaine. Silhouettes à habiller, aux proportions réelles et diversifiées, pour le dessin de mode. Armature 140 acier laqué blanc longueur total développé de l'armature 362 mm forme n° 4 prix à la pièce - mercerie-extra. The Merry Corsetier — LiveJournal. Quick question: What can I do about bones that are too long?

I'm assembling my final corset and I've ended up with a oouple of bones that are just too long for their places. Partly it's due to me ending up shortening the length more than I thought I was when I ordered them, but also because some of the bones I received from corsetsupply.com are actually longer than they are supposed to be. (I ordered 13" and 13.5", and some of the 13" are actually 13 1/4".) I could cut them, and I have cable cutters that I've used to cut spirals before, but I don't have any tips.
I've heard about people doing other things to blunt the ends such as dip them in plastic (from the hardware store?) It also crossed my mind that I might try to add a little extra material to the panels in question, hidden by the edging. Obviously, ideally I would either order new bones or some tips and cut them to size, but I'm afraid my husband would...well he'd be upset if I spent any more money on this project. How to make and fit a corset mockup. The purpose of making a corset toile, is to check the fit and enable you to make tailor made adjustments accordingly.

Obviously with a body modifying garment such as a corset, a good fit is essential for maximum impact, comfort and shape. "Squish factor" is the most unpredictable element of corset fitting and it is getting this aspect of corsetry right, that makes all the difference to how your corset will look and feel in the end. A well fitted corset will create the illusion of a small waist, framed with rounded hips and a well shaped bust.
Fitting is simpler than it may seem at first, so here are a few basic guidelines. Body Language; application web gratuite pour la création de patrons de couture. Paramètres de Pinces Apex Position of Front Shoulder Dart= Distance from BustPoint on the vertical bust line Base Position of Front Shoulder Dart= Value between 0 and 1.

Bienvenue. FREE CORSET PATTERNS - Ralphpink.com. (2417) making victorian corset. Making a Corset. No-Tabs Version 1.)

Cut out the fabric pieces. Lay your fabric on a flat surface, folded in half. Make sure that your fabric is folded on the straight (i.e., that the threads of the fabric are running straight up and down next to the fold, and not at some angle.) Place the center front side of your corset pattern against the fold, and pin it to the fabric. Using a pencil, chalk, or some other non-permanent material, trace the outline of the pattern on the fabric. Do all of the above to the lining fabric you're using. 2.) With the two pieces of fabric together, right sides out, run a basting stitch along the waist edge a quarter inch away from the edge, sewing them together.
Patron corset. Ça permet de patronner non un serre-taille, mais un corset !

Avec une technique pour les grosses poitrines (le piiiiiied). Bon, ça n'évite pas la toile mais c'est déjà pas mal ! Je teste ça, et je pourrais le traduire dans la foulée, avec les photos qui vont bien. Sur le site (premier lien), on trouve des tutos de corsets, pour les autres étapes (j'ai lu en diagonale), sur le dernier lien, il y a le pdf de dessin. Au milieu, l'explication de comment prendre vos mesures Je l'ai traduit parce que tout était en anglais, donc voilà la belle version en Français ! De plus, Ritabonheur a rajouté un lien intéressant pour les grosses poitrines : J'ai essayé d'ingrémenter ce sujet, en rajoutant ce qu'on a découvert (que j'ai découvert ?) C'est un peu le bazar du coup, navrée.Je suis en plein régime, je vais donc devoir refaire ma toile de base, je referais peut-être un tuto entier à ce moment-là ! Comment bien lacer son corset ? 4107 Patron pour corset médiéval ou renaissance - La malle aux trésors.