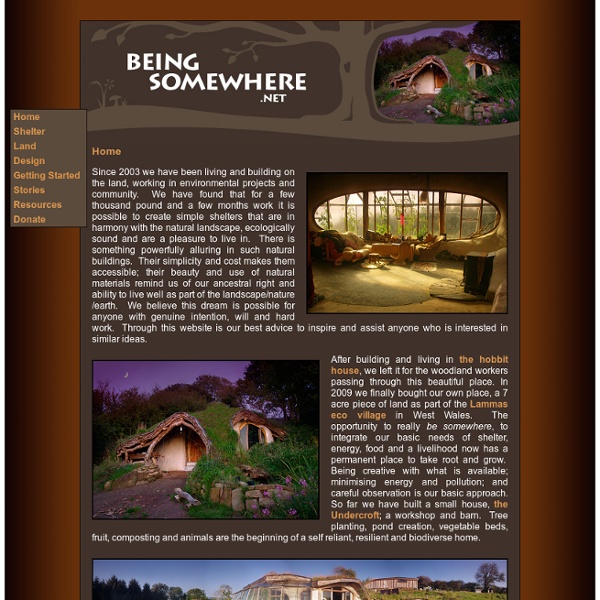
Zoom
Trash
Related:
10 DIY Upcycled Fire Pits | Trash Backwards By Liesl Clark The allure of the fire pit. Photo © Liesl Clark Seems the latest craze is repurposing metal things into fire pits. Here’s a list of some of the most innovative ones we could find: 1) Metal Wheelbarrow Fire Pit: If you’ve got a metal one that’s broken down, try to turn it into a fire pit. 2) Washing Machine Drum Fire Pit: Our app users love this. 3) Paver Brick Fire Pit: Brick and concrete pavers make easy fire pit insulation material. 4) Wash Pail Fire Pit: A metal wash pail can work as a fire pit. 5) In-Ground Fire Pit: This is a classic and easy fire pit to make at home. 6) Old Grill Fire Pit. 7) Shopping Cart Fire Pit: My favorite, with built-in log storage rack. 8) Industrial Wire Waste Fire Bowls: You can always try your hand a making fire bowls like these. 9) Tractor Rim Fire Ring: If you have access to a tractor rim, it makes a great fire ring. 10) Fireball Fire Pit: This is for the metal-smiths among us. Click Through For More Farm and Garden Ideas at Trash Backwards
3 Ways to Kill Mold Naturally A proliferation of mold and mildew can be the hallmark of hot and humid summers. I have a friend who has green mold growing on the shoes in her closet! A humidifier might be the best help for her, but there are also three natural materials that can be used as a spray to kill mold and mildew. They are all an excellent substitute for less environmentally safe bleach. Learn these three tricks for killing mold and mildew. One of these you most likely already have in your kitchen cupboard. Over the years I have found three natural ingredients that kill mold: Tea tree oil (an essential oil found in most health food stores), grapefruit seed extract and vinegar. Mold can be dangerous to your health, even if you aren’t allergic. 4 Reasons Why Your Damp House is Wrecking Your Health Tea Tree Treasure Nothing natural works for mold and mildew as well as this spray. 2 teaspoons tea tree oil 2 cups water Combine in a spray bottle, shake to blend, and spray on problem areas. Grapefruit Seed Extract
How To Build A Small DIY Septic System | How to deal with human waste… It’s not exciting, it’s not sexy, but it is necessary! If you are just camping/living somewhere for a few weeks, a basic latrine with suffice. However if we are talking months or years at a bug-out or off-the-grid location for, you’ll need to build something a bit more effective to deal with the regular waste. The awesome tutorial (that’s right, I referred to a DIY septic system tutorial as awesome!) shows how to quickly and cheaply build a small septic system using 55 gallon plastic drums and PVC pipe. How To Build A Small DIY Septic System (Photo from: WikiHow)
How to Fillet a Fish | One of Mike’s favorite things when we are at the lake is, of course, fishing. And one of my favorite things is eating fresh fish. We are blessed to be on a pristine lake and both the fishing and the eating are fantastic! Mike fillets all of the fish making it easy to cook, and easy to eat. The most important tool you will need is a sharp fillet knife (like this one). Mike’s has a 7 1/2″ blade. The fish in our example is a Largemouth Bass. First, slide your knife under the pectoral fin, angling the knife up towards the head so that you don’t miss some nice meat. Cut straight down until you hit the backbone which runs down the center of the fish. Now turn your knife towards the caudal fin (tail) and begin to slide the knife towards the dorsal fin. Run the knife along the backbone, cutting through the ribs until you reach the caudal fin. Stop cutting before you reach the caudal fin and flip the fillet over. Continue drawing your knife towards the ribs. The first side of the fish is complete.
Tips I have found these tips on pinterest and link to the original source when known. Source unknown How to Make Eggshell Calcium (and Why You’d Want to) | Mama Natural Calcium is the most abundant mineral in our body. While most of our calcium resides in our bones and teeth, it’s also important for muscle contraction, nerve health, enzyme activity and cell formation. In fact, our bodies need ample, daily amounts of calcium… and if we don’t get what we need, our bodies have no problem pulling excess stores from our teeth and bones. So, let’s just say we want to be sure we’re consuming PLENTY of calcium, especially if we are a pregnant or nursing mama! I do best consuming ~ 2,000mg of calcium a day. I feel the most calm and balanced and don’t suffer from muscle soreness or body stiffness. Which one to chose? But as natural mamas, we know that the best source is FOOD since it’s the mostly easily accessible for the body. Did you know that eggshells are a great, inexpensive, natural source of calcium? Yes, EGGSHELL Calcium! In animal and human tests, eggshell calcium shows increased bone density, less arthritic pain, and even stimulates cartilage growth.
Repurposed Crochet T-shirt Rug I’ve seen a lot of crocheted and woven and braided rugs out on the internet; it was even one of the first things I pinned to Pinterest, but I never got around to trying one of my own until now. I always thought it was going to be difficult, but actually, it’s really quite easy, and no fancy instructions needed! Here’s how I made my own crochet rug from repurposed t-shirts! Step 1. Step 2. The basic idea is that the shirt is already in the round, so you’re cutting a continuous strip from the bottom hem up to the armpit. Step 3. Step 4. I used the largest crochet hook I had on hand, which was a size Q and started with 6 SC in the first round, doubled it to 12 in the second round, and slowly increased by multiples of 6 beyond that. 1st round: 6 SC 2nd round: 2 SC in each stitch (12 stitches) 3rd round: *1 SC in next stitch, 2 SC in next stitch, repeat from * (18 stitches) 4th round: * 1 SC in next 2 stitches, 2 SC in next stitch, repeat form * (24 stitches) and so on.
Quick fix grocery bag We had grapes this weekend. So? They were really good. I found a shirt - an old favorite but hopelessly stained one (bleach* near the bottom hem). In case you want to give this super fast and easy grocery bag a try as well, keep on reading as I wrote down some instructions for you. What you need: - an old T-shirt- scissors- matching thread- a button- a piece of ribbon- sewing machine Instructions: 1. 2. 3. 4. 5. 6. 7. 8. 9. 10. Take one sleeve and cut to size, such that the folded bag fits inside the sleeve (make sure to add seam allowance). As with all of my tutorials, please note, this tutorial is intended for personal use only. * the bleach stains ended up the in hem and one of the boxed corners!!
How to Make Powdered Eggs The incredible edible powdered egg. Despite the at-times negative media attention (we all know how reliable the main-stream media is nowadays) eggs are a very nutritious source of food that is one of the cornerstones in baking. With it’s low-cost but high-quality source of protein, if it weren’t for its short shelf life and fragility, it would be a great addition to your survival store if only you could store it. Well, unbeknownst to many people, eggs can in fact be stored (up to 10 years if stored correctly) in the form of dehydrated egg powder — perfect for bug-out bags, camping trips and long-term food storage. They can be used in baked goods just like normal eggs or reconstituted and made into fluffy scrambled eggs. Here’s how you can do it at home: What You’ll Need A food dehydrator (I use a cheap Walmart version)EggsSomething to store the powder in when complete How to Make Powdered Eggs The process for making powdered eggs is fairly simple. The Cook-Dry Method The Wet-Dry Method
Saving Tomato Seeds | Backyard Diva Four easy steps to saving your own heirloom tomato seeds! Seed saving offers plenty of perks aside from saving money, it’s the long term benefit of cultivating the plants you really love and just knowing where they came from! Nothing ever tastes quite as good as a home-grown tomato! Chose your favorite tomato, ripe off the vine, healthy and soft. Seeds collected from upripe fruit will not germinate the following year. 1. 2. 3. Nonviable seeds will float to the top of your goo, discard these seeds along with your gelatinous goo. 4. In the USA <A HREF=" <A HREF=" In Canada <A HREF="
The Frugal Family Life: DIY Homemade Sugar Scrub! DIY Homemade Sugar Scrub! About a year ago I had purchased some rather expensive sea salt scrub from a direct sales company. I absolutely loved the way it made my skin feel, but I just couldn't bring myself to continuing that expense. However, with the heat lately and wearing sandals non-stop, my skin has been so dry.....and just needed some pampering--frugal pampering! I decided to try my hand at making some homemade sugar scrub. Let me tell you, it was so incredibly simple! Here's what you'll need:3/4 cup granulated sugar1/8 cup (or 2 Tbsp) olive oil Vanilla Extract (I just poured in enough to get the scent I wanted)Stir together and pour into a resealable container. This stuff felt so good on my skin, it smelled wonderful, & it made my skin feel so soft!