
123D Circuits. N°1 sur le Raspberry pi en France. Raspberry Pi. Raspfr - Association Française du Raspberry Pi. The One Button Audiobook Player. This little Raspberry Pi based project is a gift for my wife’s grandmother for her 90th birthday.

Being visually impaired, she is hard to entertain but loves to listen to audiobooks. The problem is, that she isn’t able to handle a ghetto blaster or MP3 player. The solution to this problem was – tadaaaah – a one button audiobook player It basically consists of: 1 Raspberry Pi1 ModMyPi enclosure1 button2 resistors (330 Ohm, 10 Kilo-Ohm)1 blue LED1 (slow) 8GB SD-Cardsome wirea pair of speakers The following software has been used: Raspbian minimal image ( (music player daemon)mpcmpd-pythonpyudev (for USB access)a self-written python script The features are the following: Some pics and a video: (The audiobook used in this video is a free version of Cory Doctorows “Little Brother” from Fabian Neidhardt) If you like to build your own one button audio book player, here are the super simple schematics: And last but not least – the python script.
RPi Hub. Notice: The Raspberry Pi Wiki pages on this site is collaborative work - the Raspberry Pi Foundation is not responsible for content on these pages.

Now shipping to customers See the Buying Guide on how to order one, or visit the Raspberry Pi Foundation Home Page About The Raspberry Pi production board (model B Rev 2.0) 3D CAD Model of the Raspberry Pi 3 Model B (Download) The Raspberry Pi (short: RPi or RasPi) is an ultra-low-cost ($20-$35) credit-card sized Linux computer which was conceived with the primary goal of teaching computer programming to children. Raspberry Pi is manufactured and sold in partnership with the worldwide industrial distributors Premier Farnell/Element 14 and RS Components, and the Chinese distributor Egoman Technology Corp[1]. You can get the latest news from the Foundation Home Page, the Twitter Feed or in the forums. Products are RoHS, CE, FCC, CTick, CSA and WEEE compliant[2].
Raspberry-pi. Raspberry-pi blog - Accueil. Bienvenue sur le blog des expériences avec mon précccciiiiieux. Pour ceux qui ne le connaisse pas, le raspberry-pi, est un nano ordinateur qui tient dans le creux de la main. Sans boitier ni périphérique, il a été à la base destiné pour le Tier Monde (de par son faible coût) et finalement prit d'assaux par toutes ces créatures au teint pâle et qui craignent la lumière du jour, les geeks. Le Web fourmille de tutoriels, forums, vidéos, sites, ... sur le raspberry pi, et ce blog n'a aucunement pour vocation d'apporter un contenu exclusif et totalement novateur.
Il se contente de raconter les expériences que j'ai eu l'occasion de faire, autant pour me servir de base de connaissance le jour ou ma carte SD va griller que pour le partager aux érudis et aux non-anglophones. J'essayerai tout au long des articles de banaliser au maximum les explications pour permettre à n'importe quelle personne de reproduire chez lui ce que j'ai testé (Je suis moi même une quiche en électronique).
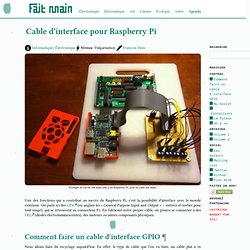
Sommaire : Raspberry PI & Arduino, domotique, robotique, et pleins de trucs en “ique” An ARM GNU/Linux box for $25. Take a byte! Cable d'interface pour Raspberry Pi. Informatique | Électronique Niveau: Vulgarisation François Dion Exemple de circuit fait main relié a un Raspberry Pi, avec un cable fait main.

Une des fonctions qui a contribué au succès du Raspberry Pi, c'est la possibilité d'interface avec le monde extérieur. On parle ici des GPIO (en anglais les « General Purpose Input and Output » – entrées et sorties pour tout usage), qui se retrouvent au connecteur P1. Au boulot Nous aurons besoin de 2 connecteurs, et non de 3. On coupe l'extra avec des ciseaux. Il faut ensuite diviser le câble. Marquer au feutre une ligne qui délimite 26 et 14 conducteurs.
La prochaine étape consiste a faire une incision avec un couteau genre X-acto ou un scalpel, dans la rainure entre les 2 fils, et ceci sans endommager l'isolation des fils. Faire l'incision et séparer les 2 parties. Il faut maintenant couper le connecteur exactement sur la septième rangée de trous, en partant de la droite.
Faire la découpe. On enlève la portion de droite. Connections Le Python #! Flirc.tv - Your TV - PC Remote Companion.