

High-Resolution Images. Panorama de l'art. Panosaurus Tripod Head. November 2006 Update: This first version of this review was written in 2004, when I tested the original Panosaurus.
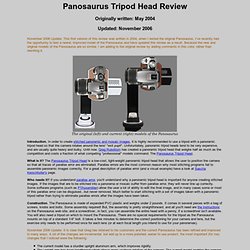
I've recently had the opportunity to test a newer, improved model of the Panosaurus and have updated this review as a result. Because the new and original models of the Panosaurus are so similar, I am adding to the original review by adding comments in this color, rather than rewriting it. The original (left) and current (right) models of the Panosaurus In order to create stitched panoramic and mosaic images, it is highly recommended to use a tripod with a panoramic tripod head so that the camera rotates around the lens' "exit pupil". Unforuntately, panoramic tripod heads tend to be very expensive, and are usually quite heavy and bulky. The Panosaurus Tripod Head is a low-cost, light-weight panoramic tripod head that allows the user to position the camera so that all traces of parallax error are eliminated. . . The Panosaurus is a terrific product at the right price. Panosaurus Tripod Head.
Panoramic Tripod Heads. Nodal Ninja Tripod Head. As interest in creating panoramic and stitched digital images has grown, so has the recognition that the difference between producing an OK result and an excellent result often comes from choosing the right equipment.
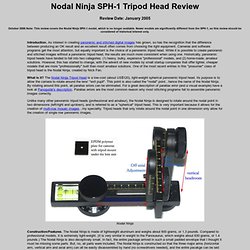
Cameras and software programs get the most attention, but equally important is the choice of a panoramic tripod head. While it is possible to create panoramic and stitched images without a panoramic tripod head, the results are much more consistent when using one. Historically, panoramic tripod heads have tended to fall into two categories: (1) heavy, bulky, expensive "professional" models, and (2) home-made, amateur solutions.
However, this has started to change, with the advent of new models by small startup companies that offer lighter, cheaper models that are more "profressionally" built than most amateur solutions. One of the most recent entries in this "prosumer" class of tripod head is the Nodal Ninja, created by Nick Fan. . Below are the results of my test. Easypano.com. FromParis: tut. pano, Quicktime VR. Wiki.panotools.org. Studio Argento: Links (con calcolo num. foto) Creating Spherical Panoramas with the Canon 5D and 15mm Fisheye Lens. Peter Gawthrop Revised 27th September 2007 Contents This document describes how I create spherical panoramas with the Canon 5D and 15mm Fisheye Lens together with Hugin.
The original photos used in this tutorial are available here together with the pto file for stitching and this file. Imagine standing at a viewpoint on a fine day and looking all around the horizon, up to the point above your head and down to your feet - you are viewing a spherical panorama. If this transparent sphere is imagined as the earth with lines of longitude (numbered from ) and latitude (numbered as at the equator, at the north pole and at the south pole) then every point that we see can (like places on the earth) be assigned a unique latitude and longitude. The problem of representing a spherical panorama on a flat surface is the same problem as that of creating maps to represent the surface of the earth and it is not surprising that many names and concepts have been taken from one problem to the other.
IQTVRA Software/Hardware Links. Photos of the World. TourWrist® World Panoramic Photography - 360Cities. Tutorials - PTGui. Hugin: photo stitcher. Easypano.it. Virtual tour software. Manfrotto School Of Xcellence. Come creare foto panoramiche. Siete arrivati in cima alla montagna, c'è un panorama magnifico, prendete la vostra macchina fotografica e scattate alcune foto.
Quando tornate a case volete rivedere quello spettacolo magnifico, ma le foto che avete fatto sono tutte spezzettate, come fare per unirle? Grazie a Hugin potete unire le vostre foto senza troppo sforzo e creare delle foto panoramiche spettacolari, con questo mini tutorial vediamo come si usa. Installazione Potete scaricare Hugin dal su sito, oppure installarlo direttamente dalla vostra distribuzione.
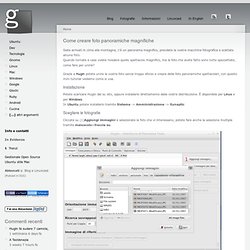
È disponibile per Linux e per Windows. Scegliere le fotografie Cliccate su (1)Aggiungi immagini e selezionate le foto che vi interessano, potete fare anche la selezione multipla tramite maiuscolo+freccia su. Mettere i punti di riferimento Passate direttamente alla scheda (2)Punti di controllo e tramite le schede 0,1,2,3,.. selezionate la foto 0 e la foto 1, come da figura. Salvate Per non perdere i punti di riferimento, salvate. FromParis: tut. pano, Quicktime VR (tecnica)
Tours from Above – Aerial Virtual Tour Photography worldwide. Mediveal Church Murals in Denmark, Last post Office in Netherlands, Occupy Wall Street, Midsummer in Sweden - Photo Panoramiques. The World in panoramic » viewat. Panoguide: the guide to panoramas and panoramic photography. Arounder - Travel and Lifestyle in 360-degree Quicktime VR - Virtual Reality Full Screen panoramas.
Photos of the Most Interesting Places on the Earth. How to... TourWrist® Panoguide. VR Photography › VR Links. IVRPA: International VR Photography Association. Patrimonium-mundi.org : UNESCO World Heritage sites in panophotographies - immersive and interactive panoramic images. Free Virtual Tour Software. TawbaWare. Tecniche Photo Stitching. Introduzione alle tecniche di Photo Stitching Sei il visitatore numero 22424 Di cosa si tratta?
Lo Stitching si può tradurre nella nostra lingua con “attaccare”, “giuntare”: in effetti questa tecnica consiste nel giuntare più fotogrammi per ottenere un’unica immagine finale. L’avvento delle fotocamere digitali e la crescente potenza di calcolo dei personal computer ha consentito una grande diffusione di questa tecnica, che oggi è tranquillamente implementabile anche a livello casalingo.
Molto spesso lo Stitching è sinonimo di “creazione di foto panoramiche” ma, come vedremo in questo articolo, le applicazioni sono molteplici e tutte molto utili ed interessanti. Questo primo articolo illustrerà le quattro applicazioni principali dello Stitching, seguiranno poi altri tre articoli che tratteranno in maniera approfondita ciascuna singola applicazione, dallo scatto alla post-produzione. 1- Riprese ad alta risoluzione. 2- Riprese panoramiche. 3- Riprese con Profondità di Campo estesa.
Conclusione. QuickTime VR. Panopticus.