
Packaging Templates. I’m not sure how I discovered this awesome collection of packaging templates but I’m glad I did!

Some professor or student at a japanese univeresity was nice enough to share all their packaging templates with the world! These are a few of my favorites and you can see all of them on their website. Every situation is covered! You sell Bon Bons? They have a box for that! P.S. How to Make a Bow from a Magazine Page — The Greenbacks Gal. Page corner bookmark for kids in Ideas for kids' crafts. Family Style - StumbleUpon. This is the most beautiful felt project we’ve seen.

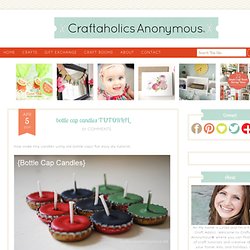
Strips of felt are wrapped around each other with hot glue to create this amazing swirled effect. What a great project for a snowed-in weekend and a movie marathon with the family. The kids could even help cut strips and decide on color combination while you operate the hot glue gun. Would you attempt something like this? Keep reading to see more pictures and find out where to find more details about this beautiful felt project! You can see all the instructions and details here on The Crafts Dept blog A few other fun pictures of the process: Images: Martha’s Crafts Department Blog Other post of mine you might like: The Best Thing to Happen to Your Baby’s Feet This Winter! Zara Kids Winter Collection. Craftaholics Anonymous - StumbleUpon. How make tiny candles using old bottle caps!

Fun easy diy tutorial. these tiny candles are a really fun to make and come together quickly. AND you can up-cycle several materials in the process, which makes this a fabulous Earth Day craft :) {Earth Day is April 22} to make these colorful tiny candles, i used several materials that usually end up in a land fill: bottle caps, broken crayons, and empty soup cans. the only thing i bought to make them was the pre-waxed wicks which cost me $1.50 for a set of 12. these make a great kid craft {with supervision, of course!} How to Make Bottle Cap Candlessupplies: bottle caps, crayons {or wax}, pre-waxed wicks, soup cans, wax paper {optional}, small cooking pan, scissors, and water remove paper from crayons. you can also use candle wax if you wanted. put crayons in clean, empty soup cans. take your pre-waxed wicks and…
Guest post {Marie Darby&8230;diy photo lampshades} & ashleyannphoto... - StumbleUpon. PINTEREST UPDATE: This is a post from 2010.

I do not take custom orders, only the tutorial is available. The lamps have held up wonderfully. As many of you requested, Marie is sharing a little tutorial here on how she made her lampshades. When she made them she was not planning on doing a tutorial for this blog, so be sure to thank her for taking the time to write all this out. Also, for those wondering…Kara will be sharing some tutorials for her book art on her blog soon. Marie is happy to do custom orders for those that prefer buying over making! * LAMPSHADE – Hobby Lobby carries self-adhesive shades & nightlights, Target has some smaller lamps for $19 that would be perfect for this project, I’ve found some lamps & shades on Craigslist. . * GLUE – I used a hot glue gun for the first lamp. . * VELLUM – I buy this in packs of 20 (I think) in the scrapbooking section of Hobby Lobby.
. * PRINTER – I have a color inkjet printer. If you are using photos – there are several options. That’s it! Tutorial: Homemade Sidewalk Chalk. By Michelle Vackar, Modern Handmade Child One of our favorite outside activities at our home is drawing with chalk on the driveway.

You can play hopscotch, four-square, and of course draw and create silly stories. My daughters and I were talking one day as we played hopscotch about how to make chalk and I thought to myself, let’s try it! It ended up being quite a lot of fun. What you will need: • Toilet paper or paper towel tubes • Scissors • Duct tape • Wax paper • Small bucket or disposable container to make the recipe • ¾ cup of warm water • 1 ½ cups Plaster of Paris • 2-3 tablespoons of tempera paint • Paper bag or a “mess mat” ** we made six tubes of chalk – we simply doubled the above recipe Step 1: If you are using paper towel tubes, cut each tube in half, so it is roughly the length of a toilet paper roll tube.
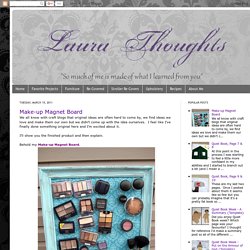
Step 2: Cover one end of each tube with duct table to hold the contents within. Step 3: Cut as many pieces of wax paper as you have tubes. Make-up Magnet Board. We all know with craft blogs that original ideas are often hard to come by, we find ideas we love and make them our own but we didn't come up with the idea ourselves.

I feel like I've finally done something original here and I'm excited about it. I'll show you the finished product and then explain. Behold my Make-up Magnet Board. I have a friend who is beautiful and stylish and has always loved make-up but recently took a course that intensified her love. Her renewed interest has worn off on me and it made me remember eye shadows I'd hidden away that were gathering dust. The basket was a mess and I was overwhelmed with all my choices never knowing what to use, digging through to see what I had and find what I wanted was a pain.
I painted it (The hard way, with a brush instead of spray paint. I went to the hardware store and picked up some metal and had them cut it to fit inside my frame. Here comes the brilliant part though. Next I wanted a place to store my brushes and liners though.