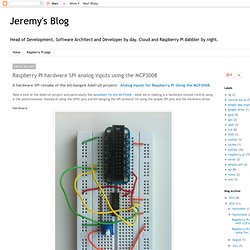

Jeremy's Blog: Raspberry Pi hardware SPI analog inputs using the MCP3008. A hardware SPI remake of the bit-banged Adafruit project: Analog Inputs for Raspberry Pi Using the MCP3008.

Take a look at the Adafruit project and particularly the datasheet for the MCP3008 - what we're making is a hardware volume control using a 10K potentiometer. Instead of using the GPIO pins and bit-banging the SPI protocol I'm using the proper SPI pins and the hardware driver. Hardware The connections from the cobbler to the MCP3008 are as follows: MCP3008 VDD -> 3.3V (red)MCP3008 VREF -> 3.3V (red)MCP3008 AGND -> GND (orange)MCP3008 CLK -> SCLK (yellow)MCP3008 DOUT -> MISO (green)MCP3008 DIN -> MOSI (yellow)MCP3008 CS -> CE0 (red)MCP3008 DGND -> GND (orange) Operating system and packages This project was built using Occidentalis v0.2 from Adafruit which takes the hassle out of fiddling with Linux. ).
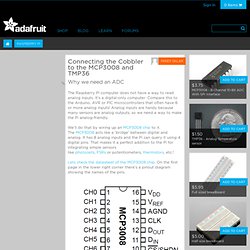
Sudo apt-get install mpg321 and secondly the Python wrapper for SPI: cd ~ git clone cd py-spidev/ sudo python setup.py install. MCP3008 - 8-Channel 10-Bit ADC With SPI Interface ID: 856 - $3.75. MCP23017 - i2c 16 input/output port expander ID: 732 - $2.95. LED light chaser with MCP23017 on Raspberry Pi. Connecting the Cobbler to the MCP3008 and TMP36. The Raspberry Pi computer does not have a way to read analog inputs.

It's a digital-only computer. Compare this to the Arduino, AVR or PIC microcontrollers that often have 6 or more analog inputs! Analog inputs are handy because many sensors are analog outputs, so we need a way to make the Pi analog-friendly. We'll do that by wiring up an MCP3008 chip to it. The MCP3008 acts like a 'bridge' between digital and analog. Lets check the datasheet of the MCP3008 chip. In order to read analog data we need to use the following pins: VDD (power), DGND (digital ground) to power the MCP3008 chip. The MCP3008 has a few more pins we need to connect: AGND (analog ground, used sometimes in precision circuitry, which this is not) connects to GND, and VREF (analog voltage reference, used for changing the 'scale' - we want the full scale so tie it to 3.3V) Below is a wiring diagram.
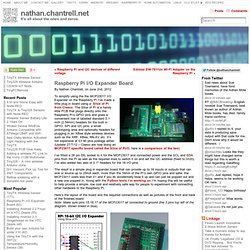
Finally the TMP36 has three pins that need to be connected. Raspberry Pi I/O Expander Board. To simplify using the the MCP23017 I/O Expander on the Raspberry Pi I’ve made a little plug in board using a Slice of Pi from Ciseco.

The Slice of Pi is a handy little PCB that plugs directly onto the Raspberry Pi’s GPIO pins and gives a convenient row of labelled standard 0.1 inch (2.54mm) headers for the built in GPIO, SPI and I2C pins, a small prototyping area and optionally headers for plugging in an XBee style wireless devices such as the XRF, XBee, RN-XV etc. It’s not expensive at £3.90 plus postage either. (Update 27/7/12 – Ciseco are now doing an MCP23017 specific board called the Slice of PI/O, here is a comparison of the two) I’ve fitted a 28 pin DIL socket to it for the MCP23017 and connected power and the SCL and SDA pins from the Pi as well as the required lines to switch it on and set the I2C address (fixed to 0×20). I’ve also added two sets of 0.1″ headers for the 16 I/O pins. Using it eg. sudo apt-get install i2c-tools sudo adduser your-userid i2c Command Line Tool . .
Raspberry Pi and the MCP23017 I2C I/O Expander. I had a quick play with the I2C drivers that are currently being developed for the Raspberry Pi this afternoon and managed to get a MCP23017 16-bit I/O Expander working with it without any fuss.

Here is a highly exciting video of it blinking an LED: The MCP23017 is a handy 28 pin chip that gives you 16 pins that can be used as either inputs or outputs (max 25mA from each pin) and up to 8 of the MCP23017 can be used on one I2C bus so it can give you a whole lot more I/O than the Pi has built in as well as reducing the risk of frying the Pi and also has the added advantage that the expander can be located away from the Pi linked with only four wires. There is also the smaller MCP23008 which is an 8 I/O version that can be used in the same way. They are both available in DIP form making it easy for building your own boards with and experimenting on breadboard.
Here is the datasheet for the MCP23017. Read on for some info on what is required to get this working.